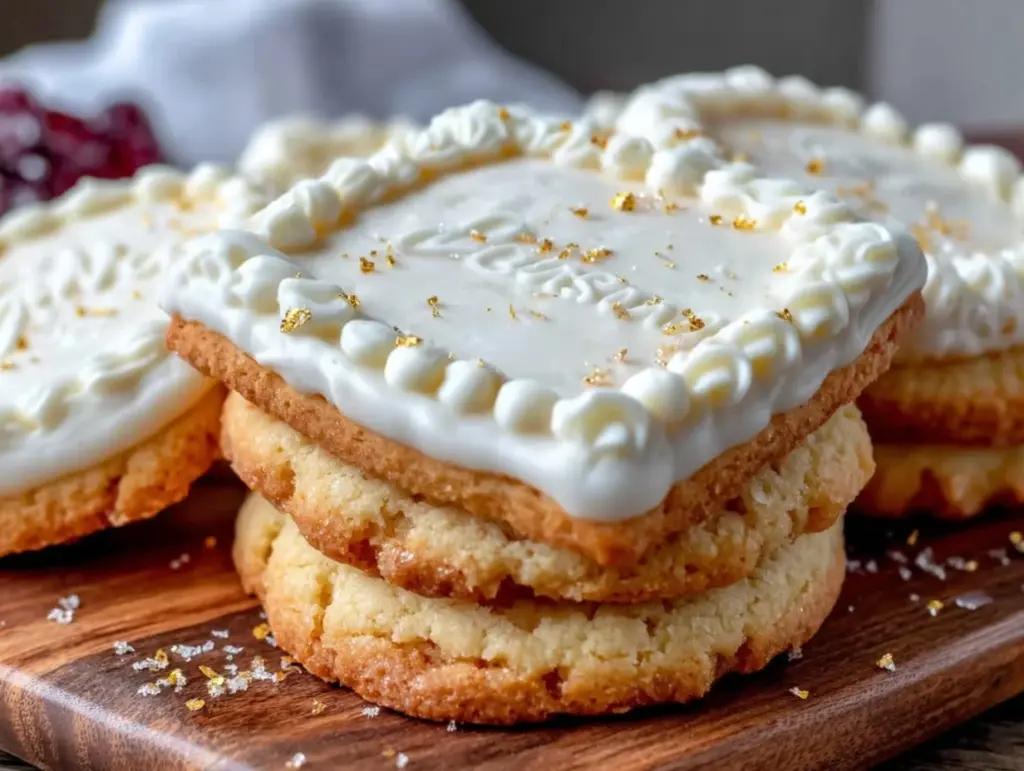
“So, you really think gold dust on cookies is extra?” my friend teased me over text one evening as I was meticulously brushing the edges of my latest batch of diploma sugar cookies with gold luster dust. Honestly, I wasn’t sure at first either. But those Perfect Custom Diploma Royal Icing Sugar Cookies with Gold Luster Dust? They turned out to be one of those rare recipes that makes you stop and smile—like you just nailed the look and flavor you’d been chasing for weeks.
It started as a last-minute idea for a graduation party I was hosting. I didn’t have time for anything fancy, just some sweet treats that would feel special and personal. I glanced at the diploma cookie cutter I’d bought months ago and thought, “Why not?” The royal icing was a bit tricky at first—too runny, too stiff—a lot of trial and error before it was just right. But the way the gold luster dust caught the light on the smooth icing? That sealed the deal.
Honestly, these cookies became my new obsession. I made them again and again that week, tweaking the icing thickness and the amount of shimmer until I finally landed on what I now call the perfect recipe. They’re not just sugar cookies; they’re little edible diplomas that bring a bit of sparkle and pride to any celebration. And if you’re wondering whether this is just another cookie recipe, let me tell you—it’s not. It’s the kind that makes you want to share, gift, and maybe even keep a secret stash for yourself.
Why You’ll Love This Recipe
These Perfect Custom Diploma Royal Icing Sugar Cookies with Gold Luster Dust aren’t just pretty—they’re a treat you’ll want to bake again and again. Here’s why:
- Quick & Easy: The recipe comes together in under two hours, perfect for busy hosts or last-minute celebrations.
- Simple Ingredients: No need for hard-to-find items; everything’s likely sitting in your pantry or fridge.
- Perfect for Special Occasions: Graduation parties, award ceremonies, or even just a sweet way to celebrate achievements.
- Crowd-Pleaser: Both kids and adults love these—plus, they’re a delightful centerpiece on any dessert table.
- Unbelievably Delicious: The buttery sugar cookie base pairs perfectly with the smooth, slightly tangy royal icing.
What sets this recipe apart is the balance between the cookie’s soft yet sturdy texture and the flawless royal icing that dries with a smooth, matte finish—ideal for detailed piping and layering. The gold luster dust adds a subtle, elegant shimmer that doesn’t just look fancy; it feels like a little celebration in every bite. I promise, once you brush that gold on, you’ll feel like you’ve added a touch of magic. And if you want to make your dessert table even more elegant, pairing these cookies with a creamy homemade Thai iced tea makes for a unique twist that guests adore.
What Ingredients You Will Need
This recipe uses simple, wholesome ingredients to deliver bold flavor and satisfying texture without the fuss. Most are pantry staples, so no surprise trips to the store needed.
- For the Sugar Cookies:
- All-purpose flour – 3 cups (360g), sifted for a tender crumb
- Unsalted butter – 1 cup (227g), softened (I swear by Plugrá for its creaminess)
- Granulated sugar – 1 cup (200g), for that perfect sweetness
- Large eggs – 2, room temperature (adds richness and helps with structure)
- Pure vanilla extract – 2 teaspoons (the secret to flavor depth)
- Baking powder – 1 teaspoon, for slight lift
- Salt – ½ teaspoon, balances sweetness
- For the Royal Icing:
- Powdered sugar – 4 cups (480g), sifted for smooth icing
- Egg whites – 3 large (or 6 tablespoons of pasteurized egg whites for safety)
- Fresh lemon juice – 1 tablespoon (brightens the icing flavor)
- Vanilla extract – 1 teaspoon
- Water – as needed (to adjust consistency)
- Decoration:
- Gold luster dust – 1 teaspoon (for that shimmering finish)
- Clear alcohol or lemon extract – 1 teaspoon (to mix with luster dust for painting)
If you want a gluten-free version, swapping the all-purpose flour with a 1:1 gluten-free baking blend works well, though the texture shifts slightly. For dairy-free needs, vegan butter and aquafaba can be a fun experiment, but the texture won’t be quite the same. I recommend using a trusted brand of gold luster dust like Wilton for food-safe shimmer that looks stunning without overpowering the design.
Equipment Needed
- Mixing bowls – various sizes for batter and icing
- Electric mixer or stand mixer – to cream butter and whip icing smoothly
- Measuring cups and spoons – accuracy matters here!
- Rolling pin – a smooth one, ideally with adjustable rings for even thickness
- Diploma-shaped cookie cutter – essential for the theme; if unavailable, a rectangle cutter with rounded edges works
- Parchment paper or silicone baking mats – prevents sticking and helps with even baking
- Fine-tipped piping bags and tips (#1, #2, or #3) – for detailed royal icing work
- Small food-safe paintbrush – for applying the gold luster dust
If you don’t have a stand mixer, a sturdy hand mixer will do just fine, though it takes slightly more elbow grease. For rolling pins, I prefer one with adjustable thickness rings so my cookies turn out uniformly thick, which helps with consistent baking and icing. Cleaning your piping tips immediately after use keeps them in good shape for future projects—trust me, dried royal icing is a pain to scrape off!
Preparation Method
- Make the cookie dough: In a large bowl, cream together 1 cup (227g) softened unsalted butter and 1 cup (200g) granulated sugar using an electric mixer until light and fluffy, about 3-4 minutes. This step is key for tender, melt-in-your-mouth cookies.
- Add 2 large eggs, one at a time, beating well after each addition, then stir in 2 teaspoons pure vanilla extract.
- In a separate bowl, whisk together 3 cups (360g) all-purpose flour, 1 teaspoon baking powder, and ½ teaspoon salt. Gradually add this dry mixture to the wet ingredients, mixing on low speed until just combined. Over-mixing will toughen the dough, so stop as soon as no flour streaks remain.
- Divide the dough into two discs, wrap each in plastic wrap, and chill for at least 1 hour or overnight. Chilling firms up the dough, making it easier to roll and cut clean shapes.
- Preheat your oven to 350°F (175°C). Line baking sheets with parchment paper or silicone mats.
- On a lightly floured surface, roll out one dough disc to about ¼ inch (6 mm) thick. Use your diploma cookie cutter to cut shapes, transferring them carefully to the baking sheet.
- Bake cookies for 8-10 minutes until the edges just begin to turn golden. Avoid over-baking to keep them soft but sturdy enough for decorating.
- Remove cookies from the oven and let cool on the baking sheet for 5 minutes before moving to a wire rack to cool completely.
- While cookies cool, prepare the royal icing: In a clean bowl, beat 3 large egg whites (or pasteurized alternatives) with 4 cups (480g) powdered sugar, 1 tablespoon fresh lemon juice, and 1 teaspoon vanilla extract until smooth and glossy. Add water 1 teaspoon at a time to reach piping consistency—think thick but pipeable.
- Divide icing into portions for base flooding and finer piping. Use a slightly thinned icing for flooding the cookie surface and thicker icing for details.
- Fill piping bags fitted with fine tips. Outline the cookie edges first, then flood inside with the thinner icing. Use a toothpick or scribe tool to pop bubbles and smooth edges.
- Let the base layer dry for at least 2 hours or overnight for best results.
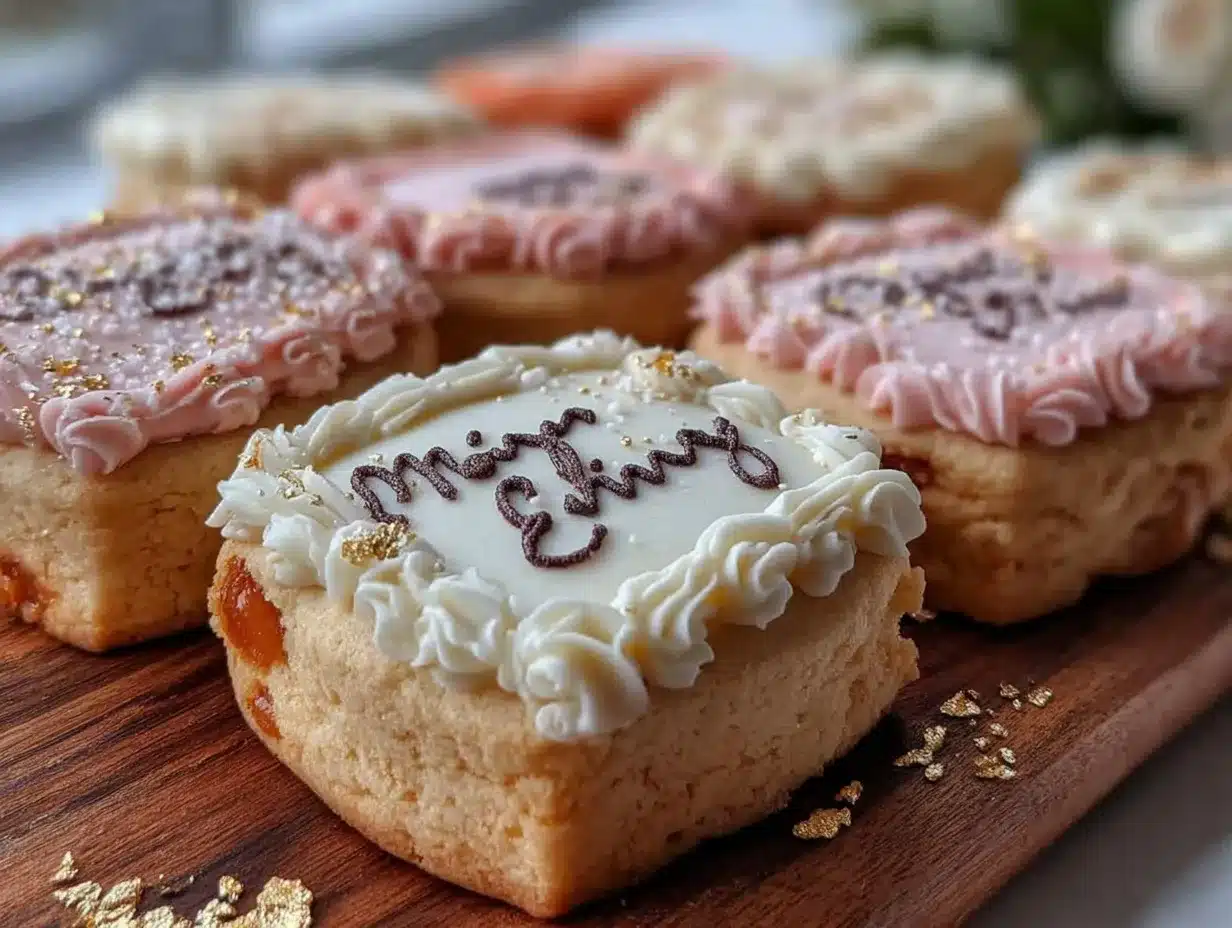
- Once dry, pipe diploma details—scrolls, ribbons, tiny text—with the thicker icing. This is where your steady hand pays off!
- Mix 1 teaspoon gold luster dust with 1 teaspoon clear alcohol or lemon extract to create a paint. Using a small brush, gently paint the raised icing details for a subtle shimmer. Let dry completely.
Pro tip: If your royal icing feels too stiff, a drop of water can bring it back. Too runny? Add a bit more powdered sugar. Also, don’t rush drying times; the gold dust sticks best to fully set icing. I learned the hard way that impatience here leads to smudged designs!
Cooking Tips & Techniques
Royal icing can be tricky—honestly, it took me a few batches to get a feel for the perfect consistency. Here’s what I learned:
- Consistency is everything: For outlining, use stiff icing so lines hold shape. For flooding, thin it down until it flows smoothly but isn’t watery.
- Use a scribe tool or toothpick: This helps you pop air bubbles immediately after flooding, avoiding ugly holes.
- Practice piping on parchment: Before decorating your cookies, get comfortable with your icing flow. It saves so much frustration.
- Dry times matter: Let base layers fully dry before adding details or gold paint, or you’ll end up with smears instead of sparkle.
- Gold luster dust application: Mixing with clear alcohol (vodka works well) gives a smooth paint that dries quickly and leaves a non-sticky finish. Water can also be used but takes longer to dry.
- Storage tip: Store decorated cookies in a single layer at room temperature in an airtight container. Refrigeration can cause royal icing to sweat.
Back when I first tried painting with gold dust, I used too much liquid, and the icing started melting—lesson learned! Also, don’t skip sifting your powdered sugar; lumps can lead to uneven icing.
Variations & Adaptations
Want to switch things up? Here are a few variations I’ve tried and loved:
- Flavor twists: Add a teaspoon of almond or lemon extract to the cookie dough for a subtle flavor boost.
- Color variations: Tint royal icing with soft pastel colors instead of white for a modern look while keeping the gold accents.
- Dietary tweaks: Use gluten-free flour blends and egg substitutes (like aquafaba) to make these cookies allergy-friendly, though the texture shifts a bit.
- Alternative shapes: If you don’t have a diploma cutter, try rectangle or scroll shapes to keep the theme but simplify prep.
- Edible glitter or colored sugar: Swap gold luster dust for fine edible glitter or sugar crystals to add sparkle with a different flair.
Once, I even paired these with a creamy homemade Thai iced tea for a graduation brunch, and the combo was a hit—kind of unexpected but so good together.
Serving & Storage Suggestions
These cookies are best served at room temperature to enjoy the perfect balance of soft cookie and crisp royal icing. Arrange them on a simple white platter or a mirrored tray to let the gold shimmer pop. They pair wonderfully with celebratory drinks, like a light peach Bellini or even a refreshing lavender gin fizz for adult gatherings.
Store leftover cookies in an airtight container at room temperature for up to 5 days. For longer storage, freeze undecorated cookies in a single layer wrapped tightly in plastic wrap, then decorate after thawing. Decorated cookies freeze less well since royal icing can crack.
When reheating cookies from the fridge, let them come to room temperature naturally to avoid condensation on the icing. Over time, the flavors meld, and the gold dust maintains its shine, keeping every cookie looking impressive even days later.
Nutritional Information & Benefits
Each Perfect Custom Diploma Royal Icing Sugar Cookie has approximately 150-180 calories, largely depending on size and icing thickness. The cookies provide a quick energy boost from simple carbohydrates and fats. While these are treats to enjoy in moderation, the use of fresh ingredients like real vanilla and lemon juice in the icing adds natural flavor without artificial additives.
For those mindful of allergens, this recipe contains gluten, dairy, and eggs, but substitutions for gluten-free and vegan baking are possible with some texture compromises. The gold luster dust is edible and safe but always check the brand for food-grade certification.
From a wellness perspective, I appreciate how this recipe balances indulgence with simple, recognizable ingredients—no mystery powders or preservatives. It’s a sweet way to celebrate milestones without overcomplicated steps or ingredients.
Conclusion
These Perfect Custom Diploma Royal Icing Sugar Cookies with Gold Luster Dust have become a staple whenever I want to add a touch of celebration to a party or just brighten someone’s day. They’re approachable enough for beginners but offer plenty of room for creativity and personalization. Whether you keep them classic or add your own flair, these cookies bring a little sparkle and a lot of smiles.
Give this recipe a try, and don’t hesitate to experiment with colors, flavors, or even shapes. I’d love to hear how you make them your own! Baking these cookies reminded me that sometimes, the simplest ingredients can create the most memorable moments.
Happy baking, and here’s to sweet celebrations!
Frequently Asked Questions
How long does royal icing take to dry completely?
Royal icing typically takes 2 to 4 hours to dry on the surface, but for best results, especially before adding additional layers or decorations, letting it dry overnight is ideal.
Can I use powdered egg whites instead of fresh eggs for royal icing?
Yes, powdered or pasteurized egg whites are a safe and convenient alternative, especially if you’re concerned about raw eggs. Just rehydrate according to the package instructions.
What is the best way to store decorated sugar cookies?
Store them in an airtight container at room temperature. Avoid stacking decorated cookies directly on top of each other to prevent damage to the icing.
Can I prepare the cookie dough ahead of time?
Absolutely! The dough can be chilled for up to 3 days or frozen for up to 3 months. Just thaw completely before rolling out.
How do I prevent royal icing from cracking?
To avoid cracks, keep your icing at the right consistency—not too thick or dry—and allow cookies to dry in a room with stable humidity. Also, avoid stacking cookies while icing is still wet.
Pin This Recipe!
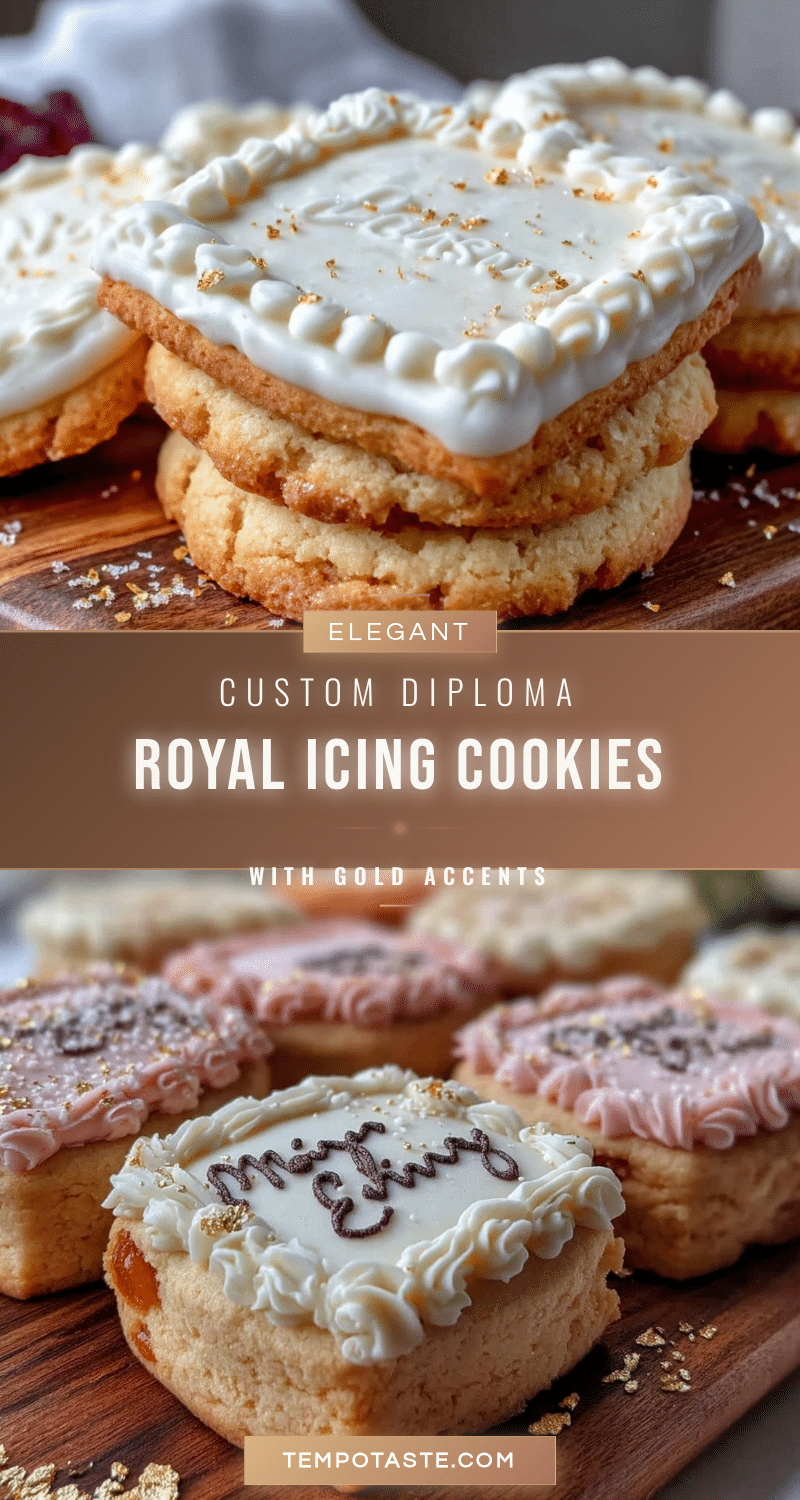
Perfect Custom Diploma Royal Icing Sugar Cookies with Gold Luster Dust

These elegant diploma-shaped sugar cookies feature a buttery base topped with smooth royal icing and a shimmering gold luster dust finish, perfect for celebrations like graduations.
- Prep Time: 20 minutes
- Cook Time: 10 minutes
- Total Time: 2 hours 30 minutes
- Yield: 24 cookies 1x
- Category: Dessert
- Cuisine: American
Ingredients
- 3 cups (360g) all-purpose flour, sifted
- 1 cup (227g) unsalted butter, softened
- 1 cup (200g) granulated sugar
- 2 large eggs, room temperature
- 2 teaspoons pure vanilla extract
- 1 teaspoon baking powder
- ½ teaspoon salt
- 4 cups (480g) powdered sugar, sifted
- 3 large egg whites (or 6 tablespoons pasteurized egg whites)
- 1 tablespoon fresh lemon juice
- 1 teaspoon vanilla extract
- Water, as needed to adjust icing consistency
- 1 teaspoon gold luster dust
- 1 teaspoon clear alcohol or lemon extract (for mixing with luster dust)
Instructions
- In a large bowl, cream together 1 cup (227g) softened unsalted butter and 1 cup (200g) granulated sugar using an electric mixer until light and fluffy, about 3-4 minutes.
- Add 2 large eggs, one at a time, beating well after each addition, then stir in 2 teaspoons pure vanilla extract.
- In a separate bowl, whisk together 3 cups (360g) all-purpose flour, 1 teaspoon baking powder, and ½ teaspoon salt.
- Gradually add the dry mixture to the wet ingredients, mixing on low speed until just combined. Avoid over-mixing.
- Divide the dough into two discs, wrap each in plastic wrap, and chill for at least 1 hour or overnight.
- Preheat oven to 350°F (175°C). Line baking sheets with parchment paper or silicone mats.
- Roll out one dough disc on a lightly floured surface to about ¼ inch (6 mm) thick. Cut shapes using a diploma cookie cutter and transfer to baking sheet.
- Bake cookies for 8-10 minutes until edges begin to turn golden. Let cool on baking sheet for 5 minutes, then transfer to wire rack to cool completely.
- Prepare royal icing by beating 3 large egg whites with 4 cups (480g) powdered sugar, 1 tablespoon fresh lemon juice, and 1 teaspoon vanilla extract until smooth and glossy. Add water 1 teaspoon at a time to reach piping consistency.
- Divide icing into portions for base flooding (thinner) and finer piping (thicker).
- Fill piping bags with fine tips. Outline cookie edges with thicker icing, then flood inside with thinner icing. Use a toothpick to pop bubbles and smooth edges.
- Let base layer dry for at least 2 hours or overnight.
- Pipe diploma details with thicker icing once base is dry.
- Mix 1 teaspoon gold luster dust with 1 teaspoon clear alcohol or lemon extract to create paint. Use a small brush to gently paint raised icing details. Let dry completely.
Notes
Use pasteurized egg whites for safety. Chill dough for easier rolling and cutting. Let royal icing dry fully before applying gold dust to avoid smudging. Store decorated cookies in a single layer at room temperature in an airtight container. For gluten-free or dairy-free versions, substitute flour and butter accordingly but expect texture changes.
Nutrition
- Serving Size: 1 cookie
- Calories: 165
- Sugar: 16
- Sodium: 90
- Fat: 7
- Saturated Fat: 4
- Carbohydrates: 25
- Protein: 2
Keywords: sugar cookies, royal icing, gold luster dust, diploma cookies, graduation cookies, decorated cookies, celebration treats