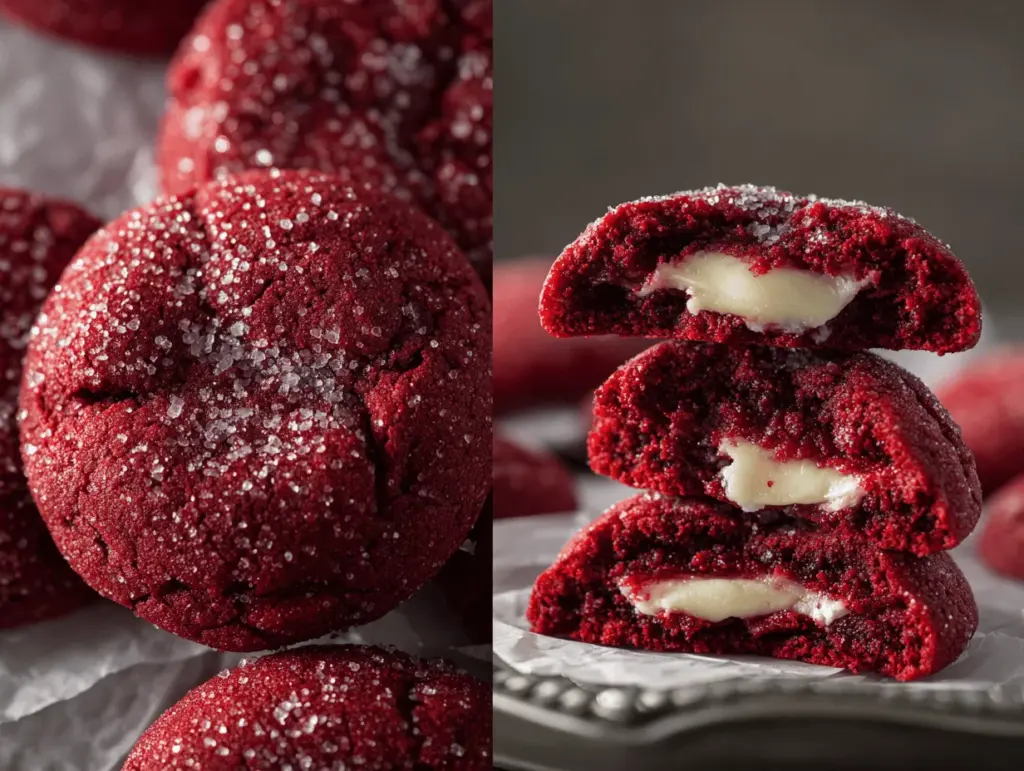
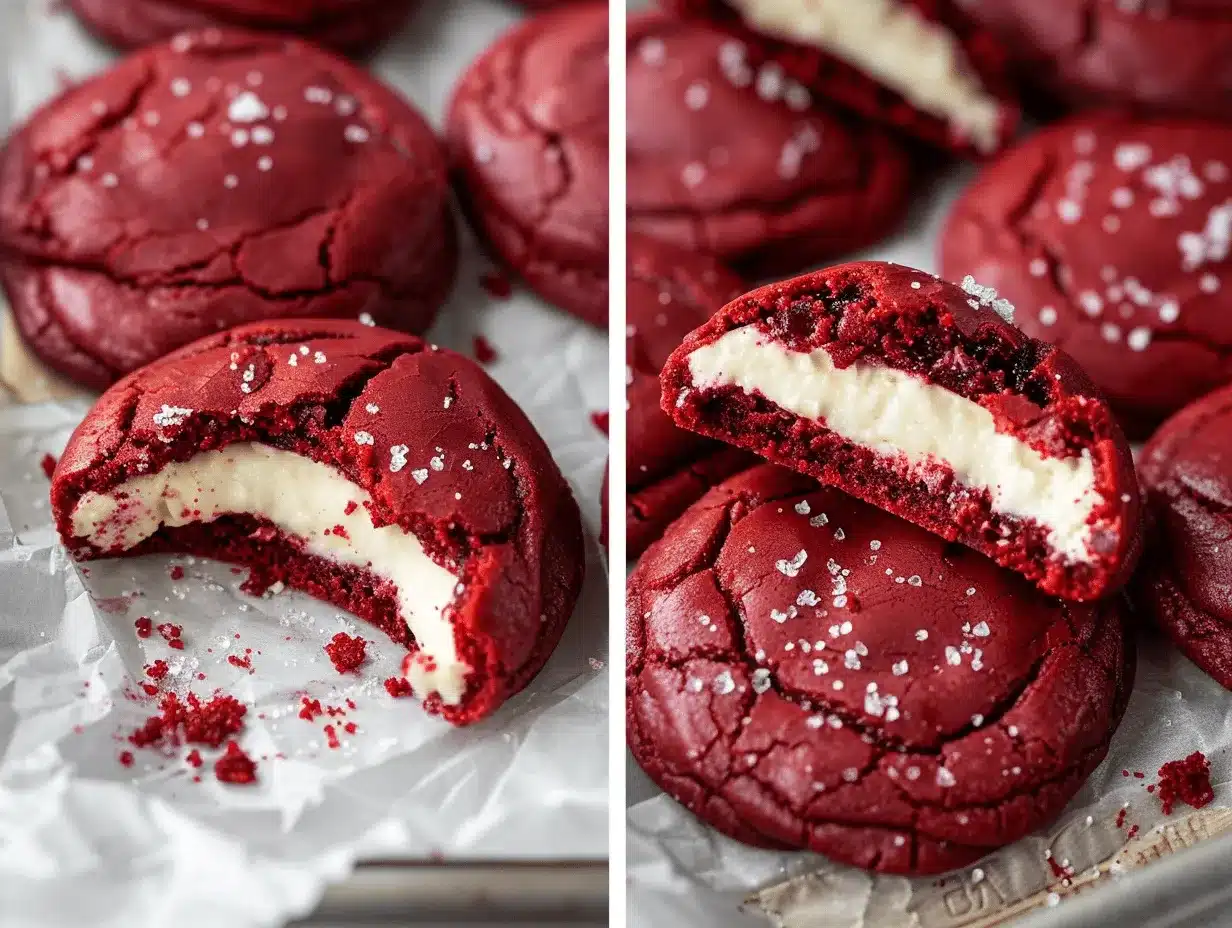
The very first time I bit into a red velvet cheesecake stuffed cookie, I was instantly hooked—the rich crimson cookie, slightly crisp on the edges, giving way to a creamy cheesecake center, was pure magic. If you’re a fan of bakery-style treats but want something a little more special, these cookies are your dream come true. They’re the kind of indulgence you crave on a cozy night in or when you want to impress at a cookie exchange. Honestly, I never thought anything could top my classic chocolate chip cookies until I baked a batch of these red velvet cheesecake stuffed cookies. The way the tangy cream cheese filling melts into the soft, cocoa-kissed cookie… let’s just say it’s dangerous to keep them in the house.
I first whipped up this recipe during the holidays, looking for something unique to share with friends. Red velvet has always been a favorite—there’s just something about that striking red hue and delicate chocolate flavor that feels festive and irresistible. But stuffing them with cheesecake? Total game changer. The idea came from a late-night bakery run, when I tasted a stuffed cookie that was good, but not quite perfect. After a few rounds of testing (and a couple of minor baking disasters), I landed on this version. Every bite is rich, creamy, and packed with that signature red velvet flavor, and honestly, I haven’t looked back since.
These red velvet cheesecake stuffed cookies are perfect for anyone who loves a little drama in their desserts (in the best way). They’re surprisingly easy to make, especially if you’re used to typical drop cookies. You’ll love how the bold color and gooey center make them an instant hit at parties, or when you just want to treat yourself. Whether you’re baking for your family, a group of friends, or just for the pure joy of it, these cookies deliver that bakery-style experience right in your kitchen. As someone who’s baked dozens of batches, I can promise you—they’re absolutely worth it.
Why You’ll Love This Red Velvet Cheesecake Stuffed Cookies Recipe
I’ve spent a lot of time perfecting these red velvet cheesecake stuffed cookies, and let me tell you, it was worth every calorie. There are so many reasons you’ll fall head-over-heels for this recipe—here are just a few:
- Quick & Easy: You can have a batch ready in about 45 minutes, including chill time. Ideal for when that sweet tooth hits or you need a last-minute dessert for guests.
- Simple Ingredients: Nothing fancy here—most of the ingredients are pantry staples, plus a brick of cream cheese. No wild goose chases at specialty stores.
- Perfect for Parties & Holidays: These cookies are a showstopper at cookie swaps, Valentine’s Day, Christmas, or honestly any celebration that calls for a little wow factor.
- Crowd-Pleaser: Seriously, I’ve never seen a plate last more than 10 minutes at a party. Kids and adults both go wild for that creamy center.
- Unbelievably Delicious: The combination of soft red velvet cookie and tangy cheesecake filling is next-level comfort food. You get the best of both worlds in one bite.
What sets these cookies apart from other stuffed cookies? It’s all about the technique. I chill the cheesecake filling so it stays creamy (not runny!) when baked, and I use just the right amount of cocoa powder to get that classic red velvet flavor without overpowering the cookie. A dash of vinegar adds that signature tang, just like in traditional red velvet cake. And, trust me, using a cookie scoop to portion the dough makes a world of difference for even baking and that bakery-perfect look.
This isn’t just another copycat recipe—it’s my go-to version, crafted after dozens of test batches and taste tests with the pickiest eaters I know (my family!). If you’ve ever been disappointed by dry cookies or bland fillings, you won’t have that problem here. The balance of flavors and textures is just right, and every cookie comes out looking like it came straight from a professional bakery. Plus, stuffing cookies is just plain fun. You’ll feel like a baking superstar, even if you’re still getting the hang of things.
Red velvet cheesecake stuffed cookies are more than just a dessert—they’re a memory in the making, a “wow” moment for anyone lucky enough to snag one. So, go ahead—treat yourself and your loved ones to something truly special!
What Ingredients You Will Need
This recipe uses simple, wholesome ingredients to deliver that bakery-style flavor and texture you crave—nothing complicated, just a few pantry staples and a little cream cheese magic. Here’s what you’ll need for these irresistible red velvet cheesecake stuffed cookies:
- For the Cheesecake Filling:
- Cream cheese, full-fat (8 oz/225 g, softened) (Philadelphia is my go-to for the creamiest texture)
- Granulated sugar (1/4 cup/50 g) (just enough to sweeten, not overpower)
- Pure vanilla extract (1/2 tsp) (adds warmth and depth)
- For the Red Velvet Cookie Dough:
- All-purpose flour (2 1/4 cups/280 g) (King Arthur or Gold Medal work well)
- Cocoa powder, unsweetened (2 tbsp/12 g) (Dutch-process for a deep color, but natural is fine too)
- Baking soda (1/2 tsp)
- Salt (1/2 tsp)
- Unsalted butter, softened (1/2 cup/113 g) (let it come to room temp for easier mixing)
- Brown sugar, packed (3/4 cup/150 g) (adds moisture and caramel flavor)
- Granulated sugar (1/4 cup/50 g)
- Large egg (1, room temperature)
- Egg yolk (1, room temperature) (extra richness and chewiness)
- Pure vanilla extract (1 tbsp/15 ml)
- Distilled white vinegar (1 tsp/5 ml) (for that classic red velvet tang)
- Red gel food coloring (about 1 tsp, or as needed for vibrant color; gel is best for intensity without thinning the dough)
- White chocolate chips (1 cup/170 g, optional but highly recommended for bakery-style flair)
Ingredient Notes & Substitutions:
- If you need a gluten-free option, swap the all-purpose flour for a 1:1 gluten-free baking blend.
- Dairy-free? Use vegan cream cheese and dairy-free butter—just keep in mind the flavor will shift slightly.
- No red gel food coloring? Liquid works, but you might need a bit more, and the cookies could be less vibrant.
- Want less sweetness? Skip the white chocolate chips or reduce the sugar a little for a more tangy, grown-up flavor.
Most of these ingredients are easy to find year-round, but you can always experiment with seasonal touches—like adding crushed peppermint at the holidays or even mini chocolate chips for a double-chocolate twist. I always say, it’s your kitchen—make it work for you!
Equipment Needed
To make these red velvet cheesecake stuffed cookies, you don’t need any fancy bakery gear—just the basics you probably already have. Here’s what I use every time I bake a batch:
- Mixing bowls: At least two—one for the filling, one for the dough. Glass or stainless steel both work fine.
- Hand mixer or stand mixer: For smooth cheesecake filling and creamy cookie dough. If you’re mixing by hand, just be ready for a little arm workout!
- Rubber spatula or wooden spoon: Helpful for scraping the sides and folding in chocolate chips.
- Cookie scoop (medium, about 1.5 tbsp): Keeps the cookies even and helps portion the dough. An ice cream scoop works in a pinch.
- Small spoon or melon baller: For scooping cheesecake filling (I’ve used a teaspoon before and it worked fine).
- Baking sheets: Heavy-duty ones help prevent burning. I always line them with parchment paper for easy cleanup.
- Parchment paper: Saves you from sticky messes and makes transferring cookies a breeze.
- Wire cooling rack: For cooling the cookies evenly—no soggy bottoms!
If you don’t have a cookie scoop, just use two spoons to shape the dough. I’ve made these at a friend’s house with only a bowl and a wooden spoon—worked just fine, though my arm was tired! For best results, keep your mixer’s beaters clean (especially between the filling and dough) and line your pans to prevent sticking. If your baking sheets are old and warped, flip them over for a flatter surface—little tricks like this make all the difference for bakery-style cookies at home.
How to Make Red Velvet Cheesecake Stuffed Cookies
-
Prep the Cheesecake Filling (10 minutes, plus chilling):
- In a medium bowl, beat 8 oz (225 g) cream cheese with 1/4 cup (50 g) granulated sugar and 1/2 tsp vanilla extract until smooth and fluffy—no lumps! (If your cream cheese is too cold, let it sit out for 15 minutes first.)
- Scoop 12-14 teaspoon-sized mounds onto a parchment-lined plate. Freeze for at least 20 minutes, until firm. (This keeps the filling from oozing out during baking—trust me, don’t skip this step!)
-
Make the Red Velvet Cookie Dough (15 minutes):
- In a medium bowl, whisk together 2 1/4 cups (280 g) all-purpose flour, 2 tbsp (12 g) cocoa powder, 1/2 tsp baking soda, and 1/2 tsp salt. Set aside.
- In a large bowl, beat 1/2 cup (113 g) unsalted butter, 3/4 cup (150 g) brown sugar, and 1/4 cup (50 g) granulated sugar until creamy and light—about 2 minutes.
- Mix in 1 large egg, 1 egg yolk, and 1 tbsp (15 ml) vanilla extract. Beat until combined, scraping the sides as needed.
- Add 1 tsp (5 ml) white vinegar and red gel food coloring (about 1 tsp; add more for deeper color). Mix until evenly tinted.
- Gradually add the dry ingredients, mixing on low just until combined—don’t overmix, or the cookies will be tough.
- Fold in 1 cup (170 g) white chocolate chips if using.
-
Assemble the Cookies (10 minutes):
- Scoop out about 2 tbsp of dough and flatten into a disc in your palm. (A medium cookie scoop makes this easier.)
- Place one frozen cheesecake ball in the center. Top with another 1 tbsp of dough, pinching the edges to seal. (It’s okay if some filling shows—it’ll bake up fine.)
- Roll gently into a ball and place on a parchment-lined baking sheet, spacing 2 inches (5 cm) apart.
- If dough gets sticky, chill your hands with cold water or pop the dough in the fridge for a few minutes.
-
Chill (optional but recommended, 15 minutes):
- For extra thick cookies, chill the assembled dough balls in the fridge for 10-15 minutes. This helps them keep that bakery-style shape.
-
Bake (10-12 minutes):
- Preheat oven to 350°F (175°C).
- Bake cookies for 10-12 minutes, until the edges are set but the centers look slightly underbaked. (They’ll finish setting as they cool—don’t overbake, or you’ll lose that gooey center!)
-
Cool & Enjoy:
- Let cookies cool on the baking sheet for 5 minutes, then transfer to a wire rack to cool completely. (The cheesecake needs to set up a bit—patience pays off!)
- Serve warm for melty centers, or at room temp for a firm, creamy bite.
Troubleshooting Tips: If your cookies spread too much, chill the dough longer or add an extra tablespoon of flour. If the filling leaks, make sure it’s really cold before stuffing. And if you want bakery-perfect rounds, use a large round cookie cutter to “scoot” the cookies into shape right after baking.
Cookie Baking Tips & Techniques
After baking more batches of red velvet cheesecake stuffed cookies than I care to admit, I’ve picked up a few tricks along the way. Here’s how to get bakery-style cookies every time (without losing your mind):
- Chill the Filling: This one is crucial. If the cheesecake isn’t cold and firm, it’ll ooze out all over the baking sheet. I once skipped this step and wound up with a gooey mess—never again!
- Don’t Overmix the Dough: Just mix until everything’s combined. Overworking the dough makes cookies tough instead of tender.
- Use Gel Food Coloring: Liquid food coloring can thin out the dough, making it harder to shape and causing cookies to spread too much. Gel is your friend for that bold red hue.
- Keep Your Hands Cool: If the dough gets sticky while shaping, chill your hands under cold water or work with small batches at a time. Warm hands = melty dough.
- Underbake Slightly: Pull the cookies when the edges are set but the centers still look a little soft. They’ll finish baking on the sheet and stay gooey inside.
- Portion for Consistency: Use a cookie scoop for even sizes. This helps every cookie bake at the same rate and look like it came from a bakery window.
- Rotate Your Baking Sheet: Halfway through baking, turn your sheet 180 degrees. This helps cookies bake evenly, especially if your oven has hot spots.
- Let Them Cool (Just a Bit): They’ll be super soft right out of the oven. Give them a few minutes to set before moving to a rack—otherwise, they’ll break open and the filling will spill everywhere (been there!).
Don’t stress if your first batch isn’t picture-perfect. My first attempt looked a little wonky, but they still tasted incredible. With a bit of practice and these tips, you’ll nail it—and maybe even come up with your own tricks along the way.
Variations & Adaptations
One of the best things about red velvet cheesecake stuffed cookies is how easy they are to personalize. Here are some of my favorite ways to switch things up:
- Double Chocolate: Swap half the white chocolate chips for semisweet or dark chocolate chips. The extra chocolate pairs perfectly with the tangy filling.
- Seasonal Peppermint: Add 1/2 tsp peppermint extract to the dough and sprinkle crushed candy canes on top before baking for a festive twist.
- Gluten-Free: Substitute a 1:1 gluten-free flour blend for the all-purpose flour. I’ve tried Bob’s Red Mill, and it works like a charm—just watch the bake time, as gluten-free cookies can brown a little faster.
- Dairy-Free: Use vegan cream cheese and plant-based butter. The flavor will be slightly different, but the cookies will still be delicious and creamy.
- Extra Red Velvet: Add a sprinkle of red sanding sugar on top for sparkle and crunch. It makes for a gorgeous finish, especially for gifting.
My personal favorite? I once mixed in a handful of mini chocolate chips to the cheesecake filling for a cookies-and-cream vibe—highly recommend if you’re feeling adventurous! Don’t be afraid to try your own spins, whether it’s adding nuts, swapping vanilla for almond extract, or even stuffing with a swirl of Nutella for a completely different surprise.
Serving & Storage Suggestions
These cookies are best served slightly warm, when the cheesecake center is still a little gooey and the red velvet is soft and rich. Arrange them on a pretty platter for parties or stack them in glass jars for a jaw-dropping edible gift. Pair with a cold glass of milk, a frothy cappuccino, or even a scoop of vanilla ice cream for a truly indulgent treat.
Storage: Store cooled cookies in an airtight container in the refrigerator for up to 5 days. Because of the cheesecake filling, I don’t recommend leaving them at room temp for more than a few hours. If you want to freeze them, layer cookies between sheets of parchment paper in a freezer-safe container. They’ll keep for up to 2 months—just thaw in the fridge overnight or zap in the microwave for 10-15 seconds for that just-baked taste.
Reheating: To warm up a refrigerated or frozen cookie, microwave on low in 10-second bursts until just warm. You can also reheat in a low oven (300°F/150°C) for 3-4 minutes, which revives the texture nicely.
Honestly, the flavors get even better after a day or two as the cheesecake melds with the red velvet—if you can manage to save any that long!
Nutritional Information & Benefits
Each red velvet cheesecake stuffed cookie comes in around 250-300 calories, with about 4g protein, 12g fat, and 32g carbohydrates per cookie (based on standard sizing). The cream cheese filling adds a touch of protein and calcium, while the cocoa provides antioxidants (hey, every little bit helps!).
These cookies aren’t exactly health food, but they’re perfect for a special treat or sharing with friends. For those watching gluten or dairy, easy swaps make them accessible for most diets. Just keep in mind they do contain common allergens like wheat, dairy, and eggs, so double-check ingredient labels if you’re baking for others.
From a wellness perspective, I always say it’s about balance—sometimes, the best benefit is simply sharing something delicious and homemade with people you love. That’s what makes these cookies so special in my book.
Conclusion
If you’re looking for a cookie that’s as stunning as it is delicious, these red velvet cheesecake stuffed cookies are the answer. They’re easy enough for a casual weekend bake but special enough to wow at any gathering. I love how the creamy cheesecake center and bold red velvet cookie come together in every bite—there’s just nothing else like it.
Don’t be afraid to put your own spin on this recipe—try a new filling, swap in a favorite chocolate, or play with toppings. That’s the beauty of home baking! Every batch is a chance to make memories (and maybe a little mess in the kitchen, too).
Let me know in the comments if you try these red velvet cheesecake stuffed cookies, or if you have your own favorite filling ideas. Tag me on Pinterest or Instagram so I can see your creations! Happy baking—and don’t forget to savor every bite.
Frequently Asked Questions
How do I keep the cheesecake filling from leaking out of the cookies?
Freeze the cheesecake filling mounds until they’re firm before stuffing the cookies. Make sure to pinch the dough edges tightly around the filling. If the dough is too sticky, chill it for a few minutes before shaping.
Can I make red velvet cheesecake stuffed cookies ahead of time?
Absolutely! You can prepare the dough and filling up to 2 days in advance. Store them separately in the fridge, then assemble and bake when you’re ready. Baked cookies also freeze beautifully for up to 2 months.
What’s the best food coloring for bright red cookies?
Gel food coloring works best for vibrant color without thinning the dough. Start with about a teaspoon and add more if needed for that classic red velvet hue.
Can I use low-fat cream cheese in the filling?
You can, but full-fat cream cheese gives the creamiest, richest texture. Low-fat versions may be a bit softer and less flavorful, but they’ll still work in a pinch.
Why do my cookies spread too much in the oven?
This can happen if the dough is too warm or if there’s not enough flour. Try chilling the dough balls before baking, or add an extra tablespoon of flour if needed. Also, avoid overmixing the dough once the flour is added.
Pin This Recipe!
Red Velvet Cheesecake Stuffed Cookies

Bakery-style red velvet cookies with a creamy cheesecake center, these indulgent treats are perfect for parties, holidays, or cozy nights in. The soft, cocoa-kissed cookie and tangy filling make every bite unforgettable.
- Prep Time: 25 minutes
- Cook Time: 12 minutes
- Total Time: 45 minutes
- Yield: 12-14 cookies 1x
- Category: Dessert
- Cuisine: American
Ingredients
- 8 oz cream cheese, full-fat, softened
- 1/4 cup granulated sugar
- 1/2 tsp pure vanilla extract
- 2 1/4 cups all-purpose flour
- 2 tbsp unsweetened cocoa powder
- 1/2 tsp baking soda
- 1/2 tsp salt
- 1/2 cup unsalted butter, softened
- 3/4 cup brown sugar, packed
- 1/4 cup granulated sugar
- 1 large egg, room temperature
- 1 egg yolk, room temperature
- 1 tbsp pure vanilla extract
- 1 tsp distilled white vinegar
- 1 tsp red gel food coloring (or as needed)
- 1 cup white chocolate chips (optional)
Instructions
- In a medium bowl, beat cream cheese, 1/4 cup granulated sugar, and 1/2 tsp vanilla extract until smooth and fluffy.
- Scoop 12-14 teaspoon-sized mounds of cheesecake filling onto a parchment-lined plate and freeze for at least 20 minutes until firm.
- In a medium bowl, whisk together flour, cocoa powder, baking soda, and salt.
- In a large bowl, beat butter, brown sugar, and 1/4 cup granulated sugar until creamy and light, about 2 minutes.
- Mix in egg, egg yolk, and 1 tbsp vanilla extract until combined.
- Add vinegar and red gel food coloring; mix until evenly tinted.
- Gradually add dry ingredients to wet ingredients, mixing on low just until combined.
- Fold in white chocolate chips if using.
- Scoop about 2 tbsp of dough and flatten into a disc. Place one frozen cheesecake ball in the center, top with another 1 tbsp of dough, and pinch edges to seal. Roll gently into a ball.
- Place dough balls on a parchment-lined baking sheet, spacing 2 inches apart.
- Optional: Chill assembled dough balls in the fridge for 10-15 minutes for thicker cookies.
- Preheat oven to 350°F (175°C). Bake cookies for 10-12 minutes, until edges are set but centers look slightly underbaked.
- Let cookies cool on the baking sheet for 5 minutes, then transfer to a wire rack to cool completely.
- Serve warm for melty centers or at room temperature for a firm, creamy bite.
Notes
Chill the cheesecake filling before stuffing to prevent leaks. Use gel food coloring for vibrant color. For bakery-perfect rounds, use a large round cookie cutter to shape cookies right after baking. Cookies can be made gluten-free or dairy-free with substitutions. Store in the refrigerator for up to 5 days or freeze for up to 2 months.
Nutrition
- Serving Size: 1 cookie
- Calories: 275
- Sugar: 20
- Sodium: 160
- Fat: 12
- Saturated Fat: 7
- Carbohydrates: 32
- Fiber: 1
- Protein: 4
Keywords: red velvet cookies, cheesecake stuffed cookies, bakery-style cookies, holiday cookies, party dessert, easy cookie recipe, stuffed cookies, cream cheese filling, chocolate cookies, festive cookies


