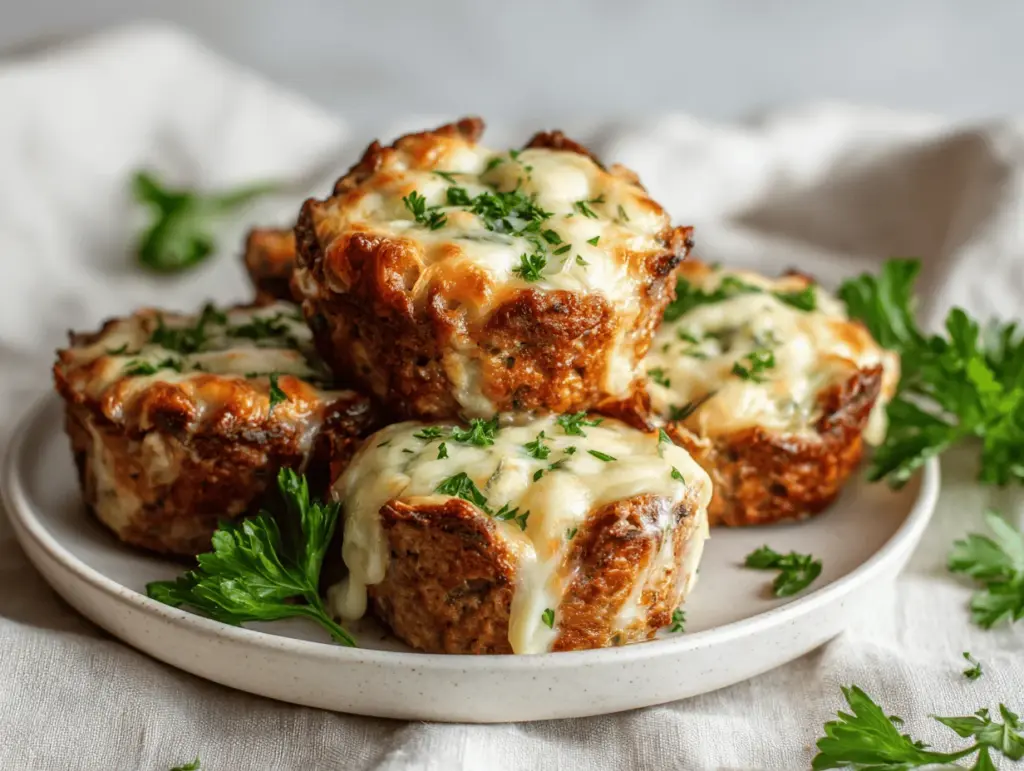
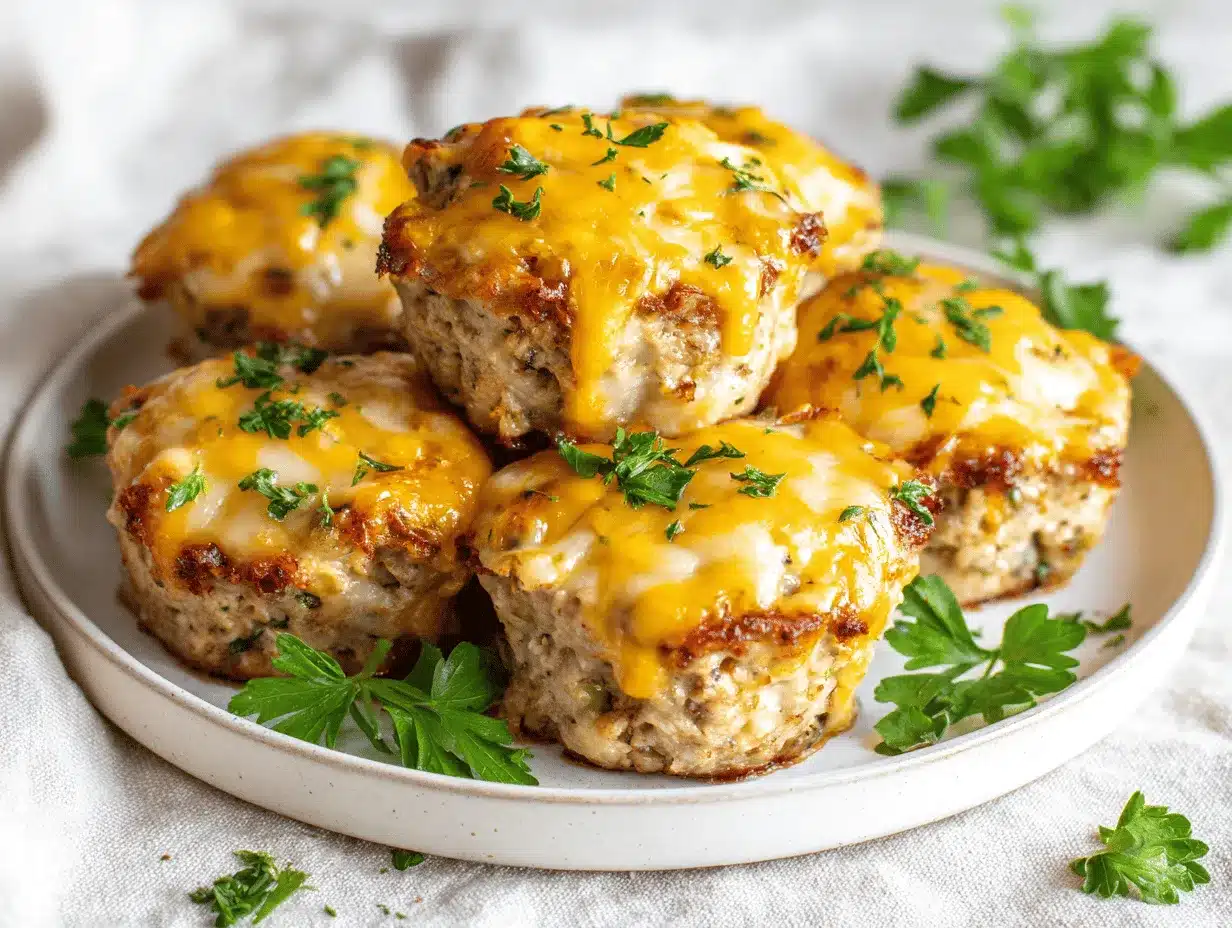
The first time I pulled a tray of Cheesy Ranch Chicken Meatloaf Minis out of my oven, the whole kitchen smelled like a cross between a bubbling pizza parlor and a classic Sunday roast. The aroma—savory ranch, gooey cheddar, a hint of garlic—had my kids wandering in before I even finished plating. Honestly, these little meatloaf cups were born from a desperate weeknight scramble, when ground chicken was the only protein left in my fridge and I was craving something comforting (but not the same old meatloaf slab). I tossed in a packet of ranch mix, some shredded cheese, and crossed my fingers—and wow, did it work!
Now, Cheesy Ranch Chicken Meatloaf Minis have become one of our go-to easy dinner ideas. They’re perfect for busy families like mine—each mini is portioned, cooks faster than a big loaf, and the cheesy tops get perfectly browned. Plus, it’s got that classic ranch flavor everyone seems to love. I’ve made these for potlucks, picky-eater playdates, and even meal-prepped lunches. The best part? They reheat like a dream, and you can even freeze them for emergency dinners.
If you’re after a dinner that’s quick, super flavorful, and guaranteed to win over a crowd (even those who claim they “don’t like meatloaf”), you need to try this Cheesy Ranch Chicken Meatloaf Minis recipe. As someone who’s tested this more times than I can count, I promise you—this recipe is a keeper. Whether you’re a ranch fanatic or just need a new twist on classic comfort food, these minis are about to become your dinnertime hero.
Why You’ll Love This Recipe
- Quick & Easy: These Cheesy Ranch Chicken Meatloaf Minis come together in about 15 minutes of prep. Perfect for those nights when you’re juggling homework, sports, and your own sanity!
- Simple Ingredients: No fancy hunting for ingredients—just ground chicken, ranch seasoning, cheese, and a few pantry basics. I bet you already have most of what you need.
- Perfect for Busy Weeknights: They bake in a muffin tin, so you get individual servings with crispy edges and melty cheese on top. Plus, cleanup is a breeze.
- Crowd-Pleaser: Even picky eaters can’t resist the cheesy ranch combo—my kids, husband, and even my mom all ask for seconds.
- Unbelievably Delicious: The texture is moist but never mushy, and the ranch-seasoned chicken is a fun twist on classic meatloaf. The cheese forms a golden crust that’s honestly irresistible.
What makes these Cheesy Ranch Chicken Meatloaf Minis stand out from every other meatloaf recipe? Well, the ranch seasoning infuses every bite with herby, tangy goodness (way more flavor than plain old ketchup topping). Using ground chicken keeps things light but still filling, and the cheddar cheese adds that ooey-gooey factor that’s just magic. I’ve tried other mini meatloaf recipes, but they always seemed dry or bland—this one is the complete opposite. Plus, the muffin-tin method means they cook faster and look so cute on a platter.
These minis are perfect for family dinners, meal prep, or even bringing to a potluck. There’s something about comfort food in mini form that just feels more special. I love that you can grab one for a quick lunch the next day, or serve them up with mashed potatoes and green beans for a classic meal. If you like easy recipes that deliver on both taste and fun, you’ll adore this Cheesy Ranch Chicken Meatloaf Minis recipe. Trust me—it’s a recipe you’ll come back to again and again.
What Ingredients You Will Need
This recipe keeps things simple without sacrificing flavor. Every ingredient plays a role—whether it’s adding moisture, boosting flavor, or bringing that perfect cheesy bite. Here’s what you’ll need for Cheesy Ranch Chicken Meatloaf Minis:
- Ground chicken (1 1/2 lbs / 680g) – Lean ground chicken works best for tender, juicy minis. I usually grab organic if it’s on sale, but any brand does the trick.
- Ranch seasoning mix (1 packet, about 1 oz / 28g) – This is the secret weapon! I’ve used both Hidden Valley and store brands, and both turn out great. If you have a homemade ranch mix, that’s awesome too.
- Shredded cheddar cheese (1 cup / 113g, divided) – Half goes inside for melty pockets, half gets sprinkled on top to form that golden, irresistible crust. You can use sharp or mild, or even swap for Monterey Jack in a pinch.
- Egg (1 large) – Binds everything together and keeps the minis moist.
- Breadcrumbs (1/2 cup / 60g) – Regular or panko both work. I’ve even used gluten-free breadcrumbs for allergy-friendly batches.
- Milk (1/4 cup / 60ml) – Adds moisture, especially since chicken can be lean. Any milk is fine—dairy-free or even half-and-half if you want extra richness.
- Garlic powder (1/2 tsp / 2g) – For a subtle kick. You could use fresh minced garlic if you’re feeling fancy, but the powder keeps things simple.
- Onion powder (1/2 tsp / 2g) – Rounds out the ranch flavor. If your family loves onion, a tablespoon of finely grated fresh onion is a nice sub.
- Salt and pepper (to taste) – I usually do 1/2 tsp salt and 1/4 tsp pepper, but adjust for your ranch mix’s saltiness.
- Chopped fresh parsley (2 tbsp / 6g, optional) – For color and a fresh finish. I throw it on top before serving if I have some handy.
Ingredient Notes & Substitutions:
- If you need it gluten-free, substitute gluten-free breadcrumbs.
- No ranch mix? Use 1 tbsp each of dried parsley and chives, 1 tsp dried dill, 1/2 tsp garlic powder, 1/2 tsp onion powder, 1/2 tsp salt, and 1/4 tsp pepper.
- Want extra veg? Finely diced bell pepper or spinach sneak in nicely.
- For dairy-free, swap in vegan cheese and your favorite plant-based milk.
- If you only have ground turkey, that works great too, though it’s a touch leaner—maybe add an extra splash of milk.
These are all fridge and pantry staples in my house, and most of the time, I don’t even need to make a special trip to the store. I love recipes that work with what’s already on hand!
Equipment Needed
- 12-cup muffin tin – Nonstick is best to prevent sticking and for easy cleanup. If you only have a 6-cup tin, just bake in two batches.
- Mixing bowls – One large for the meat mixture, one smaller for prepping toppings or wet ingredients.
- Measuring cups and spoons – Makes it easy to get each mini the same size and ensures even cooking.
- Rubber spatula or large spoon – For mixing everything together without overworking the meat.
- Nonstick spray or muffin liners – I usually spray my tin generously, but silicone liners are a game changer for zero sticking.
- Cooling rack – Not absolutely essential, but it helps keep the bottoms from getting soggy if you plan to store leftovers.
If you’re short on muffin tins, you can shape these into patties and bake on a parchment-lined baking sheet—just reduce the baking time slightly. I’ve also tried mini silicone muffin pans, which pop the minis out perfectly and are dishwasher-safe (major win for busy nights). If you use a metal tin, a good soak in hot soapy water right after baking makes cleaning up a breeze. For anyone on a tight budget, dollar-store muffin pans work just fine—just be generous with the nonstick spray. No fancy gadgets required!
Preparation Method
- Preheat your oven. Set it to 400°F (200°C). While it heats, lightly grease a 12-cup muffin tin with nonstick spray or line with silicone muffin liners. Tip: Spraying helps those cheesy edges crisp up!
- Mix the base. In a large bowl, add 1 1/2 lbs (680g) ground chicken, 1 packet (1 oz/28g) ranch seasoning, 1/2 cup (60g) breadcrumbs, 1 large egg, 1/4 cup (60ml) milk, 1/2 tsp (2g) garlic powder, 1/2 tsp (2g) onion powder, salt, and pepper. Use clean hands or a spatula to gently combine. Note: Don’t overmix or your minis might turn dense.
- Add the cheese. Fold in 1/2 cup (56g) shredded cheddar cheese until just incorporated. Save the rest for topping. Visual cue: The mixture should be just tacky, not wet or sticky.
- Portion the meat mixture. Divide evenly among the 12 muffin cups. I use a large cookie scoop for less mess—each mini should be roughly the size of a golf ball and fill the cup about 3/4 full. Tip: Press them in gently so they hold together but don’t pack too tightly.
- Top with more cheese. Sprinkle the remaining 1/2 cup (56g) cheddar on top of each mini. This is what gives you that golden, bubbly finish.
- Bake. Place the muffin tin on the center rack and bake for 18–22 minutes. They’re done when the cheese is melted and lightly browned, and the internal temperature hits 165°F (74°C). If you see juices bubbling around the edges, that’s perfectly normal.
- Rest and serve. Let the minis rest in the pan for 5 minutes before running a butter knife around the edges to loosen. Transfer to a plate or cooling rack. Be careful—they’re hot and the cheese will be gooey!
- Garnish and enjoy. Sprinkle with fresh parsley if using. Serve warm with your favorite sides or dipping sauce.
Troubleshooting: If your minis seem dry, check your bake time—chicken can dry out if overbaked. If they’re too wet, try adding a tablespoon more breadcrumbs next time. Sticky mixture? Wet your hands before shaping. These little tweaks make a big difference!
Cooking Tips & Techniques
After making these Cheesy Ranch Chicken Meatloaf Minis dozens of times, I’ve picked up a few tricks to guarantee they turn out perfectly every time:
- Don’t Overmix: It’s tempting to stir and stir, but stop as soon as the ingredients come together. Too much mixing makes the minis tough. Gentle hands make the best meatloaf!
- Use a Cookie Scoop: This is my secret for even portions (and less mess). Each scoop gives you a perfectly sized mini, so they all cook at the same rate.
- Let Them Rest: The cheese is molten right out of the oven. Resting for five minutes helps everything set, so you don’t lose all the gooey goodness when you lift them out.
- Check for Doneness: Use an instant-read thermometer if you have one. 165°F (74°C) is the magic number for poultry. No thermometer? Look for clear juices and firm texture.
- Keep an Eye on the Bake: Ovens can run hot or cold. At 18 minutes, peek in—if the cheese is golden and bubbling, they’re ready.
- Customize the Cheese: If you want extra melty tops, add the cheese halfway through baking instead of at the start.
- Don’t Skip the Spray: Even in nonstick tins, a little oil or spray saves you from a sticky cleanup headache. Trust me, I’ve learned this the hard way.
I’ve accidentally overcooked these before (distracted by a toddler meltdown—whoops!). They were still tasty, just a bit dry. That’s why I always check a couple minutes before the timer goes off. And if you’re multitasking (like I am most nights), set a phone timer. Little things like this keep dinner stress-free and delicious.
Variations & Adaptations
One of the best things about Cheesy Ranch Chicken Meatloaf Minis is how easy they are to tweak for your family’s tastes or dietary needs. Here are some fun ways to switch it up:
- Low-Carb/Keto: Swap the breadcrumbs for crushed pork rinds or almond flour. You’ll get the same texture without the carbs (I’ve made this for a keto friend and it was a hit).
- Spicy Kick: Add 1/2 teaspoon crushed red pepper flakes or swap in pepper jack cheese for a little heat. My husband loves it this way—just enough spice to wake up your taste buds.
- Veggie-Loaded: Fold in 1/2 cup finely grated zucchini (squeezed dry) or carrots. The kids never notice, and it bumps up the nutrition.
- Turkey or Beef: Use ground turkey for a similar flavor, or ground beef for a richer taste. You may need to drain a bit of fat with beef.
- Dairy-Free: Use your favorite dairy-free shredded cheese and plant-based milk. I’ve tested with Daiya cheddar shreds and almond milk and it turns out great.
- Different Shapes: Don’t have a muffin tin? Shape into patties and bake on a lined sheet, or press into a mini loaf pan for “slider” style meatloaf.
Personally, I love adding a handful of chopped spinach right into the mix for an extra pop of color and vitamins—no one ever complains! Don’t be afraid to play around. The basics stay the same, but the flavor combos are endless.
Serving & Storage Suggestions
Cheesy Ranch Chicken Meatloaf Minis are best served hot, right from the oven, when the cheese is gooey and the edges are crispy. I love plating them on a big tray with a sprinkle of parsley and a side of ranch or honey mustard for dipping. These pair perfectly with mashed potatoes, roasted veggies, or a simple green salad. For a fun twist, try serving them on slider buns with lettuce and tomato—mini meatloaf sandwiches!
If you have leftovers (which is rare in my house!), let them cool completely before placing in an airtight container. They’ll keep in the fridge for up to 4 days. To reheat, pop them in the microwave for about 45 seconds, or warm in a 325°F (165°C) oven for 10 minutes. They also freeze well—just wrap each mini in plastic wrap, then store in a freezer bag for up to 3 months. Thaw overnight in the fridge, then reheat as above. The ranch flavor actually deepens a bit after chilling, making leftovers just as tasty—if not more!
Nutritional Information & Benefits
Each Cheesy Ranch Chicken Meatloaf Mini (based on a batch of 12) has roughly:
- Calories: 160
- Protein: 15g
- Carbs: 5g
- Fat: 8g
They’re high in protein and relatively low in carbs, thanks to lean ground chicken and modest breadcrumbs. The ranch seasoning adds herby flavor without loads of extra salt, and using real cheddar cheese means you get calcium and a satisfying bite. If you use gluten-free or dairy-free swaps, they’re allergy-friendly too. I love that these minis fit into my meal plan when I’m focusing on high-protein, lower-carb dinners. Just a heads-up: ranch packets can contain dairy and gluten, so check your labels if you have allergies in the family.
Conclusion
These Cheesy Ranch Chicken Meatloaf Minis are everything I want in a weeknight dinner—fast, packed with flavor, and totally comforting. They’re the kind of meal that disappears before you know it, and I always end up wishing I’d doubled the batch. Whether you’re meal-prepping for the week or cooking for a crowd, this recipe’s flexibility means you can make it your own.
I hope you’ll try these soon and add your own twist! Maybe toss in some extra veggies, try a new cheese, or turn them into sliders for lunchboxes. Let me know how you serve them—leave a comment, share a picture, or tag me with your version. From my kitchen to yours, here’s to easy, cheesy, ranchy dinners that make everyone smile!
FAQs About Cheesy Ranch Chicken Meatloaf Minis
Can I make these meatloaf minis ahead of time?
Yes! You can prep the mixture and fill the muffin tin a day ahead. Just cover with plastic wrap and refrigerate. Bake when ready to serve.
What can I use instead of ranch seasoning?
If you’re out of ranch mix, combine dried parsley, chives, dill, garlic powder, onion powder, salt, and pepper for a homemade version. See ingredient notes above for exact amounts.
Do these freeze well?
Absolutely. Freeze cooked minis in a freezer bag for up to 3 months. Thaw overnight in the fridge and reheat in the oven or microwave.
Can I use ground turkey or beef instead of chicken?
Yes! Ground turkey is a great substitute and keeps them lean. Ground beef adds a richer flavor—just drain any extra fat after baking.
What sides go best with these minis?
They’re delicious with mashed potatoes, roasted veggies, a fresh salad, or even on slider buns for a fun twist. Don’t forget a side of ranch or honey mustard for dipping!
Pin This Recipe!

Cheesy Ranch Chicken Meatloaf Minis

These Cheesy Ranch Chicken Meatloaf Minis are a quick, flavorful, and comforting dinner idea made with ground chicken, ranch seasoning, and cheddar cheese. Baked in a muffin tin for perfect portions, they’re family-friendly, meal-prep ready, and freeze beautifully.
- Prep Time: 15 minutes
- Cook Time: 20 minutes
- Total Time: 35 minutes
- Yield: 12 minis (4 servings) 1x
- Category: Main Course
- Cuisine: American
Ingredients
- 1 1/2 lbs ground chicken
- 1 packet (1 oz) ranch seasoning mix
- 1 cup shredded cheddar cheese, divided
- 1 large egg
- 1/2 cup breadcrumbs (regular or panko; gluten-free if needed)
- 1/4 cup milk (any kind)
- 1/2 tsp garlic powder
- 1/2 tsp onion powder
- 1/2 tsp salt (or to taste)
- 1/4 tsp black pepper (or to taste)
- 2 tbsp chopped fresh parsley (optional, for garnish)
- Nonstick spray or muffin liners
Instructions
- Preheat oven to 400°F (200°C). Lightly grease a 12-cup muffin tin with nonstick spray or line with silicone muffin liners.
- In a large bowl, combine ground chicken, ranch seasoning, breadcrumbs, egg, milk, garlic powder, onion powder, salt, and pepper. Mix gently until just combined.
- Fold in 1/2 cup shredded cheddar cheese. Do not overmix.
- Divide the mixture evenly among the 12 muffin cups, filling each about 3/4 full. Press gently to shape.
- Sprinkle the remaining 1/2 cup cheddar cheese on top of each mini.
- Bake for 18–22 minutes, until cheese is melted and lightly browned and internal temperature reaches 165°F (74°C).
- Let minis rest in the pan for 5 minutes. Run a butter knife around the edges to loosen, then transfer to a plate or cooling rack.
- Garnish with fresh parsley if desired. Serve warm with your favorite sides or dipping sauce.
Notes
Don’t overmix the meat mixture for best texture. Use a cookie scoop for even portions. Let minis rest before removing from the pan to keep them intact. For gluten-free, use gluten-free breadcrumbs and check your ranch mix. For dairy-free, use vegan cheese and plant-based milk. These freeze and reheat well—perfect for meal prep.
Nutrition
- Serving Size: 1 mini meatloaf
- Calories: 160
- Sugar: 1
- Sodium: 400
- Fat: 8
- Saturated Fat: 3
- Carbohydrates: 5
- Protein: 15
Keywords: chicken meatloaf, ranch chicken, cheesy meatloaf minis, easy family dinner, meal prep, muffin tin meatloaf, kid friendly, freezer friendly, comfort food