The aroma of toasty marshmallows, gooey chocolate, and peanut butter swirling together in your kitchen? Pure magic. The first time I made these irresistible peanut butter s’mores cookie bars, I knew I had stumbled onto something that would disappear from the dessert table in minutes. You get that classic campfire flavor—without the sticky fingers or smoke in your eyes. And let’s be real, who can resist a dessert that looks like it was practically made for a Pinterest board?
Honestly, I started making peanut butter s’mores cookie bars when I needed a quick dessert for a last-minute family get-together. I had the usual pantry staples: peanut butter, graham crackers, chocolate chips, and a bag of marshmallows left over from a botched hot cocoa night. I just mixed everything up, pressed it in a pan, and popped it in the oven. What came out was a warm, gooey, chewy treat that my family begged me to make again (and again). It’s become my go-to for potlucks, birthday parties, and even late-night cravings when I just want something sweet and comforting.
These peanut butter s’mores cookie bars are perfect for anyone who wants a dessert that’s simple, fun, and guaranteed to get attention. If you’re tired of complicated recipes or just want a dessert that delivers every single time, this is it. I’ve tweaked and tested this recipe more times than I can count—sometimes with extra chocolate, other times with crunchy peanut butter—so you can trust these bars will turn out just right. Whether you’re baking for a crowd or just want to treat yourself (hey, no judgment), you’re going to fall in love with these bars. Let’s get baking!
Why You’ll Love This Recipe
- Quick & Easy: These peanut butter s’mores cookie bars come together in under 35 minutes. No special skills or fancy gadgets needed—just a bowl, a spoon, and a craving for something sweet.
- Simple Ingredients: You probably already have everything you need in your pantry. I love that I can whip these up without a grocery run!
- Perfect for Parties: Bring these to a potluck, birthday, or summer barbecue and watch them disappear. They’re always the talk of the dessert table.
- Crowd-Pleaser: Kids, adults, picky eaters—everyone loves these. The classic s’mores flavors with a peanut butter twist are irresistible. My friends always ask for the recipe!
- Unbelievably Delicious: The combo of soft, chewy cookie base, melty chocolate, and gooey marshmallows is out of this world. Top it all off with that peanut butter flavor and, wow—just wow.
What sets these peanut butter s’mores cookie bars apart from regular cookie bars? It’s the way the peanut butter brings everything together without overpowering the s’mores vibe. I blend the peanut butter right into the cookie dough, so every bite is soft and flavorful—not just the top layer. I’ve tried a lot of s’mores desserts, but none come close to the balance of salty, sweet, and gooey you get here. And honestly, they’re just fun to make! My kids love helping layer the ingredients and sneaking a few marshmallows while I’m not looking.
This isn’t just comfort food—it’s a memory-maker. It’s the kind of treat you serve when you want people to feel special. You know that feeling when everyone’s gathered around, laughing, and going back for seconds? That’s what these bars deliver. They’re simple, yes, but they’re also the dessert you’ll crave when you need a little sweetness in your day. I promise, you won’t regret making these.
What Ingredients You Will Need
This recipe uses just six main ingredients—most of which are probably sitting in your kitchen right now. Each one plays an important role in creating that classic peanut butter s’mores cookie bar taste and texture. Here’s what you’ll need (and a few tips to make them even better):
- Graham cracker crumbs (1 1/2 cups or about 120g) – These create that iconic s’mores flavor and a slightly crunchy base. You can crush whole crackers in a zip-top bag or use pre-crushed crumbs. I like to use Honey Maid for classic flavor, but any brand works.
- Creamy peanut butter (3/4 cup or 180g) – Brings a rich, nutty flavor and helps bind the dough together. I’ve tried both Jif and Skippy; both are great. Crunchy peanut butter adds a little texture if you want to shake things up.
- Unsalted butter (1/2 cup or 113g, melted) – Makes the bars soft and chewy. Salted butter is okay, but reduce added salt if you use it.
- Brown sugar (3/4 cup or 150g, packed) – Adds a caramel note and keeps the bars moist. Light or dark brown sugar both work; dark will be a bit richer.
- Mini marshmallows (1 1/2 cups or about 75g) – These melt into gooey pockets throughout the bars. I always save a handful to sprinkle on top for that classic s’mores look. If you only have regular-sized marshmallows, just chop them up.
- Chocolate chips (1 cup or 170g, semi-sweet or milk chocolate) – You can’t have s’mores without chocolate! I like to use Ghirardelli or Nestlé. For a fancier touch, try dark chocolate chunks.
Optional add-ins:
- Pinch of salt – If your peanut butter is unsalted, this helps balance the sweetness.
- Vanilla extract (1 tsp) – Adds a warm, bakery-style aroma. Not strictly necessary, but a nice touch.
Substitution tips:
- Swap in gluten-free graham crackers for a gluten-free version.
- Use almond or sunflower seed butter if you have peanut allergies in the crowd.
- Dairy-free butter and vegan chocolate make this recipe easy to adapt for special diets.
These ingredients are basic, but when you put them all together—wow, you get something special. If you’re feeling adventurous, throw in some chopped roasted peanuts for crunch, or a sprinkle of sea salt on top for that sweet-salty finish. This recipe really welcomes creativity!
Equipment Needed
- 8×8-inch (20x20cm) baking pan – This is the perfect size for thick, chewy bars. If you only have a 9×9-inch pan, reduce the baking time by a few minutes.
- Parchment paper or nonstick spray – For easy removal and less mess. I always line my pan with parchment—makes cleanup a breeze!
- Mixing bowl – Any medium to large bowl will do. If you’ve got a stand mixer, you can use that, but a sturdy spoon works just fine.
- Measuring cups and spoons – Accurate measurements really help these bars bake up perfectly. I recommend metal or sturdy plastic sets, but even the basic ones from the dollar store work in a pinch.
- Rubber spatula or wooden spoon – For mixing the dough and scraping every last bit into the pan. I’ve broken a few cheap spatulas over the years (oops), so a solid one is worth it.
- Knife or offset spatula – For cutting the bars once they’re cooled. A sharp knife dipped in warm water makes for cleaner edges.
If you don’t have parchment paper, just grease your pan really well. And if you’re baking for a crowd, you can double the recipe and use a 9×13-inch (23x33cm) pan—just watch the baking time. Honestly, as long as you have a pan and a mixing bowl, you’re set. I’ve even made these at a friend’s house with nothing but a fork and a cake pan, and they still turned out awesome!
How to Make Peanut Butter Smores Cookie Bars
- Prep your pan and oven: Preheat your oven to 350°F (175°C). Line an 8×8-inch (20x20cm) baking pan with parchment paper, leaving some overhang for easy lifting. If you’re using nonstick spray, coat the pan well. This step keeps your bars from sticking and makes cleanup so much easier.
- Mix the wet ingredients: In a large mixing bowl, combine 3/4 cup (180g) creamy peanut butter, 1/2 cup (113g) melted unsalted butter, and 3/4 cup (150g) packed brown sugar. Stir until smooth and glossy. If you like, add 1 teaspoon vanilla extract here. The mixture should smell nutty and sweet—don’t be tempted to eat it all now!
- Add the graham cracker crumbs: Pour in 1 1/2 cups (120g) graham cracker crumbs. Stir until the mixture comes together and looks like a thick dough. If it seems too dry, add a tablespoon of milk or water. Too sticky? Sprinkle in a few extra crumbs.
- Fold in the goodies: Gently fold in 1 cup (170g) chocolate chips and 1 cup (50g) mini marshmallows. Save the remaining 1/2 cup (25g) mini marshmallows to sprinkle on top later. If you’re adding nuts or extra chocolate, toss them in now.
- Press into the pan: Scoop the dough into your prepared pan. Use a spatula or your fingers (a little messy, but fun) to press it evenly. Aim for an even layer, but don’t stress if it’s not perfect—rustic is part of the charm.
- Top with extra marshmallows: Sprinkle the reserved mini marshmallows evenly over the top. Gently press them into the surface so they stick during baking.
- Bake: Place the pan in the oven and bake for 18-22 minutes. The edges should look golden and set, but the center will still be slightly soft. The marshmallows on top should be puffed and just starting to brown. Don’t overbake—these firm up as they cool.
- Cool completely: Let the bars cool in the pan for at least 30 minutes before slicing. If you try to cut them while warm, they’ll be extra gooey (not a bad thing, just a bit messy). For neater squares, chill in the fridge for 20 minutes.
- Slice and serve: Lift the bars out using the parchment overhang. Cut into squares with a sharp knife. If you want super-clean edges, wipe the knife between cuts. Admire those gorgeous layers before digging in!
Troubleshooting tips: If your bars are too crumbly, try adding a tablespoon of extra melted butter next time. Too gooey? Bake for 2-3 minutes longer, but remember—they’ll set as they cool. If your marshmallows brown too quickly, tent the pan loosely with foil during the last few minutes of baking.
Personal tip: I sometimes use a kitchen torch to toast the top marshmallows after baking for extra campfire vibes. Just keep a close eye so they don’t scorch!
Cooking Tips & Techniques
After baking these peanut butter s’mores cookie bars more times than I can count, I’ve picked up a few tricks that make the process easier and the results more consistent. Here’s what I’ve learned (sometimes the hard way!):
- Don’t overmix the dough: Stir until just combined—overmixing can make the bars dense instead of chewy.
- Watch the marshmallows: They can go from perfectly golden to burnt in a flash. I check my bars at the 15-minute mark and keep a close eye for the last few minutes.
- Chill for clean slices: If you want perfectly square bars (especially for parties or photos), let them cool completely and chill in the fridge before slicing. Warm bars are gooier and messier (but honestly delicious either way).
- Layer your add-ins: I like to add a few chocolate chips and marshmallows on top right before baking—they look gorgeous and give you those lovely toasted spots.
- Use parchment paper for easy removal: Skipping this step means you might be scraping sticky marshmallow bits out of the pan later. Trust me, I’ve learned this the hard way!
One time I forgot to save marshmallows for the topping, and while the bars still tasted amazing, they didn’t have that classic s’mores look. Now I always set them aside first so I don’t forget! If your oven runs hot, check a few minutes early—overbaked bars aren’t nearly as gooey or soft.
If you’re multitasking (hey, who isn’t?), you can mix the dough ahead of time and keep it in the fridge for up to a day. Just let it soften a bit before pressing into the pan. And if you’re making a double batch, rotate the pan halfway through baking for even browning.
Variations & Adaptations
One of my favorite things about peanut butter s’mores cookie bars is how easy they are to customize. Here are a few fun twists and tweaks:
- Gluten-Free Version: Use gluten-free graham crackers and double-check your chocolate chips and marshmallows are certified gluten-free. The texture is still awesome!
- Nut-Free Swap: Substitute sunflower seed butter or Wowbutter for peanut butter to make these safe for nut-free households. I’ve baked this way for school parties, and nobody notices the difference.
- Double Chocolate Dream: Add 2 tablespoons unsweetened cocoa powder to the dough and use dark chocolate chunks for a more intense chocolate flavor.
- Holiday Twist: In winter, mix in a pinch of cinnamon or use peppermint chocolate chips for a seasonal flavor. For summer parties, add a handful of chopped strawberries on top before baking.
- Vegan Version: Use plant-based butter, vegan marshmallows, and dairy-free chocolate chips. The bars still bake up gooey and delicious!
Personally, I love swapping in crunchy peanut butter for extra texture, or sprinkling a little flaky sea salt on top before baking. The salty-sweet combo is amazing. Don’t be afraid to experiment—these bars are super forgiving and fun to make your own.
Serving & Storage Suggestions
These peanut butter s’mores cookie bars are best served at room temperature, where the marshmallows are soft and the chocolate is perfectly melty. I love piling them on a platter for parties, or serving them warm with a scoop of vanilla ice cream (seriously, try it!).
Pair them with cold milk, hot chocolate, or even coffee for a cozy treat. For a party, cut them into small squares and stick toothpicks in for easy grabbing—the layered look is so eye-catching.
Store leftovers in an airtight container at room temperature for up to 4 days. If your kitchen is warm, pop them in the fridge—they’ll stay chewy, and the flavors actually deepen overnight. To freeze, wrap tightly in plastic and foil, and keep for up to 2 months. Thaw at room temp or zap in the microwave for a few seconds to bring back that gooey goodness.
Reheat bars gently in the microwave (about 10-15 seconds per bar) for a warm, melty treat. The marshmallows get soft again, just like fresh-baked!
Nutritional Information & Benefits
One peanut butter s’mores cookie bar (based on 16 bars per pan) has about 210 calories, 10g fat, 26g carbs, and 3g protein. They’re definitely a treat, but not over-the-top for a dessert.
Peanut butter adds a bit of plant-based protein and healthy fats, while graham crackers provide whole grains if you use whole wheat. If you go with dark chocolate, you’ll get some antioxidants, too. These bars can be made gluten-free or dairy-free with simple swaps, and are naturally egg-free.
Just a heads-up: they do contain peanuts, wheat, and dairy (unless substituted). As always, check your ingredients if allergies are a concern. For me, dessert is about balance—and these bars fit right into my “treat yourself, but make it homemade” philosophy!
Conclusion
If you’re searching for an easy, crowd-pleasing dessert, these peanut butter s’mores cookie bars are a must-try. They’re quick, use basic ingredients, and always get rave reviews—what more could you want? You can make them your own with swaps and add-ins, and they taste just as good the next day (if they last that long).
Honestly, I love this recipe because it brings back all the best parts of summer campfires, but with way less mess. It’s the kind of treat that makes people smile and ask for seconds. Give them a try, then let me know how you customize yours! Share your creations, leave a comment, or tag me if you post your bars online—I can’t wait to see your take on this classic party treat. Happy baking, and don’t forget to sneak a few marshmallows for yourself while you’re at it!
Frequently Asked Questions
Can I make these peanut butter s’mores cookie bars ahead of time?
Absolutely! You can bake them a day in advance and store in an airtight container. The flavors even get better as they sit, and they stay chewy for several days.
Can I use crunchy peanut butter instead of creamy?
Yes, crunchy peanut butter adds a nice texture and a little extra nuttiness. Both work well, so use what you have or what you prefer.
What’s the best way to cut clean squares?
Let the bars cool completely, then chill in the fridge for 20-30 minutes. Use a sharp knife, and wipe it clean between cuts for tidy edges.
Can I double the recipe for a bigger crowd?
Definitely! Just double all the ingredients and bake in a 9×13-inch (23x33cm) pan. Add a few minutes to the baking time and keep an eye on the marshmallows so they don’t brown too much.
Can I use regular-sized marshmallows?
If mini marshmallows aren’t available, chop up regular ones into smaller pieces. They’ll melt and brown just the same!
Pin This Recipe!
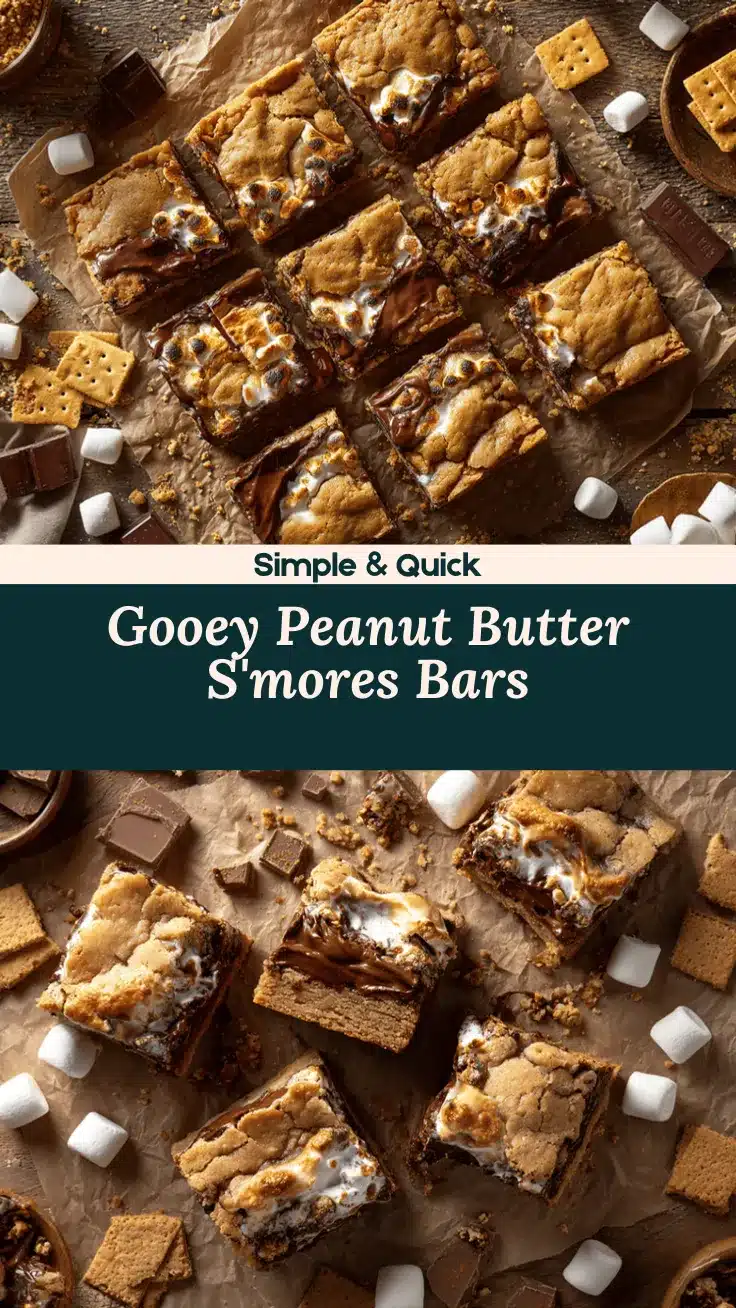
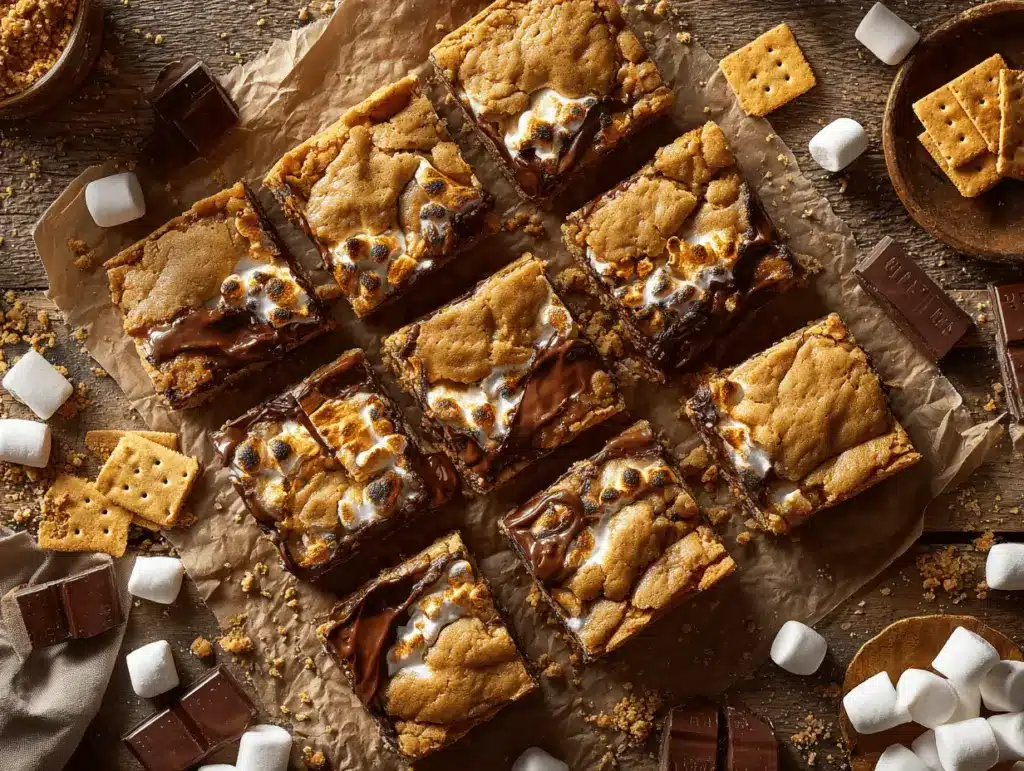
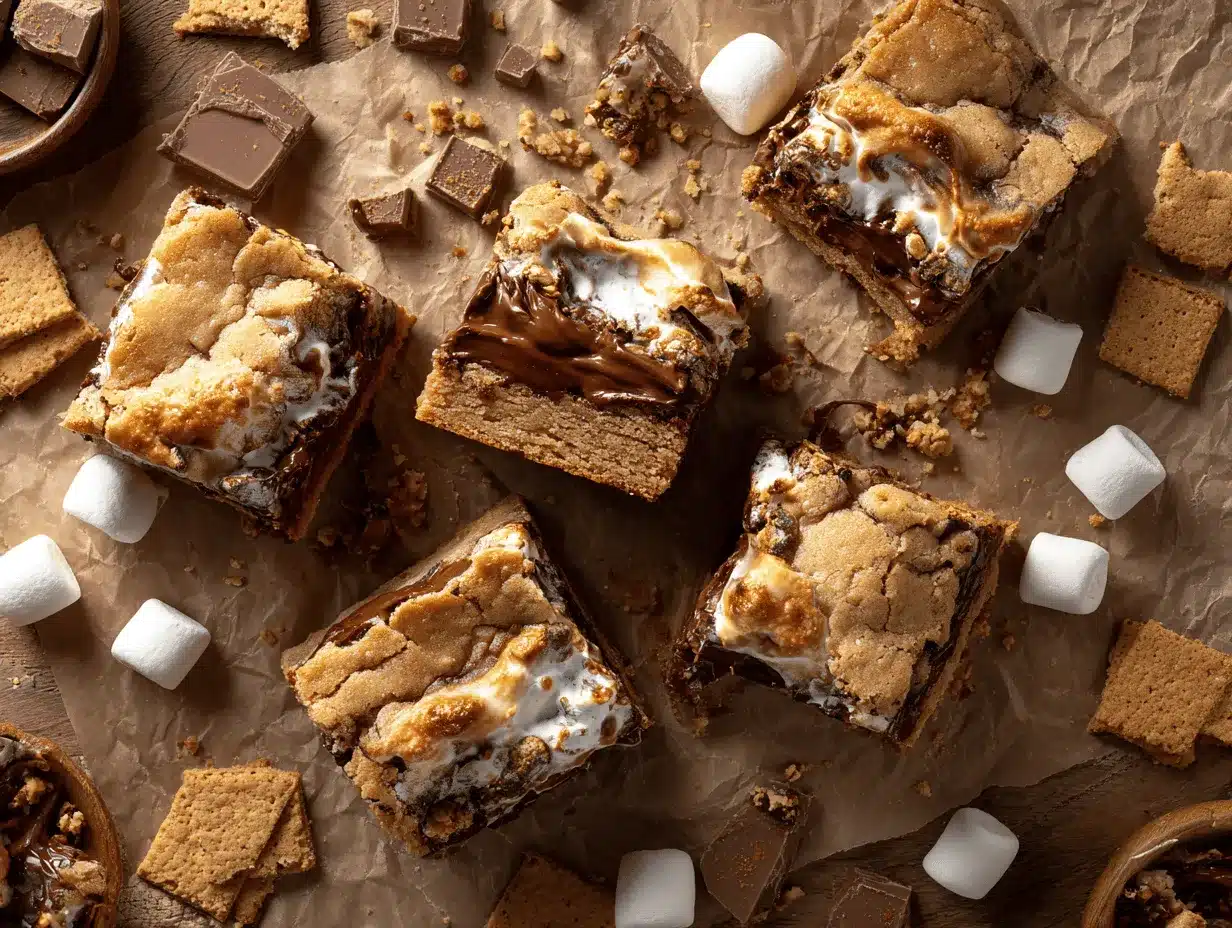
Peanut Butter Smores Cookie Bars

These easy peanut butter s’mores cookie bars combine classic campfire flavors—gooey marshmallows, melty chocolate, and peanut butter—in a chewy, crowd-pleasing dessert. With just six main ingredients and minimal prep, they’re perfect for parties, potlucks, or a quick homemade treat.
- Prep Time: 10 minutes
- Cook Time: 20 minutes
- Total Time: 35 minutes
- Yield: 16 bars 1x
- Category: Dessert
- Cuisine: American
Ingredients
- 1 1/2 cups graham cracker crumbs (about 120g)
- 3/4 cup creamy peanut butter (about 180g)
- 1/2 cup unsalted butter, melted (about 113g)
- 3/4 cup brown sugar, packed (about 150g)
- 1 1/2 cups mini marshmallows (about 75g, divided)
- 1 cup chocolate chips (semi-sweet or milk, about 170g)
- Optional: pinch of salt (if using unsalted peanut butter)
- Optional: 1 teaspoon vanilla extract
Instructions
- Preheat oven to 350°F (175°C). Line an 8×8-inch baking pan with parchment paper or coat with nonstick spray.
- In a large mixing bowl, combine peanut butter, melted butter, and brown sugar. Stir until smooth and glossy. Add vanilla extract if using.
- Add graham cracker crumbs and stir until a thick dough forms. If too dry, add a tablespoon of milk or water; if too sticky, add more crumbs.
- Fold in chocolate chips and 1 cup mini marshmallows. Reserve the remaining 1/2 cup marshmallows for topping.
- Press dough evenly into the prepared pan.
- Sprinkle reserved mini marshmallows on top and gently press them into the surface.
- Bake for 18-22 minutes, until edges are golden and set but center is still slightly soft. Marshmallows on top should be puffed and just starting to brown.
- Cool in the pan for at least 30 minutes before slicing. For cleaner cuts, chill in the fridge for 20 minutes.
- Lift bars out using parchment overhang and cut into squares. Serve and enjoy!
Notes
For gluten-free bars, use gluten-free graham crackers. Substitute sunflower seed butter for nut-free, or use vegan butter and chocolate for dairy-free/vegan. Don’t overbake—bars firm up as they cool. Chill before slicing for clean edges. Top with extra chocolate chips or a sprinkle of sea salt for added flavor.
Nutrition
- Serving Size: 1 bar (1/16 of pan)
- Calories: 210
- Sugar: 16
- Sodium: 90
- Fat: 10
- Saturated Fat: 4
- Carbohydrates: 26
- Fiber: 1
- Protein: 3
Keywords: peanut butter, s'mores, cookie bars, dessert, easy, party, marshmallow, chocolate, potluck, summer, baking