“You’ve got to try the dip,” my coworker insisted, sliding a container across the breakroom table with a grin that promised something better than your average party snack. Honestly, I was skeptical—seven layers? It sounded like too much fuss for a work potluck. But as soon as I scooped up that first bite of the flavorful seven layer taco dip, I was hooked. The creamy, spicy, crunchy mix knocked out my usual go-to chips and salsa combo in one fell swoop.
That dip has been my secret weapon ever since—whether it’s an impromptu game night or a last-minute get-together. The layers come together so easily, yet the flavors feel like they took hours to perfect. I’ve made it more times than I can count (probably three times in a single week during one obsession phase), and it’s always the first thing to disappear. What’s wild is how the simple ingredients—stuff most folks have on hand—join up to create a dip that’s both comforting and exciting. It’s become that quiet staple I rely on when I want to impress without the stress.
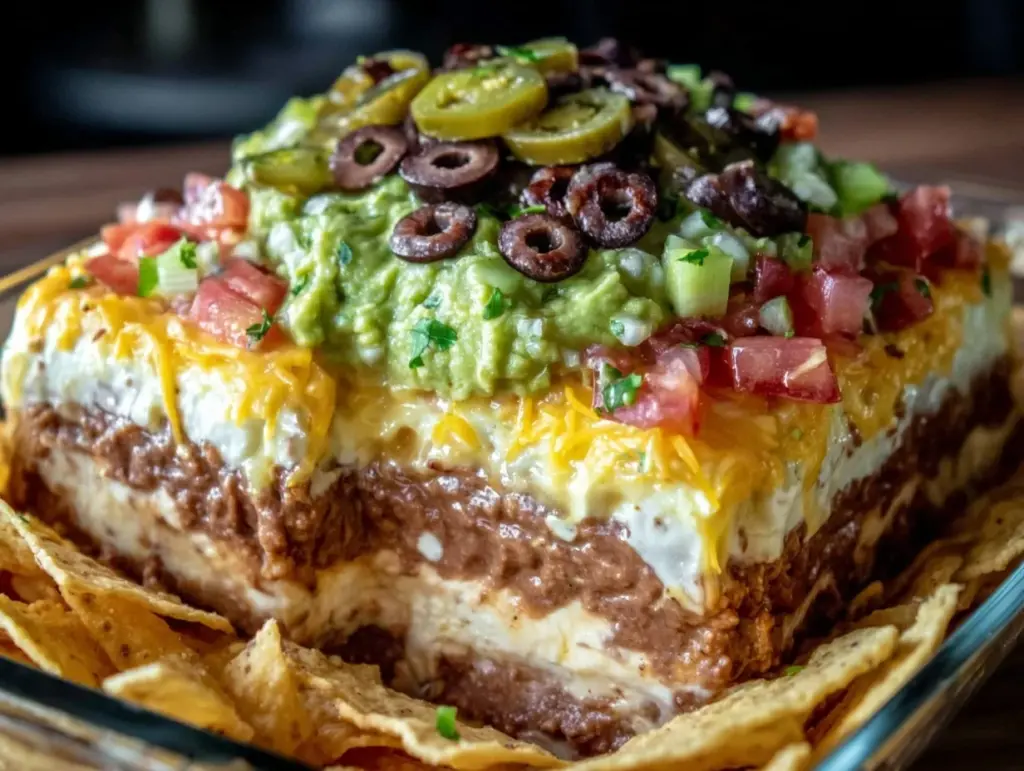
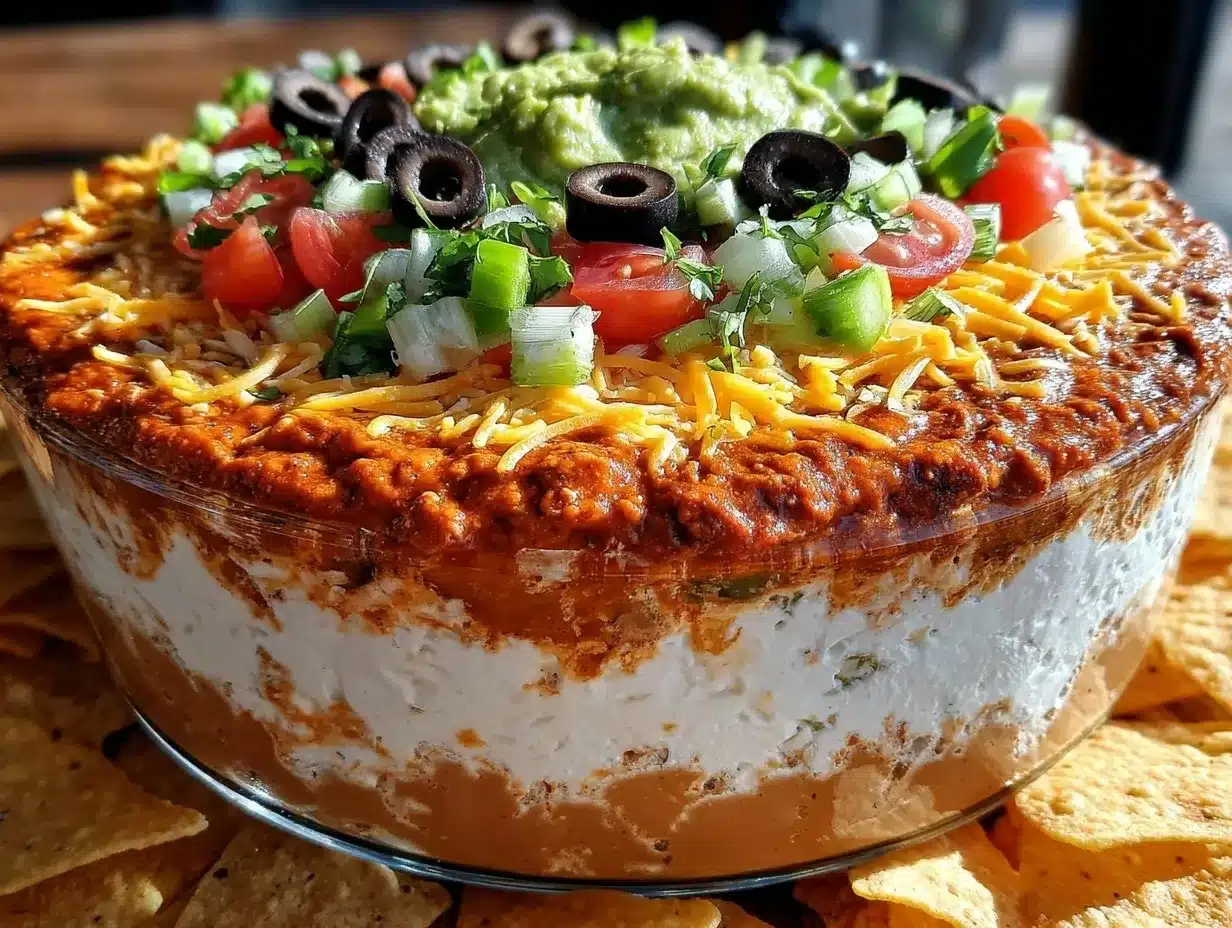
There’s something about the way the cool sour cream and creamy refried beans balance the zing of salsa, the richness of melted cheese, and the fresh crunch of veggies that makes this recipe a little celebration on its own. Plus, no one ever guesses how easy it was to put together. That’s the kind of recipe that sticks with you, you know? I keep it in my back pocket for when I want the party to start—without all the fuss.
Why You’ll Love This Recipe
Having tested and tweaked this recipe over countless gatherings, I can say this flavorful seven layer taco dip stands out for so many reasons. It’s not just a dip; it’s a crowd magnet that’s both effortless and reliable.
- Quick & Easy: Ready in under 20 minutes, making it perfect when you’re short on time but want big flavor.
- Simple Ingredients: No exotic stuff here—just pantry staples and fresh veggies you probably already have.
- Perfect for Parties: Whether it’s a casual potluck, game day, or a festive holiday spread, this dip fits right in.
- Crowd-Pleaser: Kids, adults, picky eaters—everyone keeps coming back for more.
- Unbelievably Delicious: The layers combine creamy, spicy, tangy, and crunchy textures that keep your taste buds guessing.
This isn’t just any taco dip. The secret is in the layering technique and carefully balanced seasoning. For instance, I like to gently blend a little taco seasoning into the sour cream for a subtle kick without overpowering the other layers. And the choice of cheese? Sharp cheddar mixed with a milder Monterey Jack gives you that perfect melty, gooey texture that just melts in your mouth.
It’s the kind of recipe where the first bite makes you close your eyes and savor, while the next one pulls you right back in. For those who want a little twist, you can swap out refried beans for black beans or add a layer of seasoned ground beef. Honestly, that flexibility is part of what makes it so special—it’s adaptable but always hits that comfort food sweet spot.
What Ingredients You Will Need
This flavorful seven layer taco dip uses simple, wholesome ingredients to deliver bold flavor and satisfying texture without the fuss. Most are pantry staples, and you can easily swap fresh or canned based on what you have around.
- Refried beans (about 1 cup) – Choose canned for convenience; I like to use low-sodium varieties for a less salty dip.
- Sour cream (1 cup) – Full-fat gives richness, but Greek yogurt works for a tangier, healthier option.
- Taco seasoning (1 to 2 teaspoons) – I prefer homemade or a trusted brand like McCormick for that authentic spice blend.
- Salsa (1 cup) – Fresh or store-bought, chunky salsa adds great texture; mild or medium based on your heat tolerance.
- Shredded cheddar cheese (1 cup) – Sharp cheddar adds bold flavor, but a mix with Monterey Jack creates a smoother melt.
- Diced tomatoes (1/2 cup) – Fresh, seeded and drained to avoid watery dip.
- Sliced black olives (1/4 cup) – Adds a salty, briny contrast; optional but recommended.
- Chopped green onions (1/4 cup) – Freshness and a bit of bite to finish.
- Shredded lettuce (1 cup) – Crisp iceberg or romaine, finely shredded for a fresh crunch.
- Jalapeño slices (to taste) – Optional, for those who want a little heat kick.
For substitutions: Use black beans instead of refried beans for a chunkier texture. Swap sour cream with a non-dairy alternative to keep it vegan-friendly. If fresh tomatoes aren’t in season, canned diced tomatoes, drained well, can work fine. When I’m feeling fancy, I sometimes add a sprinkle of fresh cilantro or a squeeze of lime over the top to brighten everything up.
Equipment Needed
- 9-inch glass or ceramic pie dish: Ideal for showing off those beautiful layers. If you don’t have one, a shallow baking dish or even a clear plastic container works.
- Mixing bowls: A couple of medium bowls to mix your sour cream with taco seasoning and to stir the beans if desired.
- Spoon or spatula: For spreading each layer evenly. I prefer a small offset spatula for smooth, neat layers.
- Knife and cutting board: For chopping veggies like tomatoes, green onions, and jalapeños.
- Measuring cups and spoons: To keep the seasoning balanced and consistent every time.
Nothing fancy or specialized here—this recipe fits perfectly into any kitchen setup. I’ve even prepped it in a small dorm kitchenette with just a bowl, spoon, and plastic container. If you want to keep your layers extra crisp, chill the dish before serving. Also, glass bowls help you see the layers clearly, which always gets compliments.
Preparation Method
- Mix sour cream and taco seasoning: In a medium bowl, stir 1 cup of sour cream with 1 to 2 teaspoons of taco seasoning until evenly combined. This will add a subtle spice to the creamy layer. (About 3 minutes)
- Prepare the bean layer: If you like, warm 1 cup of refried beans slightly (about 30 seconds in the microwave) to spread more easily. Then, spread an even layer at the bottom of your 9-inch dish. (2 minutes)
- Spread the seasoned sour cream: Gently spoon the seasoned sour cream mixture over the beans, smoothing it out with a spatula to cover completely. (2 minutes)
- Add salsa: Spoon 1 cup of salsa evenly over the sour cream layer. Choose a chunky salsa to add texture, but be sure to drain any excess liquid first to avoid sogginess. (2 minutes)
- Layer shredded cheese: Sprinkle 1 cup of shredded cheddar (or cheddar/Monterey Jack blend) evenly over the salsa layer. The cheese melts slightly from the warmth of the layers beneath, adding gooey goodness. (1 minute)
- Top with fresh veggies: Evenly scatter 1/2 cup diced tomatoes, 1/4 cup sliced black olives, 1/4 cup chopped green onions, and 1 cup shredded lettuce over the cheese. This adds fresh crunch and color. (5 minutes)
- Add optional jalapeños: For some heat, arrange thin slices of jalapeño over the top. Adjust to your heat preference. (1 minute)
- Chill before serving: Cover with plastic wrap and refrigerate for at least 30 minutes to let flavors meld and layers set. (30 minutes or up to overnight)
- Serve with chips: Use sturdy tortilla chips to scoop and enjoy the full range of flavors and textures in every bite.
Pro tip: When layering, don’t press down too hard—let each layer stay distinct for a pretty presentation. Also, warming the beans just a bit makes spreading easier but avoid overheating as it can dry out. If you’re short on time, assembling it the night before lets the dip deepen in flavor and makes it even better.
Cooking Tips & Techniques
One thing I learned early on is that layering is king here. You want each layer to be visible and balanced so every bite gets some of everything. Using an offset spatula helps spread layers evenly without mixing them.
Drain your salsa and diced tomatoes thoroughly; watery toppings can turn your dip into a soggy mess if you’re not careful. Also, when chopping green onions and lettuce, aim for small, even pieces so they distribute well and don’t overwhelm a single scoop.
A common slip is skipping the chill time. Honestly, if you serve this right after assembling, the layers haven’t had a chance to settle and meld, so the flavors don’t sing as much. Plan ahead and give it at least 30 minutes in the fridge.
I once tried adding all the veggies into the salsa layer instead of as a top layer—big mistake. It made the salsa watery and the whole dip too soft. Keep the fresh veggies on top to preserve crunch and add that satisfying texture contrast.
When multitasking, I like prepping the veggies while the beans warm, then mixing the sour cream and seasoning while layering the beans. It keeps things moving smoothly and avoids that last-minute rush.
Variations & Adaptations
This dip is super adaptable, which is part of why it’s so popular with different crowds.
- Meat Lover’s Version: Add a cooked, seasoned ground beef or shredded chicken layer right on top of the refried beans for extra protein and heartiness.
- Vegetarian/Vegan: Use black beans instead of refried beans, swap sour cream with dairy-free coconut or cashew-based sour cream, and use vegan cheese.
- Low-Carb: Use a layer of guacamole instead of beans, and serve with sliced veggies or low-carb chips instead of tortilla chips.
- Spicy Kick: Mix diced jalapeños into the salsa layer, or sprinkle cayenne into the sour cream mixture for added heat.
- Seasonal Twist: In summer, swap diced tomatoes for fresh mango or pineapple chunks for a sweet, bright contrast.
Personally, I’ve tried a version with a layer of roasted corn and black bean salsa—turned out fantastic and added a lovely smoky sweetness. Feel free to experiment and make it your own.
Serving & Storage Suggestions
Serve this dip chilled or at room temperature with sturdy tortilla chips that can hold up to the layers without breaking. For parties, arrange the chips around the dish on a large platter for easy access.
It pairs beautifully with cold beverages like a crisp margarita or an ice-cold soda. For a fuller spread, serve alongside herb roasted chicken thighs or a fresh salsa salad.
Store leftovers in an airtight container in the refrigerator for up to 3 days. The flavors deepen but the lettuce layer may wilt; if possible, add fresh lettuce just before serving again.
Reheat is not recommended as it changes the texture, but the dip is best enjoyed cold or at room temperature. If you want to prep in advance, assemble all layers except lettuce and add it last minute for that fresh crunch.
Nutritional Information & Benefits
Per serving (about 1/8 of the dish), this dip provides approximately:
| Calories | 220 |
|---|---|
| Protein | 10g |
| Fat | 12g |
| Carbohydrates | 18g |
| Fiber | 5g |
Key ingredients like black or refried beans offer fiber and protein, making it more filling than your average dip. The fresh veggies contribute vitamins and antioxidants, especially vitamin C from tomatoes and green onions.
If you swap sour cream for Greek yogurt, you get extra protein and probiotics. This recipe can easily fit into gluten-free diets by serving with gluten-free chips. However, it contains dairy and sometimes olives, which are common allergens, so adjust accordingly.
From my experience, this dip strikes a nice balance between indulgence and nutrition, making it a satisfying choice that doesn’t leave you feeling weighed down.
Conclusion
The flavorful seven layer taco dip is one of those recipes that’s easy to make but hard to forget. It’s a reliable win for any gathering, offering layers of taste and texture that invite everyone to dig in and enjoy themselves.
Feel free to play with the layers and ingredients to suit your taste—this dip loves a little personalization. Whether you’re aiming for classic comfort or a bold twist, it adapts beautifully.
Personally, I keep coming back to it because it’s both a nostalgic reminder of fun social moments and a simple way to bring people together without stress. If you give it a try, I’d love to hear how you made it your own or what crowd it won over!
FAQs About Flavorful Seven Layer Taco Dip
Can I prepare the seven layer taco dip ahead of time?
Absolutely! Assemble it a few hours or even the night before, just add the lettuce fresh before serving to keep it crisp.
What can I use instead of refried beans?
Black beans or pinto beans work well if you want a chunkier texture or a lighter dip.
How spicy is this dip?
The heat level depends on your salsa and jalapeño choice. You can keep it mild or add extra spice by mixing in cayenne or hot sauce.
Is this recipe gluten-free?
Yes, as long as you serve with gluten-free chips and check taco seasoning ingredients, it’s naturally gluten-free.
Can I freeze leftover taco dip?
Freezing isn’t recommended because the fresh veggies and dairy layers don’t thaw well and can change texture.
For more easy crowd-pleasing recipes, you might enjoy the creamy one-pot vodka rigatoni with Italian sausage or the savory burst cherry tomato brown butter pasta, both perfect for feeding a hungry group.
Pin This Recipe!

Flavorful Seven Layer Taco Dip

A quick and easy seven layer taco dip that’s a crowd-pleaser for parties, combining creamy, spicy, tangy, and crunchy textures with simple pantry ingredients.
- Prep Time: 15 minutes
- Cook Time: 0 minutes
- Total Time: 45 minutes
- Yield: 8 servings 1x
- Category: Appetizer
- Cuisine: Mexican
Ingredients
- 1 cup refried beans (low-sodium preferred)
- 1 cup sour cream (full-fat or Greek yogurt as a substitute)
- 1 to 2 teaspoons taco seasoning
- 1 cup salsa (chunky, mild or medium heat)
- 1 cup shredded cheddar cheese (or cheddar/Monterey Jack blend)
- 1/2 cup diced tomatoes (seeded and drained)
- 1/4 cup sliced black olives (optional but recommended)
- 1/4 cup chopped green onions
- 1 cup shredded lettuce (iceberg or romaine)
- Jalapeño slices to taste (optional)
Instructions
- Mix sour cream and taco seasoning in a medium bowl until evenly combined.
- Warm refried beans slightly (about 30 seconds in microwave) and spread evenly in the bottom of a 9-inch dish.
- Spread the seasoned sour cream mixture gently over the beans layer.
- Spoon salsa evenly over the sour cream layer, draining excess liquid first.
- Sprinkle shredded cheddar cheese evenly over the salsa layer.
- Top with diced tomatoes, sliced black olives, chopped green onions, and shredded lettuce.
- Add jalapeño slices on top if desired.
- Cover with plastic wrap and refrigerate for at least 30 minutes to let flavors meld and layers set.
- Serve chilled or at room temperature with sturdy tortilla chips.
Notes
Do not press down layers to keep them distinct. Warm beans slightly for easier spreading but avoid overheating. Drain salsa and diced tomatoes well to prevent sogginess. Chill at least 30 minutes before serving for best flavor and texture. Assemble the night before and add lettuce fresh for crispness. Can substitute black beans for refried beans or add seasoned ground beef for a meat version.
Nutrition
- Serving Size: About 1/8 of the dis
- Calories: 220
- Fat: 12
- Carbohydrates: 18
- Fiber: 5
- Protein: 10
Keywords: seven layer dip, taco dip, party dip, easy dip, crowd-pleaser, Mexican appetizer, layered dip


