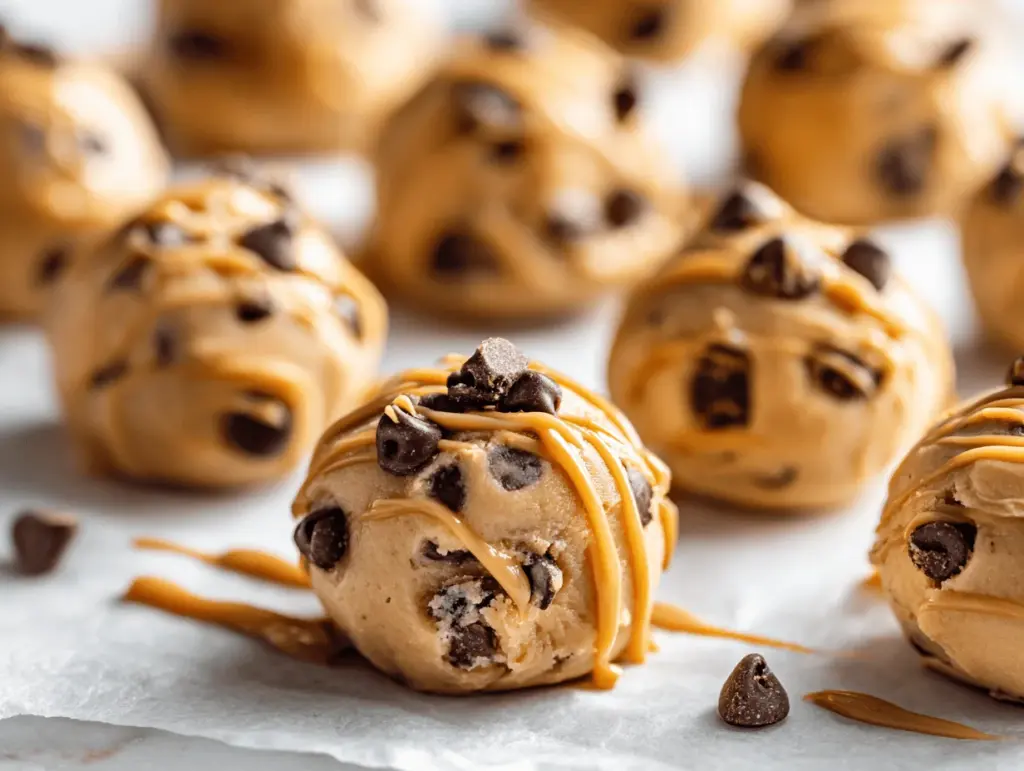
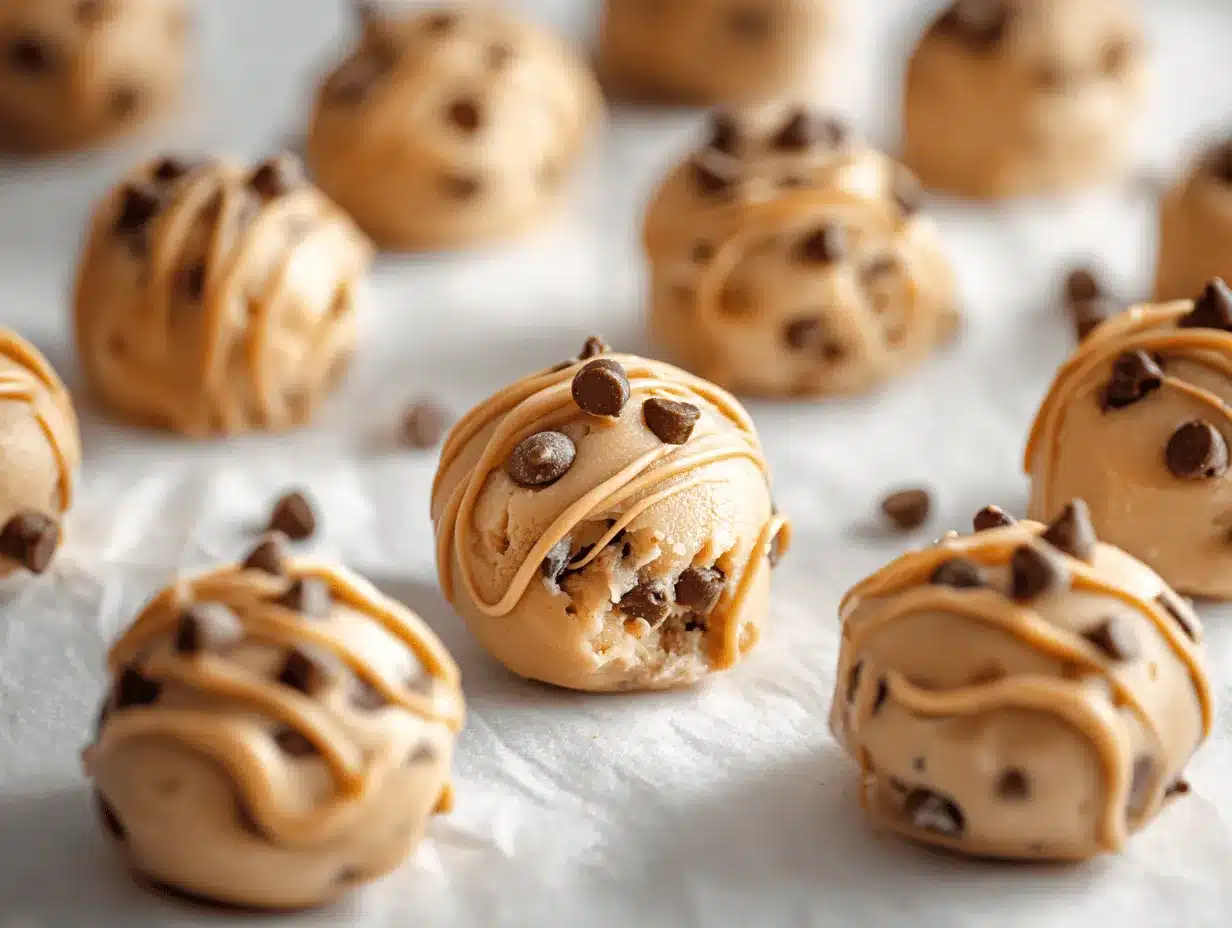
The first time I bit into one of these frozen peanut butter yogurt bites, it was like a mini ice cream party in my mouth—creamy, nutty, just the right amount of sweet, and gone way too fast! There’s something downright magical about the way smooth peanut butter swirls with tangy Greek yogurt and a drizzle of honey. I’ll never forget making these with my daughter on a hot summer afternoon; we both ended up sneaking “just one more” before they were even fully frozen.
Honestly, frozen peanut butter yogurt bites are the kind of treat that makes you feel like you’re getting away with something—indulgent flavor, zero guilt. I started making them when I needed quick, high-protein snacks to keep my energy up between work calls. Now, they’re a permanent staple in my freezer. Whether you need a grab-and-go breakfast, a healthy sweet treat for the kids, or that little something after dinner that doesn’t wreck your healthy eating goals, these bites seriously deliver.
You’ll love the simplicity, too. No fancy equipment, no weird ingredients—just wholesome stuff you probably already have. As a long-time recipe tinkerer, I’ve tested every combo imaginable (crunchy peanut butter, chocolate chips, even a pinch of sea salt), and I always come back to this reliable, crowd-pleasing version. If you’ve been hunting for a snack that’s easy, healthy, and totally addictive, frozen peanut butter yogurt bites are about to become your new obsession.
Why You’ll Love This Recipe
- Quick & Easy: You can whip up a batch in just 10 minutes (plus freeze time). No oven, no fuss—just mix, scoop, and freeze.
- Simple Ingredients: Everything you need is probably in your kitchen right now. Greek yogurt, peanut butter, honey (or maple syrup), and a sprinkle of chocolate chips if you’re feeling fancy.
- Perfect for Any Occasion: These bites are awesome for after-school snacks, post-workout energy, summer parties, or even as a light dessert after dinner.
- Crowd-Pleaser: Every time I serve these, both kids and adults go wild for them. I’ve brought them to potlucks and watched them disappear!
- Unbelievably Delicious: You get creamy, nutty, and just-sweet-enough in every bite. Honestly, if you love peanut butter cups or frozen yogurt, these are basically the lovechild of both.
This recipe stands out because of its smooth, rich texture—thanks to blending the yogurt and peanut butter together until silky. I’ve tried skipping this step, but trust me, a quick blend is worth it for that melt-in-your-mouth creaminess. I also love that you can customize: swirl in a bit of cocoa powder for chocolate lovers, or top with crushed pretzels for a salty crunch.
What really gets me is how these little bites manage to feel indulgent and wholesome at the same time. They’re packed with protein, naturally sweetened, and totally free from the junk you find in store-bought treats. You know, sometimes you just want a snack that makes you smile without thinking twice about it. These frozen peanut butter yogurt bites are exactly that—comforting, craveable, and always a hit!
What Ingredients You Will Need
This recipe uses simple, wholesome ingredients that come together for a crave-worthy frozen treat—no hard-to-find stuff, and tons of room to play around if you’re feeling creative.
- Greek yogurt: Plain, whole-milk Greek yogurt is my favorite for rich, creamy texture (2% or nonfat work too, but you’ll get a tangier, slightly icier bite). Use your favorite brand—I love FAGE or Chobani for consistency.
- Natural peanut butter: Go for the creamy, unsweetened variety—just peanuts and salt. If your peanut butter is super thick, warm it a bit for easier mixing. Crunchy works if you want texture!
- Honey or maple syrup: I usually grab honey for a classic flavor, but maple syrup is perfect for a vegan version or if you want a deeper sweetness. Just 1-2 tablespoons brings it all together.
- Vanilla extract: A splash of vanilla adds warmth and rounds out the flavors. You could skip it, but honestly, it makes everything taste like dessert.
- Mini chocolate chips (optional): Sprinkle a few on top or fold them in for chocolatey bites—just don’t overdo it or they’ll make the bites crumbly. I use Enjoy Life for a dairy-free option.
- Pinch of sea salt (optional): Especially good if your peanut butter is unsalted. Just a tiny bit makes the sweet and salty flavor pop.
Ingredient Substitutions & Tips:
- For a nut-free version, swap sunflower seed butter or tahini for peanut butter (the flavor changes, but still yummy).
- Any thick, dairy-free yogurt (like coconut or almond yogurt) works if you want these bites vegan or lactose-free.
- If you’re out of honey or maple syrup, a spoonful of agave or brown rice syrup will do the trick.
- Mix up the add-ins: chopped nuts, shredded coconut, dried cranberries, or even a dusting of cinnamon for extra flair.
All in all, these ingredients are everyday staples at my house, and I bet they are for you, too. The best part? You can swap and experiment without messing up the recipe—it’s super forgiving!
Equipment Needed
- Mixing bowl: Any medium bowl will do—glass or stainless steel works best for easy cleanup.
- Silicone spatula or spoon: For stirring everything together. I love silicone because it scrapes the bowl clean (less waste, more bites!).
- Mini muffin tin or silicone molds: I’m obsessed with these for perfectly shaped bites, but you can use a standard ice cube tray or even just dollop onto a lined baking sheet if you don’t have molds.
- Measuring spoons and cups: For accurate amounts. I usually eyeball a bit, but if you’re new to the recipe, measure for the best results.
- Parchment paper (optional): If you’re free-forming the bites on a tray, parchment keeps them from sticking. Trust me, you’ll thank yourself later.
- Freezer-safe container: To store the finished bites. I use a glass container with a snap lid so they don’t pick up freezer smells.
If you don’t have a silicone mold, don’t stress—ice cube trays or even mini cupcake liners work just fine. And for cleaning, soak your mixing bowl right after making the bites (peanut butter + yogurt can be stubborn if it dries!). If you’re just starting out, don’t feel like you need fancy baking tools; I made these for years with nothing but a spoon and a regular muffin tin.
Preparation Method
-
Gather your ingredients and gear.
You’ll need 1 cup (240g) plain Greek yogurt, 1/2 cup (125g) natural peanut butter, 2 tablespoons (30ml) honey or maple syrup, 1 teaspoon (5ml) vanilla extract, and a handful of mini chocolate chips if you like. Get your mixing bowl, spatula, and mini muffin tin or silicone mold ready. -
Mix the yogurt and peanut butter.
In the bowl, combine Greek yogurt and peanut butter. Stir with a silicone spatula until completely smooth—no streaks of peanut butter or lumps of yogurt. (Tip: If your peanut butter is stiff, microwave it for 10–15 seconds to soften.) -
Add honey and vanilla.
Pour in honey (or maple syrup) and vanilla extract. Stir again until everything is evenly combined. The mixture should be creamy and slightly thick. Taste and add a pinch of salt if you want to balance the sweetness. -
Fold in chocolate chips (optional).
If you’re using chocolate chips or any other mix-ins, gently fold them into the mixture. Don’t over-mix—just enough to distribute them evenly. -
Portion into molds.
Use a small spoon or cookie scoop to divide the mixture evenly into your mini muffin tin or silicone molds. Aim for about 1 tablespoon (15g) per bite. If you’re using a baking sheet, just dollop little mounds and flatten slightly with the back of your spoon. -
Top with extras.
Sprinkle a few extra mini chocolate chips, chopped nuts, or even a pinch of flaky sea salt on top of each bite for a pretty finish. -
Freeze until solid.
Place the tray or molds in the freezer for at least 2 hours, or until the bites are completely firm. (If your freezer is packed, give it up to 3 hours.)
Pro tip: If you’re impatient, set a timer so you don’t keep poking them every 10 minutes (guilty!). -
Pop out and store.
Once frozen solid, pop the bites out of the molds. If you used a baking sheet, gently lift them off the parchment. Transfer to a freezer-safe container with a tight lid. -
Enjoy!
Let the bites sit at room temperature for 2–3 minutes before eating—they’ll soften just enough for perfect texture. Devour straight from the freezer for a refreshing treat.
Troubleshooting: If your bites are too icy, try using full-fat yogurt next time; if they’re too soft, add a bit more peanut butter. If you have trouble unmolding, let them sit out for a minute or run the bottom of the tray under warm water for a few seconds. And honestly, even the “ugly” ones taste amazing!
Cooking Tips & Techniques
Making frozen peanut butter yogurt bites is pretty foolproof, but a few pro tips make all the difference:
- Blend for super smooth bites: If you want ultra-creamy texture, use a hand mixer or small blender to whip the yogurt and peanut butter together. This step makes the bites almost like mini frozen cheesecakes!
- Don’t skimp on cooling time: Letting them freeze for a full 2–3 hours ensures they’re solid and easy to pop out. I’ve tried to rush this and ended up with sticky, half-melted blobs—still tasty, but definitely not as Pinterest-worthy.
- Watch the sweetener: Too much honey or syrup makes the bites too soft. Stick with 2 tablespoons max for the best texture.
- Layer for variety: For a fun twist, spoon half the mixture into molds, sprinkle some chopped berries or granola, then cover with the rest of the mixture. You get a surprise in every bite!
- Keep portion sizes small: Smaller bites freeze faster and are easier to eat straight from the freezer. If you go bigger, add a few extra minutes to the freeze time.
I’ve definitely had my share of peanut butter yogurt “fails”—like the time I tried stirring in huge chocolate chunks (they made the bites fall apart) or used regular yogurt instead of Greek (way too icy). Lesson learned: stick with thick yogurt, keep mix-ins small, and don’t overdo the toppings. Oh, and if you’re multitasking, set your timer—otherwise, you’ll forget them in the freezer and end up with rock-hard bites (just let them thaw a bit before eating if that happens).
Consistency is key, so always mix the base thoroughly and portion evenly. The more you make these, the more you’ll find little shortcuts that work for you!
Variations & Adaptations
One of the best things about frozen peanut butter yogurt bites is how easy they are to customize. Here are a few of my favorite twists:
- Dairy-Free & Vegan: Use coconut yogurt or almond milk yogurt instead of Greek yogurt, and swap honey for maple syrup or agave. Sunflower seed butter works for a nut-free, allergy-friendly version.
- Chocolate Lovers: Mix 1 tablespoon (8g) of unsweetened cocoa powder into the base for a chocolate-peanut butter vibe. You can also drizzle melted dark chocolate on top before freezing for a peanut butter cup feel.
- Fruit Swirl: Swirl in a spoonful of raspberry or strawberry jam, or fold in finely chopped fresh berries for a fruity burst. In summer, I love adding chopped strawberries or blueberries.
- Crunch Factor: Add a handful of chopped roasted peanuts, granola, or pretzel pieces to the mix for texture.
- Spice It Up: A pinch of cinnamon or a dash of pumpkin pie spice gives the bites a cozy, warming flavor—so good in fall!
For different cooking methods, you can even freeze these in popsicle molds for a bigger, on-the-go snack. If you have silicone ice cube trays, those work perfectly for bite-sized pieces. I once made a holiday version with chopped dried cranberries and pistachios—total festive vibes!
Don’t be afraid to riff on this recipe to fit your tastes, allergies, or whatever you have in the pantry. That’s half the fun!
Serving & Storage Suggestions
Frozen peanut butter yogurt bites are best eaten straight from the freezer—let them sit out for just 2–3 minutes so they’re creamy, not rock hard. I love plating them on a chilled platter for parties or popping them in a small bowl for movie night.
They pair perfectly with a fresh fruit salad, a warm cup of coffee, or even as a topping for your morning oatmeal (seriously, try it!). If you want to get fancy, drizzle with a little extra melted peanut butter or chocolate before serving.
For storage, keep the bites in an airtight container in the freezer. They’ll stay fresh for up to 2 months, but good luck making them last that long! If they’re stacked, place a sheet of parchment paper between layers to prevent sticking. To reheat (if you want them a bit softer), microwave for 5–10 seconds or let them thaw at room temperature for a couple of minutes. Honestly, the flavors get even better after a day or two as everything melds together.
Nutritional Information & Benefits
Each frozen peanut butter yogurt bite (about 1 tablespoon) has roughly 60–70 calories, 3g protein, 4g healthy fat, and only 3g sugar (depending on your sweetener and mix-ins). They’re naturally gluten-free and can be made dairy-free and vegan with a couple of simple swaps.
The Greek yogurt pumps up the protein and probiotics, making them a filling snack that actually keeps you satisfied. Peanut butter adds healthy fats and a dose of fiber. If you’re watching carbs or sugars, use plain yogurt and go light on the honey or syrup.
Potential allergens include peanuts and dairy, so always double-check ingredients if you’re sharing with friends or family. From a wellness perspective, I love that these bites give you a treat that’s both nourishing and crave-worthy—snacking done right!
Conclusion
Frozen peanut butter yogurt bites are the snack you’ll want on repeat—easy, healthy, and pure comfort in every bite. They’re customizable, kid-friendly, and perfect for those moments when you just need a little something sweet without any hassle.
I make them every week because they hit that sweet spot between nutritious and delicious, and they’re so much fun to tweak based on what’s in your fridge. If you’re looking for a snack that feels like dessert (but way better for you), give these a try—you won’t regret it!
Drop a comment below if you try this recipe, or let me know your favorite add-ins! I love seeing your twists and hearing how these bites fit into your snack routine. Go on, treat yourself—you deserve it!
FAQs About Frozen Peanut Butter Yogurt Bites
How long do frozen peanut butter yogurt bites last in the freezer?
They’re best within 2 months when stored in an airtight container. They rarely last that long in my house!
Can I make these peanut-free?
Absolutely! Use sunflower seed butter or any other nut/seed butter you like. The flavor will change a bit, but they’re still super tasty.
What’s the best yogurt to use for this recipe?
I recommend thick, plain Greek yogurt for the creamiest bites. Dairy-free yogurts work too, but make sure they’re not too runny.
Can I add protein powder to these bites?
Yes! Stir in a scoop of your favorite protein powder (vanilla or unflavored works best). You might need to add a splash more yogurt if the mixture gets too thick.
How do I keep the bites from sticking to the molds?
Use silicone molds or line your tray with parchment paper. If they stick, let them sit out for a minute or run the bottom of the tray under warm water for a few seconds—they’ll pop right out.
Pin This Recipe!

Frozen Peanut Butter Yogurt Bites

Frozen peanut butter yogurt bites are a creamy, nutty, and slightly sweet snack that tastes indulgent but is packed with protein and wholesome ingredients. They’re easy to make, customizable, and perfect for a healthy treat straight from the freezer.
- Prep Time: 10 minutes
- Cook Time: 0 minutes
- Total Time: 2 hours 10 minutes
- Yield: 18-20 bites (about 18-20 servings) 1x
- Category: Snack
- Cuisine: American
Ingredients
- 1 cup (240g) plain Greek yogurt (whole milk preferred, but 2% or nonfat works)
- 1/2 cup (125g) natural creamy peanut butter (unsweetened)
- 2 tablespoons (30ml) honey or maple syrup
- 1 teaspoon (5ml) vanilla extract
- 1/4 cup mini chocolate chips (optional)
- Pinch of sea salt (optional, especially if peanut butter is unsalted)
Instructions
- Gather your ingredients and equipment: Greek yogurt, peanut butter, honey or maple syrup, vanilla extract, mini chocolate chips (optional), mixing bowl, spatula, and mini muffin tin or silicone mold.
- In a mixing bowl, combine Greek yogurt and peanut butter. Stir with a silicone spatula until completely smooth and no streaks remain. If peanut butter is stiff, microwave it for 10–15 seconds to soften.
- Add honey (or maple syrup) and vanilla extract. Stir again until evenly combined. Taste and add a pinch of salt if desired.
- Gently fold in mini chocolate chips or other mix-ins if using. Do not over-mix.
- Use a small spoon or cookie scoop to portion the mixture into mini muffin tin, silicone molds, or dollop onto a parchment-lined baking sheet (about 1 tablespoon per bite).
- Sprinkle extra mini chocolate chips, chopped nuts, or a pinch of flaky sea salt on top of each bite if desired.
- Freeze for at least 2 hours, or until the bites are completely solid. (Up to 3 hours if your freezer is full.)
- Once frozen, pop the bites out of the molds or lift from parchment. Transfer to a freezer-safe container with a tight lid.
- Let bites sit at room temperature for 2–3 minutes before eating for best texture. Enjoy straight from the freezer.
Notes
For ultra-creamy bites, blend the yogurt and peanut butter with a hand mixer or blender. Use full-fat Greek yogurt for best texture. Customize with mix-ins like chopped nuts, berries, or granola. Let bites thaw for a couple of minutes before eating for perfect creaminess. Store in an airtight container in the freezer for up to 2 months.
Nutrition
- Serving Size: 1 bite (about 1 tablespoon)
- Calories: 65
- Sugar: 3
- Sodium: 30
- Fat: 4
- Saturated Fat: 1
- Carbohydrates: 4
- Fiber: 1
- Protein: 3
Keywords: frozen peanut butter yogurt bites, healthy snack, high protein snack, easy snack, freezer snack, Greek yogurt, peanut butter, kid friendly, gluten free, no bake, summer snack