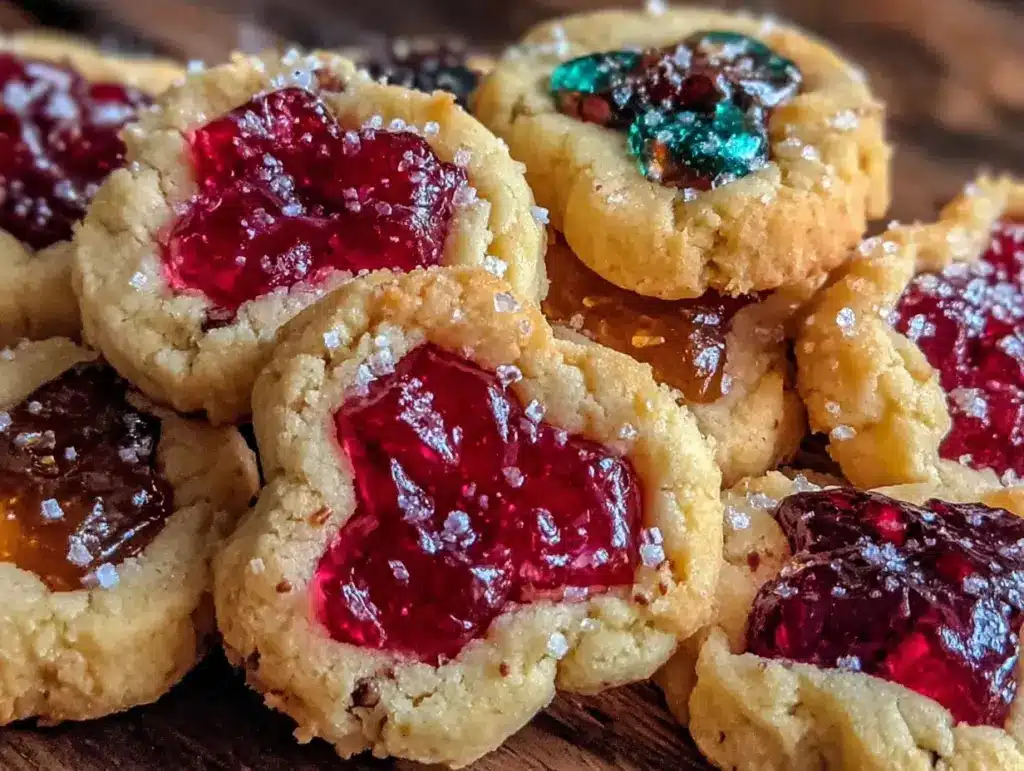
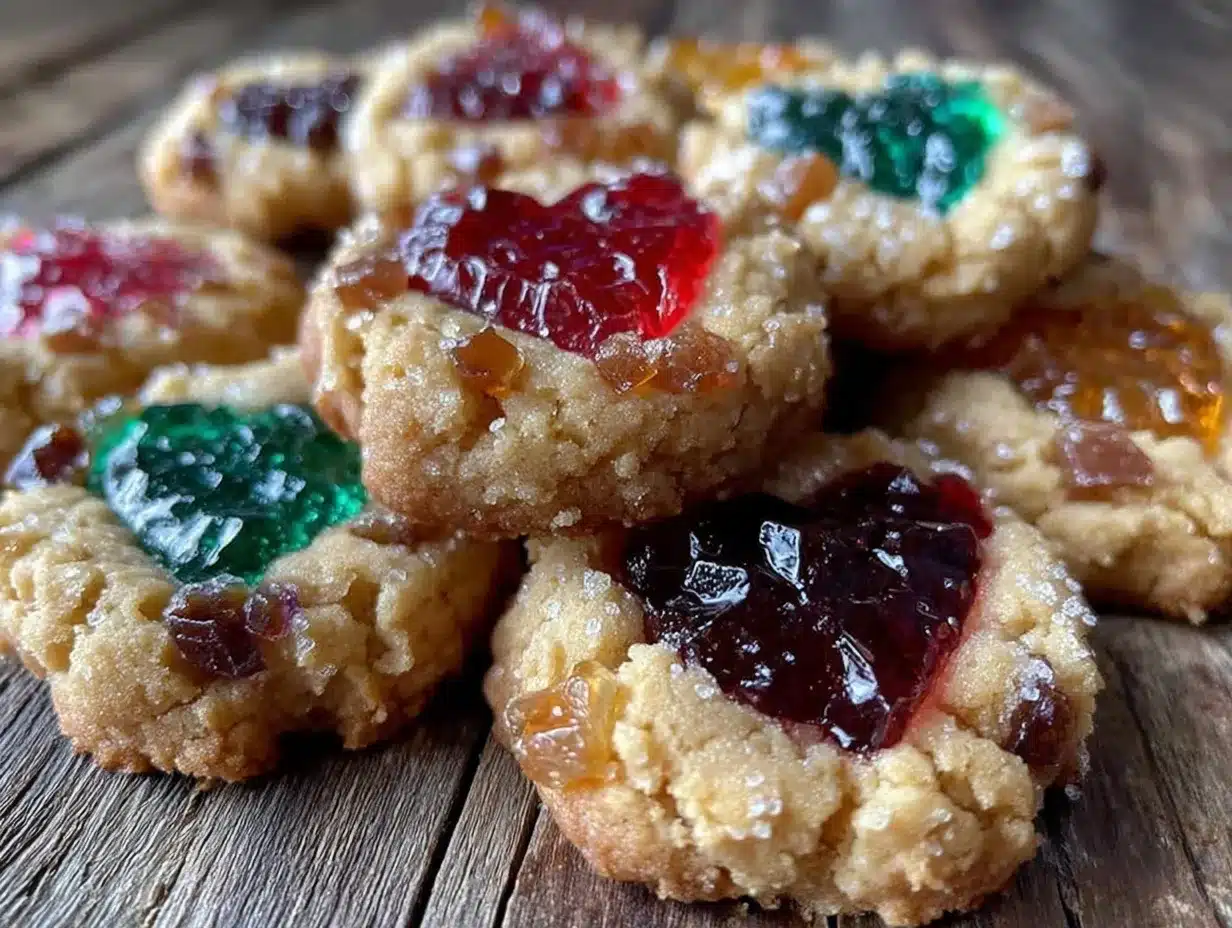
The first time I bit into a stained glass window cookie, I was completely enchanted. The way the sunlight hit the translucent candy center, casting colorful patterns on my plate, was almost mesmerizing. Honestly, these stunning stained glass window cookies aren’t just a treat for your taste buds—they’re a feast for your eyes. I stumbled upon this recipe during a chilly December afternoon, looking for a festive yet simple project to brighten up my kitchen. Since then, I’ve made these cookies countless times, tweaking the colors, shapes, and flavors to suit every season and celebration.
If you’ve never tried making these before, you’re in for a real treat. The stunning stained glass window cookies combine buttery, tender edges with a glossy, jewel-like candy center that melts in your mouth. Plus, they’re fantastic for cozy family baking sessions or dazzling gifts that’ll have everyone asking for the recipe. This recipe is straightforward enough for beginners, yet impressive enough to wow guests at holiday parties or brunches. Whether you’re a cookie veteran or just looking for a fun new baking adventure, these stained glass window cookies will quickly become a favorite.
After testing this recipe over and over, I can vouch for its foolproof nature and the joyful experience it brings. So, roll up your sleeves, grab your favorite cookie cutters, and let’s get started on creating these edible works of art that everyone will adore.
Why You’ll Love This Recipe
- Quick & Easy: This recipe comes together in about 30 minutes, making it perfect for last-minute baking sessions or holiday preparations.
- Simple Ingredients: No need for fancy or hard-to-find items — just pantry staples and a few colorful hard candies.
- Perfect for Celebrations: Whether it’s Christmas, Easter, birthdays, or just a sunny afternoon, these cookies add that magical touch.
- Crowd-Pleaser: Kids and adults alike are captivated by the glowing candy centers — it’s like edible stained glass!
- Unbelievably Delicious: The buttery cookie base contrasts beautifully with the sweet, slightly crunchy candy center for a delightful texture combo.
This recipe stands out because of its charming technique — melting crushed hard candies inside the cookie cutouts creates that iconic stained glass effect. Unlike regular sugar cookies, these have an almost jewel-like sparkle that makes them extra special. Plus, I’ve found that chilling the dough before rolling makes it easier to handle and yields a perfect shape every time. It’s not just baking; it’s turning your kitchen into a little candy art studio!
Honestly, biting into one of these stained glass window cookies feels like a little celebration for your taste buds. The balance between sweet, buttery, and slightly crunchy is spot-on. Plus, they’re a fun project to share with kids or friends, making memories as bright as the cookies themselves.
What Ingredients You Will Need
This recipe uses simple, wholesome ingredients to deliver bold flavor and that classic stained glass look without any extra fuss. Most are probably hanging out in your pantry right now!
- For the Cookie Dough:
- 2 ¾ cups (345g) all-purpose flour – the base for tender, sturdy cookies
- 1 teaspoon baking powder – helps the cookies puff just enough
- ½ teaspoon salt – balances the sweetness
- 1 cup (227g) unsalted butter, softened – I prefer Land O Lakes for creaminess
- 1 cup (200g) granulated sugar – adds sweetness and crunch
- 1 large egg, room temperature – binds everything together
- 1 teaspoon vanilla extract – brings warmth and depth
- For the Stained Glass Centers:
- Hard candies, crushed finely – use Jolly Ranchers or Life Savers for vibrant colors
- Optional: Food coloring (if you want to tint clear candies for custom colors)
For the candy, I highly recommend picking up a few different colors to create a rainbow effect in your cookies. Crushing the candies finely is key — a quick blitz in a food processor or placing them in a bag and pounding with a rolling pin works like a charm. Just be sure to keep the pieces small enough to melt evenly but chunky enough to hold their shape.
Feel free to swap all-purpose flour with a gluten-free blend if needed, but keep in mind the texture might shift slightly. And if you want a dairy-free version, swap the butter for a plant-based alternative, but again, expect some changes in richness.
Equipment Needed
- Mixing Bowls: Large for dough mixing and a small one for candy prep.
- Electric Mixer: Hand or stand mixer makes creaming the butter and sugar so much easier.
- Rolling Pin: For flattening the dough evenly — a textured or silicone rolling pin works great.
- Cookie Cutters: Various shapes with a smaller inner cutter to create the window effect (think stars, hearts, snowflakes).
- Baking Sheets: Non-stick or lined with parchment paper to prevent sticking and ease cleanup.
- Food Processor or Plastic Bag & Rolling Pin: For crushing hard candies safely and finely.
- Cooling Rack: Essential for cooling cookies evenly and preventing sogginess.
If you don’t have a food processor, no worries! Just put the candies in a sturdy plastic bag and gently crush them with a rolling pin — works just as well. For cookie cutters, if you don’t have nested cutters, you can use smaller cutters or even a knife for the inner cutout. I’ve also found that silicone baking mats help keep cookies evenly baked and easy to lift off the tray.
Detailed Preparation Method
- Prep Your Ingredients: Start by crushing your hard candies into small, even pieces. Set aside. Preheat your oven to 350°F (175°C) and line baking sheets with parchment paper. This step makes the process smoother and quicker.
- Mix Dry Ingredients: In a medium bowl, whisk together 2 ¾ cups (345g) all-purpose flour, 1 teaspoon baking powder, and ½ teaspoon salt. This ensures even distribution of leavening and salt.
- Cream Butter and Sugar: Using a hand or stand mixer, beat 1 cup (227g) softened unsalted butter with 1 cup (200g) granulated sugar until light and fluffy (about 3-4 minutes). You’ll notice the mixture turns pale and slightly airy — that’s the secret to soft cookies.
- Add Egg and Vanilla: Beat in 1 large egg and 1 teaspoon vanilla extract until fully combined, scraping down the sides as needed. The dough will start to come together now.
- Combine Wet and Dry: Gradually add the flour mixture to the wet ingredients, mixing on low speed just until combined. Avoid overmixing — you want the dough tender, not tough.
- Chill the Dough: Wrap the dough in plastic wrap and refrigerate for at least 30 minutes. This step is crucial — chilled dough rolls out better and holds its shape during baking, which is key for those delicate cutout windows.
- Roll Out the Dough: Lightly flour your work surface and rolling pin. Roll chilled dough to about ¼ inch (6 mm) thickness. If it’s sticky, sprinkle a bit more flour but don’t overdo it.
- Cut the Cookies: Use your large cookie cutter to cut shapes from the dough. Then, carefully use a smaller cutter to remove the center of each cookie, creating a “window.” Transfer the cookies to your lined baking sheet using a thin spatula or bench scraper.
- Add the Candy “Glass”: Fill the cookie centers with crushed hard candies, spreading them evenly but not exceeding the edges of the cutout. The candy will melt and fill the hole during baking, creating that iconic stained glass effect.
- Bake: Place cookies in the preheated oven and bake for 10-12 minutes (or until the edges just begin to turn golden). Keep an eye on them — you want the candy melted but not burnt.
- Cool Completely: Let cookies cool on the baking sheet for 5 minutes, then carefully transfer to a wire rack to cool fully. The candy centers will harden as they cool, turning beautifully translucent.
Pro tip: If your candy centers crack while baking, it’s usually because the candy pieces were too large or uneven. Crushing them finely helps avoid this. Also, don’t try to move cookies before they’ve cooled properly — the candy needs time to set fully.
Cooking Tips & Techniques
One trick I’ve learned is to chill the dough twice if your kitchen is warm. After rolling and cutting, pop the trays with cutouts into the fridge for 10 minutes before baking; this helps the cookies hold their shape and prevents spreading.
Another tip: when crushing candies, use a clean towel over the bag and gently tap instead of pounding hard. This prevents shards from flying everywhere and keeps the pieces uniform.
Watch your oven carefully toward the end of baking. The candy melts quickly and can burn if left too long. If you notice the edges browning too fast, lower the heat by 10°F (5°C) and extend baking time slightly.
For consistent results, rotate your baking sheet halfway through baking to ensure even heat distribution. This trick saved me many a batch that was unevenly cooked.
Finally, always cool cookies fully on a wire rack. Leaving them on the hot baking sheet can cause the candy centers to become soggy or crack.
Variations & Adaptations
- Seasonal Themes: Swap your cookie cutters and candy colors to match holidays — pumpkins and orange/red candies for fall, hearts and pinks for Valentine’s, or snowflakes and icy blues for winter.
- Dietary Substitutes: Use almond flour or a gluten-free blend for gluten-sensitive friends. Swap butter for coconut oil or vegan butter for dairy-free options.
- Flavor Twists: Add a teaspoon of almond extract or lemon zest to the dough for a fragrant boost. You can also sprinkle colored sugar on edges before baking for extra sparkle.
- Cooking Method: Tried these as mini cookies baked in silicone molds — same stained glass effect but with a fun rounded shape.
- Personal Variation: Once, I mixed crushed peppermint candies in the centers for a minty holiday treat — the cooling sensation paired beautifully with the buttery cookie.
Serving & Storage Suggestions
These stunning stained glass window cookies are best served at room temperature, letting the candy centers shine in the light. I love arranging them on a festive platter or hanging them on a cookie tree for a striking presentation.
Pair them with a warm cup of tea or hot cocoa for a cozy afternoon treat that feels like a warm hug. They also make charming edible gifts — just package them in cellophane bags tied with ribbon.
Store cookies in an airtight container at room temperature for up to a week. If you want to keep them longer, they freeze well in a sealed container for up to 3 months. To thaw, leave them out at room temperature for a few hours. Avoid refrigerating as it can make the candy centers cloudy or sticky.
Over time, the candy centers may develop a slight bloom — that whitish haze from sugar crystallization — but they’re still delicious and safe to eat. For best appearance, enjoy within the first week.
Nutritional Information & Benefits
Each cookie (approximately 2.5 inches in diameter) contains around 150 calories, with 8g of fat, 20g of carbohydrates, and 2g of protein. These cookies are a sweet treat rather than a health food, but the simple ingredients mean no preservatives or artificial additives.
The butter provides some beneficial fats, and using real vanilla extract adds flavor without extra sugar. For those mindful of allergens, note these contain gluten, dairy, and eggs.
From a wellness perspective, baking at home means you can control ingredient quality and avoid unwanted additives. Plus, the joy and mindfulness of making stained glass window cookies can be a lovely stress-reliever, adding to overall well-being.
Conclusion
Making stunning stained glass window cookies is not just baking; it’s creating beautiful, edible art that lights up any occasion. These cookies combine simplicity, charm, and deliciousness in a way that always brings a smile to my face. Whether you customize colors for a holiday or stick to classic shapes, they’re sure to impress and delight.
I encourage you to play around with shapes, colors, and flavors — after all, the best recipes are the ones you make your own. If you give this recipe a try, please share your creations and any fun twists you’ve added. I love hearing how these cookies brighten up your kitchen as much as they do mine.
Happy baking, and here’s to many colorful, sweet moments ahead!
FAQs
Can I use sugar crystals instead of hard candies for the window?
It’s best to stick with hard candies like Jolly Ranchers or Life Savers. Sugar crystals won’t melt evenly and won’t create the beautiful stained glass effect.
What if my candy center cracks after baking?
This usually happens if the candy pieces are too large or uneven. Make sure to crush candies finely and spread evenly. Also, avoid moving cookies before they fully cool.
Can I make these cookies gluten-free?
Yes! Substitute all-purpose flour with a gluten-free blend, but expect a slight change in texture. Chilling the dough well helps maintain shape.
How do I store stained glass window cookies?
Store them in an airtight container at room temperature for up to a week. They can also be frozen for up to 3 months — just thaw before serving.
Can I use flavored hard candies for the stained glass centers?
Absolutely! Flavored candies add a fun twist. Just keep in mind some flavors might be stronger or more minty, so choose according to your taste preferences.
Pin This Recipe!
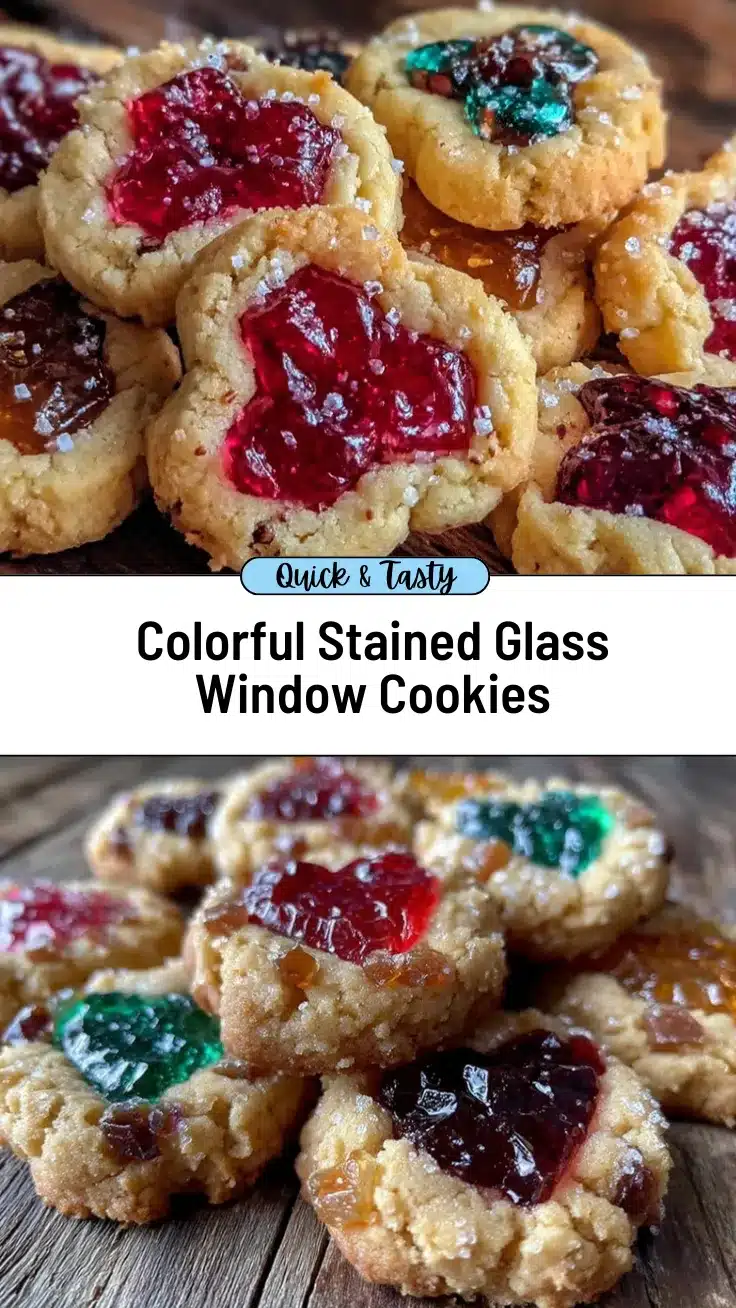
Stunning Stained Glass Window Cookies

These stunning stained glass window cookies feature buttery, tender edges with a glossy, jewel-like candy center that melts in your mouth, perfect for festive celebrations and gifting.
- Prep Time: 15 minutes
- Cook Time: 12 minutes
- Total Time: 27 minutes
- Yield: 24 cookies 1x
- Category: Dessert
- Cuisine: American
Ingredients
- 2 ¾ cups (345g) all-purpose flour
- 1 teaspoon baking powder
- ½ teaspoon salt
- 1 cup (227g) unsalted butter, softened
- 1 cup (200g) granulated sugar
- 1 large egg, room temperature
- 1 teaspoon vanilla extract
- Hard candies, crushed finely (e.g., Jolly Ranchers or Life Savers)
- Optional: Food coloring (to tint clear candies)
Instructions
- Crush hard candies into small, even pieces and set aside. Preheat oven to 350°F (175°C) and line baking sheets with parchment paper.
- In a medium bowl, whisk together flour, baking powder, and salt.
- Using a hand or stand mixer, beat softened butter and sugar until light and fluffy, about 3-4 minutes.
- Beat in egg and vanilla extract until fully combined.
- Gradually add the flour mixture to the wet ingredients, mixing on low speed just until combined.
- Wrap dough in plastic wrap and refrigerate for at least 30 minutes.
- Lightly flour work surface and rolling pin. Roll chilled dough to about ¼ inch (6 mm) thickness.
- Use a large cookie cutter to cut shapes from the dough, then use a smaller cutter to remove the center to create a window.
- Transfer cookies to lined baking sheet using a thin spatula or bench scraper.
- Fill cookie centers with crushed hard candies, spreading evenly but not exceeding edges.
- Bake for 10-12 minutes or until edges begin to turn golden and candy is melted.
- Cool cookies on baking sheet for 5 minutes, then transfer to wire rack to cool completely and harden candy centers.
Notes
Chill dough before rolling to help hold shape. Crush candies finely to avoid cracking. Cool cookies fully before moving to prevent candy centers from cracking or becoming soggy. Rotate baking sheet halfway through baking for even heat distribution. For warm kitchens, chill cut cookies before baking to prevent spreading.
Nutrition
- Serving Size: 1 cookie (approximat
- Calories: 150
- Sugar: 15
- Sodium: 90
- Fat: 8
- Saturated Fat: 5
- Carbohydrates: 20
- Protein: 2
Keywords: stained glass cookies, holiday cookies, cutout cookies, candy window cookies, festive cookies, easy cookie recipe