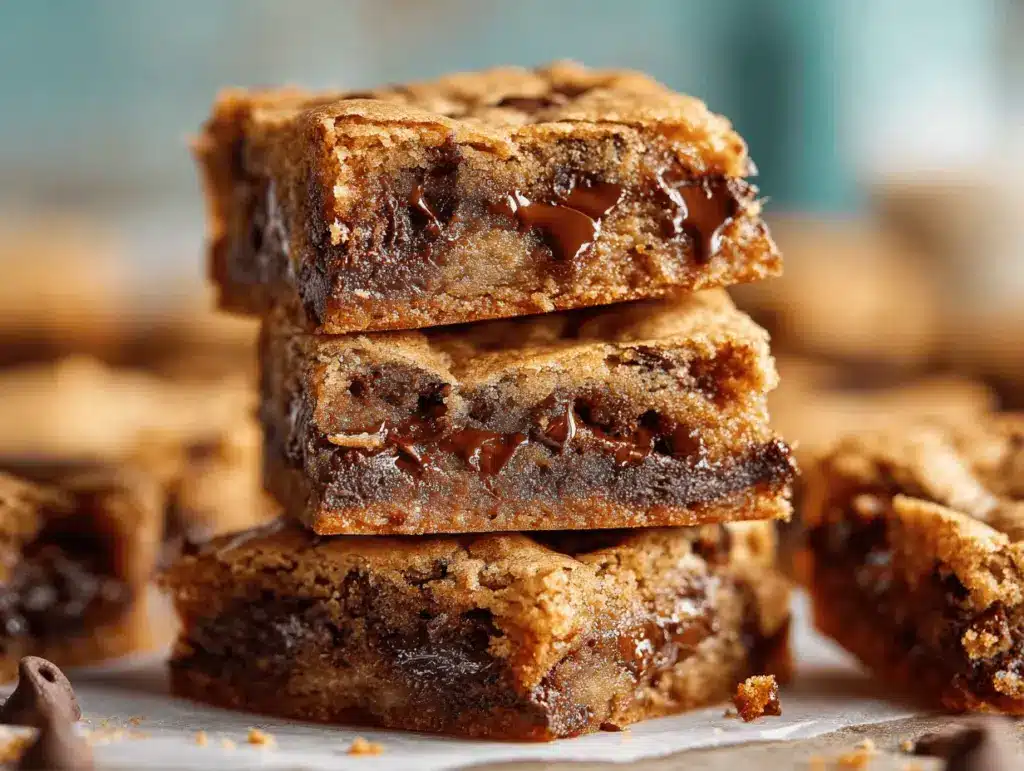
That nutty aroma of brown butter swirling through my kitchen? It gets me every time. The first time I pulled a pan of brown butter chocolate chip cookie bars from the oven, I thought, “Oh wow, this is dangerous.” You know those moments where you just stand there, fork in hand, not even waiting for things to cool? That’s what these bars do to me—and honestly, I bet they’ll do the same to you.
I stumbled into this recipe after a late-night craving for chocolate chip cookies collided with my laziness (I just didn’t want to scoop individual cookies, you know?). Instead, I pressed the dough into a pan and—on a whim—browned my butter first. The result was magic: chewy, rich, and loaded with gooey chocolate in every bite. Over time, I’ve tweaked things for maximum chew and flavor. Now, these brown butter chocolate chip cookie bars are my secret weapon for bake sales, potlucks, and those days when nothing but a thick slab of cookie will do.
What I love most? They’re crazy simple, but taste like you spent way more time and effort. The brown butter adds a depth you just don’t get from your usual cookie bars, and there’s no chilling required (hallelujah). Whether you’re baking for a crowd, sneaking treats for yourself, or trying to impress that friend who claims they “don’t like sweets,” these bars always deliver. After dozens of batches (and a few late-night taste tests), I can say with confidence: these brown butter chocolate chip cookie bars are about to become your new go-to dessert.
Why You’ll Love This Recipe
- Quick & Easy: These brown butter chocolate chip cookie bars come together in under an hour. No scooping, no chilling, just pure cookie bliss in bar form.
- Simple Ingredients: Forget specialty items—everything you need is probably in your pantry right now. I’m talking flour, sugar, eggs, and of course, chocolate chips.
- Perfect for Any Occasion: Bake sales, birthday parties, game nights, or just a regular Tuesday—these bars fit right in. They look impressive but don’t require fancy skills.
- Crowd-Pleaser: I’ve watched these disappear faster than anything else at potlucks. Even the “I don’t eat dessert” people sneak a second bar.
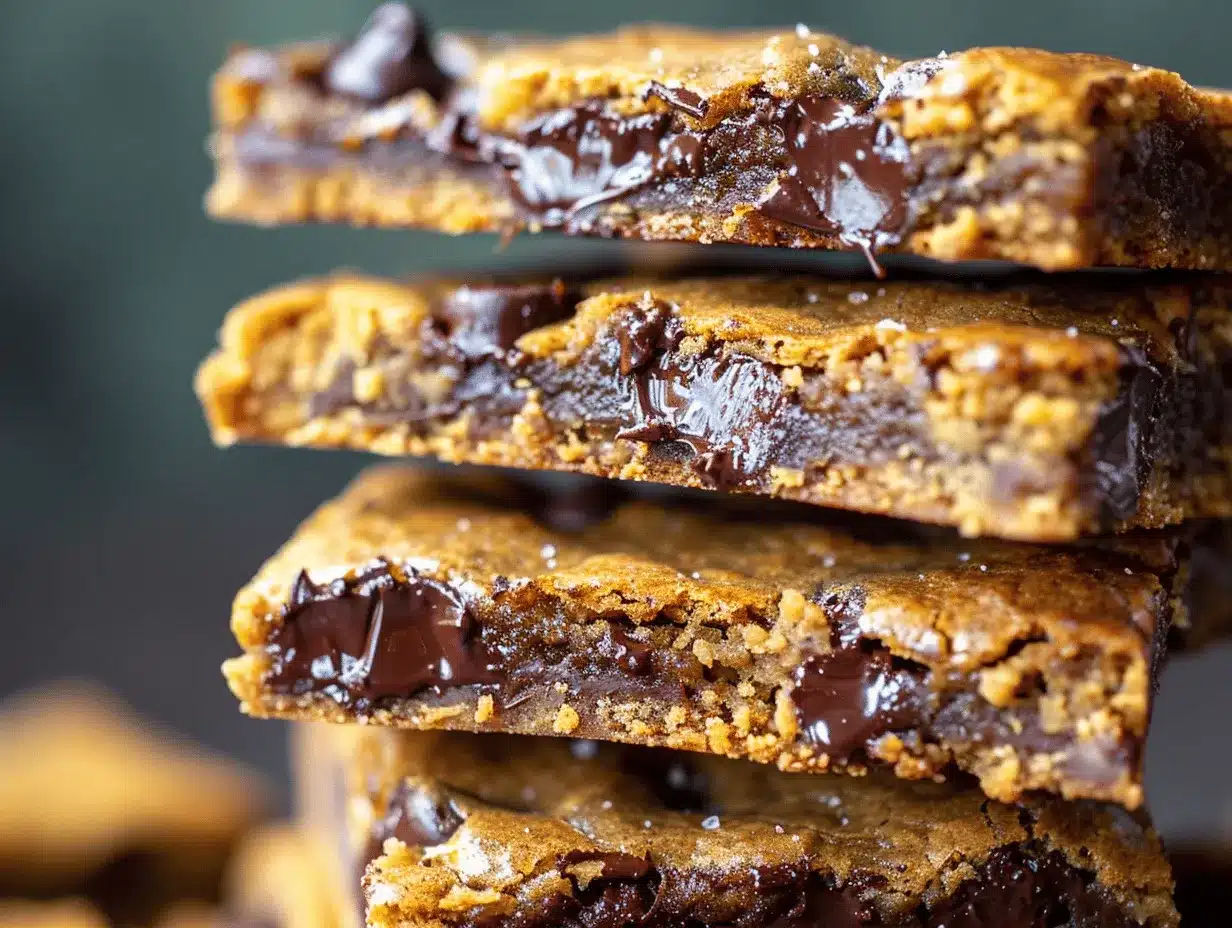
- Unbelievably Delicious: The brown butter gives a toasty, caramel-like flavor, while the edges stay chewy, and the middle is soft and gooey. It’s honestly the best of all cookie worlds.
Unlike standard cookie bars, the brown butter here is the real game-changer. When you take that extra step, it adds this deep, almost butterscotch note that regular melted butter just can’t match. And because you’re pressing the dough into a pan, you get that perfect combo: crispy edges for folks who love crunch, and super-chewy centers for people (like me) who live for gooey cookies.
This isn’t just another cookie bar recipe—it’s the one you’ll brag about. I’ve tried all the shortcuts and swaps, but this version, with just the right amount of brown sugar and a touch of flaky sea salt, is pure comfort. It’s the kind of treat that makes you pause for a second after the first bite, close your eyes, and just…smile. Trust me, you’ll want to bake these again and again.
What Ingredients You Will Need
This recipe is all about taking everyday ingredients and turning them into something show-stopping. Most of these are pantry staples, so you probably have them on hand right now. Here’s what you’ll need to make the ultimate brown butter chocolate chip cookie bars:
- Unsalted butter (1 cup / 226g), browned: The heart of the recipe—browning the butter gives a deep, nutty flavor.
- Brown sugar (1 1/4 cups / 250g), packed: Adds moisture and a rich, caramel note for extra chewiness.
- Granulated sugar (1/2 cup / 100g): For just the right amount of sweetness and crisp edges.
- Large eggs (2), room temperature: Helps bind everything and gives that tender, chewy texture.
- Vanilla extract (2 teaspoons): I go for pure vanilla whenever possible—makes a big flavor difference.
- All-purpose flour (2 1/4 cups / 280g): The classic base—King Arthur is my go-to for consistent results.
- Baking soda (1 teaspoon): Gives just enough lift to keep the bars from being too dense.
- Salt (1/2 teaspoon): Essential for balance—don’t skip it!
- Semi-sweet chocolate chips (1 1/2 cups / 255g): I love using a mix of chips and chunks for pockets of melted chocolate.
- Flaky sea salt (optional, for topping): Totally optional but gives a lovely finish—Maldon is my favorite here.
Ingredient tips:
- Use European-style butter for an extra rich, creamy flavor.
- Substitute dark chocolate chips or chopped chocolate bars for a more intense chocolate punch.
- If you need a gluten-free version, swap in a 1:1 gluten-free flour blend (I’ve had good luck with Bob’s Red Mill).
- Dairy-free? Use a plant-based butter and allergy-friendly chocolate chips—texture stays pretty close.
Honestly, these brown butter chocolate chip cookie bars are so forgiving. You can toss in a handful of nuts, swap some chocolate for butterscotch, or even sprinkle in a few M&Ms if you’re feeling wild. The base recipe is sturdy and adaptable—just how I like it.
Equipment Needed
- Medium saucepan: For browning the butter. If you haven’t done this before, a light-colored pan helps you see the color change.
- Large mixing bowl: You’ll combine your dough here. Glass or stainless steel both work fine.
- Whisk and spatula: Whisk for blending the wet ingredients, spatula for folding in the flour and chocolate chips.
- 9×13-inch (23x33cm) baking pan: Metal pans give the best chewy edges, but glass works too. Just watch for slightly longer bake times.
- Parchment paper: Makes cleanup a breeze and helps lift the bars out for easy cutting.
- Knife or bench scraper: For getting neat, bakery-style squares (if you care about looks—I usually just dig in).
Personal tip: I’ve made these in both metal and glass pans. Metal gives that classic edge chew, but glass is handy if you want to check doneness from the bottom. If you only have an 8×8 pan, halve the recipe and adjust the bake time (they’ll be thicker!). For easy cleaning, line the pan with parchment and leave an overhang—no stuck cookie bits to fight with later.
On a budget? All these tools are kitchen basics, so you don’t need anything fancy. I’ve even browned butter in a cheap nonstick skillet and stirred the dough with a big spoon. It all works!
Preparation Method
-
Browning the Butter:
Add 1 cup (226g) unsalted butter to a medium saucepan over medium heat. Let it melt, then keep cooking, swirling occasionally, until it foams and turns golden brown (about 5-7 minutes). You’ll know it’s ready when it smells nutty and you see brown bits on the bottom. Tip: Don’t walk away—it goes from perfect to burnt quick! Pour the brown butter (scrape in all the flavorful brown bits) into a large mixing bowl and let cool 10-15 minutes. -
Preheat & Prep:
While the butter cools, preheat your oven to 350°F (175°C). Line a 9×13-inch (23x33cm) pan with parchment paper, leaving a little overhang on the sides for easy lifting. -
Mix Wet Ingredients:
To the cooled brown butter, add 1 1/4 cups (250g) brown sugar and 1/2 cup (100g) granulated sugar. Whisk until smooth and glossy. Add 2 large eggs (room temp) one at a time, whisking well after each. Stir in 2 teaspoons vanilla extract. You want the mix to look shiny and cohesive. -
Combine Dry Ingredients:
In a separate bowl, whisk together 2 1/4 cups (280g) all-purpose flour, 1 teaspoon baking soda, and 1/2 teaspoon salt. This helps distribute the baking soda evenly—no weird salty bites! -
Bring It All Together:
Gently fold the dry ingredients into the wet mixture using a spatula. Don’t overmix—stop as soon as you don’t see streaks of flour. The dough will be thick and a little glossy. -
Add the Chocolate:
Fold in 1 1/2 cups (255g) semi-sweet chocolate chips. I like to save a handful for sprinkling on top—it makes for prettier bars and those Instagram-worthy melty chocolate puddles. -
Press & Bake:
Scoop the dough into your prepared pan. Use the spatula or your hands (with a little butter on them, if it sticks) to press the dough into an even layer. Sprinkle reserved chocolate chips and a pinch of flaky sea salt on top, if you like. Bake for 22-28 minutes, until the edges are golden brown and a toothpick in the center comes out with just a few moist crumbs. Don’t overbake! They’ll set more as they cool. -
Cool & Slice:
Let the bars cool in the pan for at least 30 minutes (if you can wait). Use the parchment to lift them out, then cut into 16-24 bars, depending on how big you like them.
Prep notes:
- If your butter is too hot, the eggs might scramble—let it cool until just warm to the touch.
- For extra gooey bars, slightly underbake—just watch that the center isn’t raw.
- If the dough seems greasy, don’t worry—it’s just the magic of brown butter. It’ll bake up perfectly, I promise.
Cooking Tips & Techniques
Brown butter can be a little intimidating if you haven’t done it before, but it’s honestly easier than you think. Just keep your eye on the pan and swirl it gently. The color and nutty smell are your best indicators—it’s done as soon as it’s a deep golden brown with some dark flecks at the bottom.
One common mistake? Overmixing the dough. If you stir too much after adding the flour, you’ll end up with tough bars instead of chewy ones. I learned this the hard way after a batch that turned out more like dense cake (oops). Fold just until combined—some little flour streaks are okay.
If you want those perfect melty pools of chocolate on top, press a few extra chips or chunks into the dough just before baking. They’ll stay gooey and look so tempting!
Timing is everything with these bars. The edges should be set and golden, but the center should still look a little soft. They’ll continue to cook as they cool, so don’t wait for a totally dry toothpick. If you’re making these ahead, you can even underbake them by a minute or two for that super fudgy middle.
Multitasking? Brown your butter first and get your dry ingredients measured while it cools. I usually use that time to prep the pan and snack on a few chocolate chips—quality control, right?
For consistent results, use a kitchen scale to measure your flour and chocolate. It really does make a difference in texture, especially if you tend to scoop heavy. And if you’re making these for a party, cut them small—they’re rich, so a little goes a long way (but honestly, no one ever stops at just one).
Variations & Adaptations
- Gluten-Free: Swap in your favorite 1:1 gluten-free flour blend for the all-purpose flour. I’ve tested this with Bob’s Red Mill and the bars still turn out chewy and rich.
- Mix-In Magic: Add 1/2 cup chopped toasted nuts (walnuts, pecans, or almonds) for extra crunch. Or swirl in 1/3 cup peanut butter or Nutella before baking for a fun twist.
- Holiday Vibes: Toss in a handful of dried cranberries and white chocolate chips for a festive spin, or sprinkle in some pumpkin spice around fall.
If you want to go dairy-free, use a plant-based butter and allergy-friendly chocolate chips. The texture holds up surprisingly well, though the flavor is a little different (still good!). For a lower-sugar version, cut the granulated sugar by 1/4 cup and use dark chocolate chips. The bars come out a bit less sweet but still plenty satisfying.
I’ve even made these in an 8-inch square pan when I wanted them super thick—just reduce the oven temp to 325°F (160°C) and bake for 35-40 minutes. They’re almost like blondies that way. The recipe is pretty forgiving, so feel free to play around with your favorite flavors and mix-ins.
Serving & Storage Suggestions
These brown butter chocolate chip cookie bars are best served slightly warm, when the chocolate is still gooey and the edges are a little crisp. If you’re feeling fancy, top them with a scoop of vanilla ice cream and a drizzle of caramel sauce—honestly, it’s unreal.
For a fun presentation, cut the bars into small squares and arrange them on a pretty platter with a dusting of powdered sugar. They pair well with a cold glass of milk, hot coffee, or even an iced latte for an afternoon pick-me-up.
To store, keep the bars in an airtight container at room temperature for up to 4 days. If you want to make them last longer, pop them in the fridge for up to a week (they’ll get a little firmer, but still chewy). For longer storage, wrap individual bars in plastic wrap and freeze for up to 2 months. Reheat in the microwave for about 10 seconds for that just-baked taste—so good!
Honestly, the flavors deepen after a day or two, and they somehow get even chewier. If you’re making them for a party, you can bake a day ahead and they’ll still taste amazing.
Nutritional Information & Benefits
Each bar (based on 24 bars per batch) has about 210 calories, 11g fat, 27g carbs, and 2g protein. They’re definitely a treat, but the brown butter offers a little vitamin A and the eggs add some protein.
Using real, simple ingredients means you skip the preservatives found in store-bought treats. You can control the sugar and chocolate type for a slightly healthier twist (think dark chocolate or less sugar).
Contains gluten, dairy, and eggs—so not suitable for those with allergies to these. For a gluten-free or dairy-free option, see the adaptation notes above. I love that you can make these fit your needs with just a few easy swaps—homemade always feels better!
Conclusion
If you’re looking for a dessert that’s easy, crowd-pleasing, and downright irresistible, these brown butter chocolate chip cookie bars are it. The brown butter gives them a flavor that’s just unforgettable—rich, nutty, and totally crave-worthy. They’re simple enough for a weeknight, but special enough for a celebration.
I always come back to this recipe when I want something comforting but not fussy. It’s a little nostalgic, a little grown-up, and always makes people happy. If you try them, make sure to put your own spin on things—add your favorite mix-ins or tweak the chocolate. That’s the magic of baking at home!
Let me know in the comments if you bake these, or if you have a favorite cookie bar twist. Don’t forget to share this recipe with friends who need a little more cookie joy in their lives. Go ahead—grab a fork, and treat yourself!
FAQs
Can I make brown butter chocolate chip cookie bars ahead of time?
Absolutely! Bake the bars, let them cool, then store in an airtight container at room temperature for up to 4 days. The flavors get even better after a day.
What’s the best way to brown butter without burning it?
Use medium heat and a light-colored pan if possible. Stir or swirl often, and watch for the butter to foam and turn golden with nutty brown bits on the bottom. As soon as you smell that toasty aroma, remove it from heat.
Can I use different types of chocolate?
Definitely. Swap out semi-sweet chips for dark, milk, or even white chocolate. You can also use chopped chocolate bars for bigger pools of melted chocolate.
How do I make these gluten-free?
Just use a 1:1 gluten-free flour blend in place of all-purpose flour. The bars stay chewy and delicious—no one will even notice the difference!
What’s the secret to chewy, not cakey, cookie bars?
Don’t overmix the dough after adding flour, and keep a close eye on baking time. Slightly underbaking and letting them cool in the pan keeps the centers soft and chewy—just the way I like them!
Pin This Recipe!

Brown Butter Chocolate Chip Cookie Bars

These easy, chewy cookie bars feature rich brown butter and gooey chocolate chips in every bite. Perfect for bake sales, parties, or a comforting treat, they come together quickly with pantry staples and no chilling required.
- Prep Time: 20 minutes
- Cook Time: 25 minutes
- Total Time: 45 minutes
- Yield: 16-24 bars 1x
- Category: Dessert
- Cuisine: American
Ingredients
- 1 cup (226g) unsalted butter, browned
- 1 1/4 cups (250g) packed brown sugar
- 1/2 cup (100g) granulated sugar
- 2 large eggs, room temperature
- 2 teaspoons vanilla extract
- 2 1/4 cups (280g) all-purpose flour
- 1 teaspoon baking soda
- 1/2 teaspoon salt
- 1 1/2 cups (255g) semi-sweet chocolate chips (plus extra for topping)
- Flaky sea salt, optional, for topping
Instructions
- Add butter to a medium saucepan over medium heat. Melt, then cook, swirling occasionally, until it foams and turns golden brown (5-7 minutes). Pour brown butter (including brown bits) into a large mixing bowl and let cool for 10-15 minutes.
- Preheat oven to 350°F (175°C). Line a 9×13-inch pan with parchment paper, leaving an overhang for easy lifting.
- To the cooled brown butter, add brown sugar and granulated sugar. Whisk until smooth and glossy. Add eggs one at a time, whisking well after each. Stir in vanilla extract.
- In a separate bowl, whisk together flour, baking soda, and salt.
- Gently fold dry ingredients into wet mixture using a spatula. Stop as soon as you don’t see streaks of flour.
- Fold in chocolate chips, reserving a handful for topping if desired.
- Press dough evenly into prepared pan. Sprinkle reserved chocolate chips and flaky sea salt on top, if using.
- Bake for 22-28 minutes, until edges are golden and a toothpick in the center comes out with a few moist crumbs. Do not overbake.
- Cool in pan for at least 30 minutes. Use parchment to lift out, then cut into 16-24 bars.
Notes
Let brown butter cool before adding eggs to avoid scrambling. For extra gooey bars, slightly underbake. Use European-style butter for richer flavor. Adapt with gluten-free flour or dairy-free butter as needed. Bars store well at room temperature for 4 days, or freeze up to 2 months.
Nutrition
- Serving Size: 1 bar (based on 24 bars per batch)
- Calories: 210
- Sugar: 18
- Sodium: 110
- Fat: 11
- Saturated Fat: 7
- Carbohydrates: 27
- Fiber: 1
- Protein: 2
Keywords: brown butter, chocolate chip, cookie bars, chewy dessert, easy baking, potluck, bake sale, comfort food


