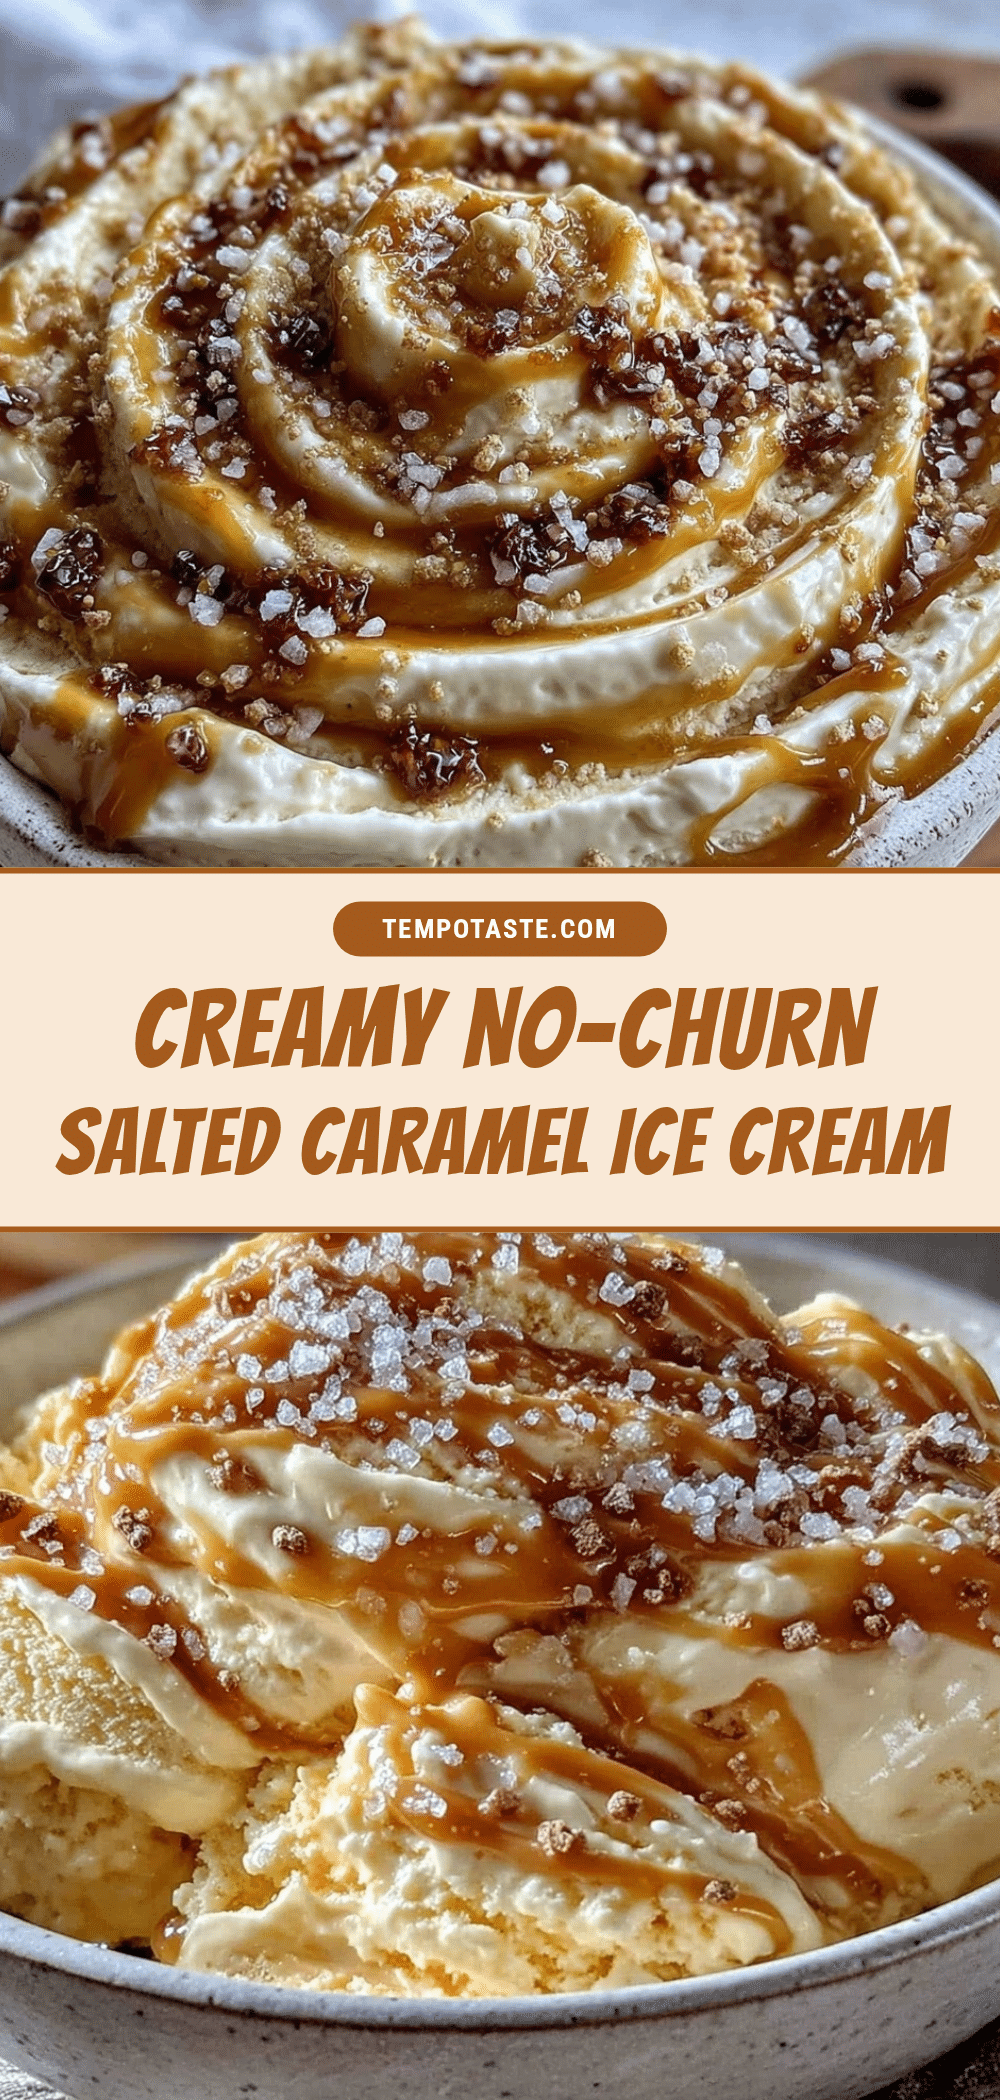
Introduction
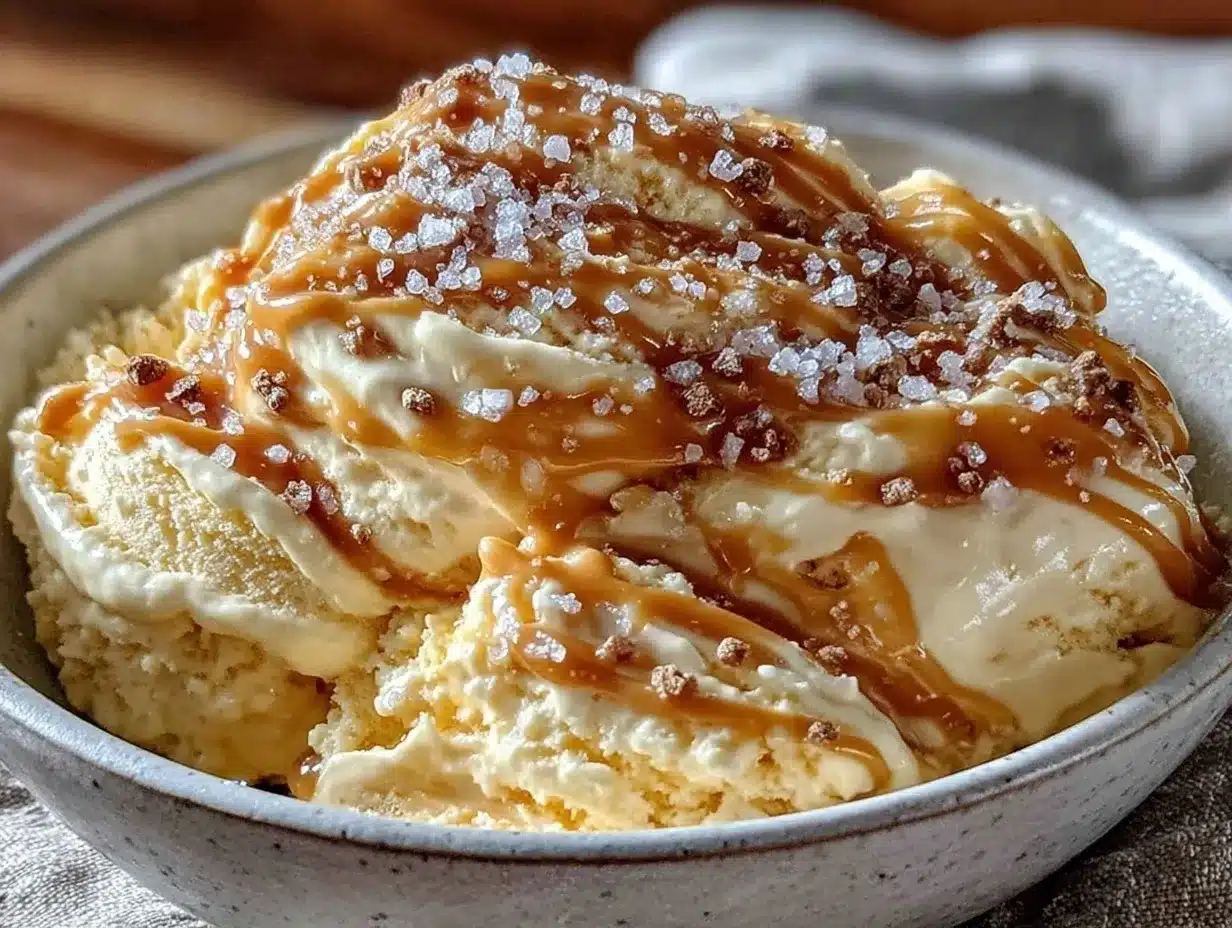
My partner took a spoonful of this creamy no-churn salted caramel ice cream and just stopped mid-chew like a kid who’d found a secret stash of candy. The soft murmur of “Wow, this is ridiculously good” was all I needed to realize I’d made something special. Honestly, I wasn’t expecting much when I first tossed the ingredients together — no fancy ice cream maker, no complicated steps, just a simple recipe I’d scribbled down after a late-night craving for caramel that wasn’t too sweet or too salty. The moment the ice cream hit the tongue, that perfect balance of rich caramel and a hint of salt made it clear: this recipe was a keeper.
It wasn’t just the taste but the texture — so smooth and creamy it almost felt like I’d spent hours churning it. The golden caramel ribbons swirled throughout added that little surprise bite each time. Watching my partner’s reaction made me realize that sometimes the simplest homemade desserts can feel like a little luxury, especially on those evenings when you want something indulgent but fuss-free. This creamy no-churn salted caramel ice cream recipe stuck with me because it’s a rare treat that doesn’t demand a ton of time or special gear but still impresses with every scoop. I have a feeling it’ll do the same for you.
Why You’ll Love This Recipe
This creamy no-churn salted caramel ice cream recipe has quickly become one of my go-to desserts for good reasons. It’s just so darn easy and satisfying! I’ve tested versions with and without an ice cream maker, and honestly, this no-churn version holds up beautifully — silky texture, deep caramel flavor, and just the right hint of saltiness to keep every bite interesting. You’ll appreciate how approachable it is, even if you’ve never made homemade ice cream before.
- Quick & Easy: Ready in under 15 minutes of prep time, then just freeze — perfect for busy weeknights or last-minute dessert cravings.
- Simple Ingredients: Uses pantry staples like sweetened condensed milk and heavy cream, plus homemade caramel sauce you can whip up in a snap.
- Perfect for Any Occasion: Whether you’re wrapping up a family dinner or need a fuss-free treat for a casual gathering, this hits the spot.
- Crowd-Pleaser: I’ve never met a kid or adult who turned down a second scoop — it’s that irresistible.
- Unbelievably Delicious: The creamy texture combined with the salty-sweet caramel ribbons makes it feel like comfort food with a gourmet twist.
What sets this recipe apart is the way the caramel sauce is swirled through the ice cream rather than mixed in completely — those pockets of golden goodness add a playful texture and bursts of flavor that you don’t always get with store-bought versions. Plus, the no-churn method means you don’t have to worry about complicated equipment or babysitting your ice cream maker. It’s homemade sweetness with zero stress, which honestly makes it my favorite kind of dessert.
What Ingredients You Will Need
This creamy no-churn salted caramel ice cream recipe uses straightforward ingredients that come together to create a rich and luscious treat. The components are mostly pantry staples, and the homemade caramel sauce is surprisingly simple to pull off — no fancy syrups needed!
- For the Ice Cream Base:
- Heavy cream, cold (2 cups / 480 ml) – this provides the silky, creamy texture.
- Sweetened condensed milk (1 can, 14 oz / 396 g) – it adds sweetness and helps the ice cream set without churning.
- Pure vanilla extract (1 teaspoon) – for that warm, familiar flavor base.
- Fine sea salt (1/4 teaspoon) – balances the sweetness and enhances flavor.
- For the Salted Caramel Sauce:
- Granulated sugar (1 cup / 200 g) – the heart of the caramel flavor.
- Unsalted butter, cubed (6 tablespoons / 85 g), softened – adds richness and smoothness.
- Heavy cream, warm (1/2 cup / 120 ml) – makes the caramel sauce creamy and pourable.
- Flaky sea salt (1 teaspoon) – sprinkled on top for that perfect salty crunch.
If you want to tweak the recipe, you can swap out the sweetened condensed milk for a dairy-free version or use coconut cream instead of heavy cream for a slightly different texture (though it won’t be quite as fluffy). For the caramel, I recommend using a trusted brand of unsalted butter like Kerrygold for that deep, creamy flavor. And if you’re making this during berry season, try adding fresh blueberries or raspberries on top for a pop of tartness, similar to the fresh fruit in my blueberry lemon breakfast scones.
Equipment Needed
The beauty of this creamy no-churn salted caramel ice cream recipe is how minimal the equipment needs to be. You don’t need an ice cream maker, which honestly makes it way less intimidating.
- Mixing bowls – one large for whipping the cream, and one medium for combining the base ingredients.
- Electric hand mixer or stand mixer – essential for whipping the heavy cream to soft peaks.
- Medium saucepan – to make the salted caramel sauce.
- Rubber spatula – for folding the whipped cream gently into the condensed milk mixture.
- Loaf pan or any freezer-safe container – for freezing the ice cream.
- Plastic wrap or airtight lid – to cover the ice cream while freezing.
If you don’t have a hand mixer, a whisk can work, but it’ll take a bit more elbow grease to get the cream to the right consistency. I once tried whipping cream by hand for this recipe—it was a workout but totally doable if you’re patient! For the caramel, using a heavy-bottomed saucepan helps prevent the sugar from burning too quickly. If you don’t have a loaf pan, any shallow container will do, just make sure it’s freezer-safe to avoid any cracking or damage.
Preparation Method
- Make the Salted Caramel Sauce:
In a medium saucepan over medium heat, add 1 cup (200 g) granulated sugar. Stir constantly with a heat-resistant spatula or wooden spoon as the sugar melts and caramelizes. This takes about 5-7 minutes — keep your eyes on it because it can go from golden to burnt quickly.
Once the sugar is a deep amber color and fully melted, immediately add 6 tablespoons (85 g) of softened unsalted butter. The mixture will bubble vigorously, so be careful. Stir until butter is fully incorporated, about 1-2 minutes.
Slowly pour in 1/2 cup (120 ml) warm heavy cream while stirring continuously. Let the sauce boil for another minute until smooth. Remove from heat and stir in 1 teaspoon flaky sea salt. Set aside to cool completely — it will thicken as it cools.
- Prepare the Ice Cream Base:
In a large bowl, pour 1 can (14 oz / 396 g) sweetened condensed milk and stir in 1 teaspoon pure vanilla extract and 1/4 teaspoon fine sea salt until combined.
- Whip the Heavy Cream:
In a separate large bowl, use an electric mixer to whip 2 cups (480 ml) cold heavy cream on medium-high speed until soft peaks form (about 3-4 minutes). You want the cream fluffy but not stiff.
- Combine and Fold:
Gently fold the whipped cream into the condensed milk mixture using a rubber spatula. Fold carefully to keep the airiness intact — this is what makes the ice cream creamy without churning.
- Layer the Ice Cream and Caramel:
Pour half of the ice cream base into a freezer-safe loaf pan or container. Drizzle half of the cooled salted caramel sauce over the top. Use a knife or skewer to swirl the caramel gently into the ice cream base. Repeat with remaining ice cream and caramel, swirling again to create ribbons.
Sprinkle a pinch of flaky sea salt on top for an extra hit of saltiness.
- Freeze:
Cover with plastic wrap or an airtight lid and freeze for at least 6 hours or overnight for best texture.
- Serve:
When ready to serve, let ice cream sit at room temperature for 5-10 minutes to soften slightly for easier scooping.
One tip I learned the hard way: don’t skip letting the caramel cool before swirling it in, or it’ll melt the whipped cream base and make the texture less fluffy. Also, folding gently is key — rushing this step can deflate your cream and make the ice cream dense.
Cooking Tips & Techniques
Making no-churn ice cream might sound straightforward, but there are a few tricks I’ve picked up over time that really make a difference. First, chilling your mixing bowl and beaters before whipping the cream helps it whip faster and hold its shape better. I actually keep a bowl in the fridge just for this purpose — it’s a small thing but makes whipping cream less of a hassle.
When making caramel, patience is a virtue. Stirring sugar constantly prevents clumps and burning, but don’t rush the color change; a deep amber means rich flavor, but any darker and you risk bitterness. I’ve burnt caramel more times than I want to admit, so I now stand right by the stove and keep my attention laser-focused.
For folding the whipped cream into the condensed milk, think gentle and deliberate. Use a wide spatula and scoop under the cream, folding it over the mixture rather than stirring. This keeps the airy texture intact, which is what gives the ice cream that creamy, scoopable softness without churning.
Lastly, freezing time matters. I’ve found the ice cream’s texture improves the longer it freezes — a quick 4-hour freeze works, but overnight is best for that perfect firmness without iciness. And if you’re in a hurry, letting it soften at room temperature for a few minutes before scooping makes serving a breeze.
Variations & Adaptations
This creamy no-churn salted caramel ice cream recipe is a fantastic base that you can easily tweak to fit your taste or dietary needs.
- Dairy-Free Version: Swap heavy cream for coconut cream and use sweetened condensed coconut milk. The texture will be slightly different but still creamy and delicious.
- Chocolate-Caramel Swirl: Add a layer of melted bittersweet chocolate or cocoa powder folded into part of the base before swirling with caramel for a salted caramel chocolate twist.
- Nutty Caramel Crunch: Fold in toasted pecans or walnuts along with the caramel swirl for some added texture and nuttiness — this is one of my favorite upgrades for a little crunch.
- Spiced Caramel: Stir a pinch of cinnamon or cardamom into the caramel sauce for a warm spice note that pairs beautifully with the sweet and salty flavors.
- Alcohol-Infused: Add a tablespoon of bourbon or dark rum to the caramel sauce for an adult-only version that’s perfect for special occasions.
I once tried mixing in some homemade caramel from my fig balsamic glazed chicken marinade — it was an unexpectedly delightful combo, proof that this recipe plays well with other caramel-infused dishes.
Serving & Storage Suggestions
This creamy no-churn salted caramel ice cream is best served slightly softened so you get that melt-in-your-mouth experience. A scoop or two in a chilled bowl, topped with a sprinkle of flaky sea salt or a drizzle of extra caramel sauce, makes for a simple yet satisfying presentation.
It pairs wonderfully with warm desserts like an apple crisp or alongside a slice of rich chocolate cake — if you’re planning a brunch spread, this ice cream would be a dreamy finish after something like the savory Father’s Day brunch crepes. For drinks, a strong cup of espresso or a caramel latte complements the flavors beautifully.
Store leftovers in an airtight container in the freezer to keep it from absorbing any fridge odors. It keeps well for up to 2 weeks, but you’ll want to consume it sooner for the best texture. To re-soften after freezing, let it sit at room temperature for about 10 minutes before scooping.
Interestingly, the caramel ribbons tend to intensify in flavor the longer the ice cream sits, making each scoop a bit more decadent as time goes on.
Nutritional Information & Benefits
One serving (about 1/2 cup or 120 ml) of this creamy no-churn salted caramel ice cream contains roughly 250-300 calories, depending on portion size and caramel amount. It’s rich in fats from the heavy cream and butter, offering a satisfying dose of energy, and moderately high in sugar due to the sweetened condensed milk and caramel.
The recipe is gluten-free naturally, which is great for those avoiding gluten. The sea salt adds trace minerals, while the caramel sauce’s butter and cream provide some fat-soluble vitamins like A and E.
As a homemade dessert, it’s free from preservatives, artificial flavors, and stabilizers often found in store-bought ice creams. When enjoyed in moderation, it’s a lovely way to indulge thoughtfully, especially compared to processed sweets.
Conclusion
This creamy no-churn salted caramel ice cream recipe is one of those rare treats that feels both indulgent and effortlessly simple. It’s the kind of dessert you can whip up without specialized equipment, using familiar ingredients, yet it delivers that rich, luxurious flavor that feels special. I love how easy it is to customize — whether you want to add nuts, chocolate, or a splash of booze — it’s a flexible base for creativity.
Making this recipe reminded me that homemade desserts don’t have to be complicated to be memorable. If you’ve been looking for a no-fuss way to impress your family or just treat yourself, this salted caramel ice cream might just be your new favorite.
If you try it, I’d love to hear how you made it your own or what you paired it with. Sharing those little adaptations makes cooking even more fun and personal. Here’s to many creamy, salty-sweet scoops ahead!
FAQs
Can I make this salted caramel ice cream without an electric mixer?
Yes, but whipping the cream by hand will take more time and effort. Use a large bowl and a sturdy whisk, and be prepared for a bit of an arm workout. Make sure your cream is very cold to help it whip better.
How do I store leftover ice cream to keep it from getting icy?
Store it in an airtight container in the freezer and press plastic wrap directly on the surface before sealing. This reduces ice crystals. Let the ice cream soften at room temperature for 5-10 minutes before serving.
Can I use store-bought caramel sauce instead of making my own?
Absolutely! Just choose a high-quality salted caramel sauce you like, and swirl it into the ice cream base the same way. Homemade caramel gives a fresher taste but store-bought works fine for convenience.
Is this recipe suitable for vegans?
Not as written, but you can make it vegan by substituting coconut cream for heavy cream and using sweetened condensed coconut milk. Use a vegan caramel recipe or sauce to keep it completely plant-based.
Why does my ice cream sometimes get icy or grainy?
This can happen if the cream isn’t whipped enough or if air isn’t incorporated well. Also, swirling in warm caramel can melt the base, causing texture issues. Make sure your caramel is cooled and fold ingredients gently to keep the texture smooth.
Pin This Recipe!
Creamy No-Churn Salted Caramel Ice Cream

A rich and luscious no-churn ice cream featuring silky texture and swirls of homemade salted caramel sauce. Easy to make with simple pantry ingredients and no special equipment.
- Prep Time: 15 minutes
- Cook Time: 10 minutes
- Total Time: 6 hours 25 minutes
- Yield: 8 servings 1x
- Category: Dessert
- Cuisine: American
Ingredients
- 2 cups (480 ml) cold heavy cream
- 1 can (14 oz / 396 g) sweetened condensed milk
- 1 teaspoon pure vanilla extract
- 1/4 teaspoon fine sea salt
- 1 cup (200 g) granulated sugar
- 6 tablespoons (85 g) unsalted butter, softened and cubed
- 1/2 cup (120 ml) warm heavy cream
- 1 teaspoon flaky sea salt
Instructions
- Make the Salted Caramel Sauce: In a medium saucepan over medium heat, add 1 cup granulated sugar. Stir constantly as the sugar melts and caramelizes (5-7 minutes) until deep amber color.
- Immediately add 6 tablespoons softened unsalted butter and stir until fully incorporated (1-2 minutes).
- Slowly pour in 1/2 cup warm heavy cream while stirring continuously. Let boil for 1 minute until smooth. Remove from heat and stir in 1 teaspoon flaky sea salt. Set aside to cool completely.
- Prepare the Ice Cream Base: In a large bowl, combine 1 can sweetened condensed milk, 1 teaspoon vanilla extract, and 1/4 teaspoon fine sea salt.
- Whip the Heavy Cream: In a separate large bowl, whip 2 cups cold heavy cream with an electric mixer on medium-high speed until soft peaks form (3-4 minutes).
- Gently fold the whipped cream into the condensed milk mixture using a rubber spatula, keeping the mixture airy.
- Layer the Ice Cream and Caramel: Pour half of the ice cream base into a freezer-safe loaf pan or container. Drizzle half of the cooled salted caramel sauce on top and swirl gently with a knife or skewer.
- Repeat with remaining ice cream base and caramel sauce, swirling again. Sprinkle a pinch of flaky sea salt on top.
- Cover with plastic wrap or airtight lid and freeze for at least 6 hours or overnight.
- Before serving, let ice cream sit at room temperature for 5-10 minutes to soften slightly.
Notes
Let the caramel cool completely before swirling into the ice cream base to avoid melting the whipped cream. Fold whipped cream gently to keep the mixture airy. Chilling mixing bowls and beaters helps whip cream faster. Freeze overnight for best texture. Let ice cream soften 5-10 minutes before scooping.
Nutrition
- Serving Size: 1/2 cup (120 ml)
- Calories: 275
- Sugar: 25
- Sodium: 120
- Fat: 18
- Saturated Fat: 11
- Carbohydrates: 27
- Protein: 3
Keywords: no-churn ice cream, salted caramel, homemade ice cream, easy dessert, no ice cream maker, creamy ice cream, caramel sauce