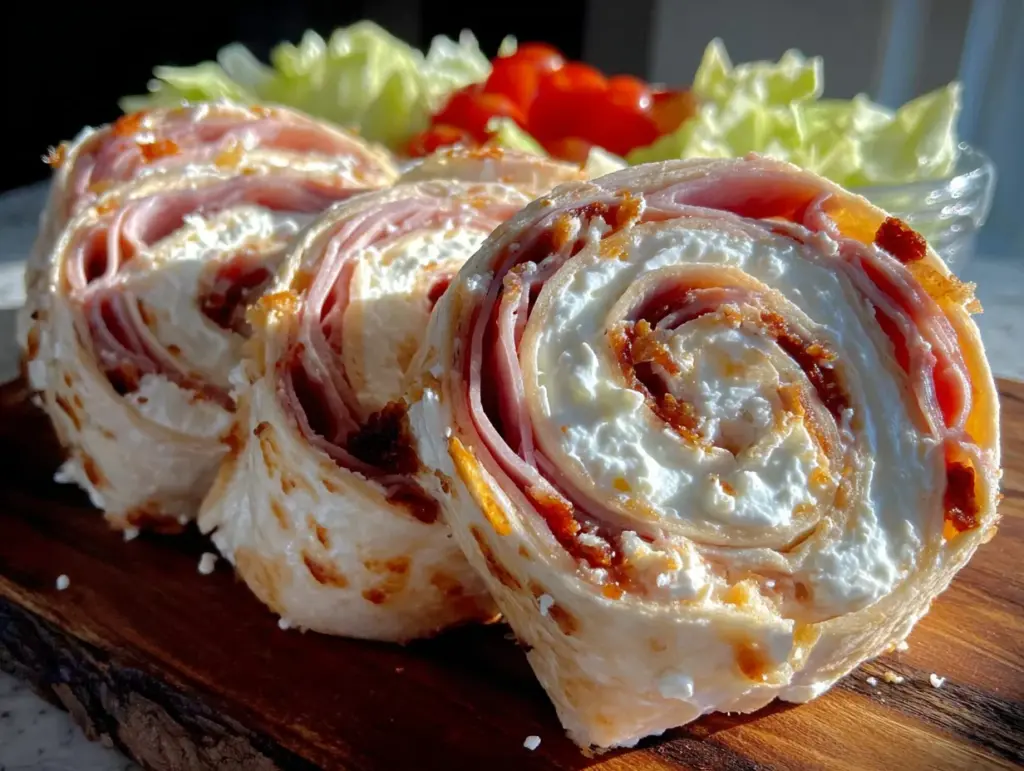
Standing in my kitchen at 6:47 AM, staring at a half-empty package of tortillas and a block of cream cheese that really needed using up—that’s where this whole thing started. My youngest was circling me like a tiny shark, asking what was for lunch, and I had approximately zero energy left to think about it. The turkey slices in the fridge were about to hit their expiration date, and honestly? I just needed something, anything, that would come together fast and not end up in the trash at noon.
I grabbed the cream cheese, softened it in the microwave for about fifteen seconds (don’t judge), and started spreading. The tortilla rolled up easily, and when I sliced it, those little spirals looked so ridiculously cute that I actually laughed out loud. My kid grabbed one, then another, and by the time I had the lunchbox packed, half the pinwheels were already gone. That’s when I knew I’d stumbled onto something good.
These easy turkey pinwheel lunchbox roll-ups with cream cheese have become our go-to for school lunches, afternoon snacks, and even party platters. They’re the kind of recipe that saves you on those mornings when you’re running late and the coffee hasn’t kicked in yet. No cooking required, minimal mess, and they actually taste like something you’d want to eat—not just bland leftovers shoved into a container. Honestly, if I can make these work at 6AM with one eye open, you can too.
Why You’ll Love This Recipe
Let me tell you why these roll-ups have earned a permanent spot in our weekly rotation. I’ve tested this recipe about a dozen times—sometimes with different fillings, sometimes with different tortillas—and every single time, they disappear fast. Here’s what makes them special:
- Ready in 10 Minutes : No joke, you can have these assembled and sliced in the time it takes to pour your morning coffee. Perfect for those mornings when you’re running behind (which, let’s face it, is most mornings).
- Simple Ingredients : You probably have everything in your fridge right now. Cream cheese, deli turkey, tortillas, and whatever veggies or extras you like. No fancy grocery store runs required.
- Perfect for Lunchboxes : These hold up beautifully in a lunchbox for hours. No sogginess, no weird textures—just perfectly rolled pinwheels that stay fresh until lunchtime.
- Crowd-Pleaser : My kids devour these, but so do adults at parties. I’ve brought them to potlucks and watched grownups hover around the platter like it’s the main event.
- Endlessly Customizable : You can switch up the fillings based on what you have or what your kids like. It’s practically impossible to mess these up.
What makes this different from other pinwheel recipes? It’s the cream cheese base. Most recipes use flavored spreads or try to get fancy, but plain cream cheese gives you this perfect, creamy foundation that holds everything together without overpowering the other flavors. Plus, it keeps the tortilla soft and pliable—no cracking or breaking when you roll it up. I’ve tried other methods, and honestly, nothing works as well as good old-fashioned cream cheese.
These aren’t just lunchbox fillers. They’re the kind of snack that makes you feel like you’ve got your act together, even when you’re winging it. And honestly? That feeling is priceless.
What Ingredients You Will Need
This recipe uses simple, everyday ingredients that come together to create something genuinely delicious. Nothing exotic, nothing hard to find—just good, basic staples that work beautifully together.
For the Pinwheels
- 8 ounces cream cheese, softened to room temperature (I prefer Philadelphia for the smoothest spread, but any brand works)
- 4 large flour tortillas (burrito size, about 10 inches—the bigger ones roll up easier and give you more pinwheels per tortilla)
- 8 slices deli turkey, thin-sliced (I like oven-roasted turkey breast for its mild flavor, but smoked turkey works great too)
- 1/2 cup shredded lettuce (romaine or iceberg both work—iceberg stays crunchier longer in the fridge)
- 1/4 cup shredded carrots (for color and a little sweetness—you can skip these if your kids are anti-veggie)
Optional Add-Ins

- 2 tablespoons ranch dressing mix (stir into the cream cheese for extra flavor—hidden valley is my go-to)
- 4 slices provolone or cheddar cheese (adds richness and helps everything stick together)
- 1/4 cup sliced bell peppers (any color works, but red adds the most visual pop)
- 2 tablespoons everything bagel seasoning (sprinkle on top for a trendy twist that kids actually love)
- 1/4 cup cucumber, thinly sliced and patted dry (adds freshness without making things soggy)
A quick note on ingredient selection: always pat your veggies dry before adding them to the roll-ups. Wet vegetables will make the tortilla soggy over time, and nobody wants a mushy pinwheel at lunchtime. I learned this the hard way after a particularly sad batch that looked great at 7AM but was a disaster by noon.
For the cream cheese, make sure it’s truly softened—not cold, not melted, but that perfect spreadable consistency. If you forget to take it out of the fridge (which I do approximately 80% of the time), microwave it in 10-second bursts until it’s soft but not hot. Hot cream cheese will tear your tortilla, so be patient.
And about the tortillas: flour tortillas work best here. Whole wheat is fine too, but corn tortillas are too small and brittle—they’ll crack when you try to roll them. I’ve tried, and it wasn’t pretty.
Equipment Needed
- Cutting board (any size works, but a larger one gives you room to work)
- Sharp knife (a serrated bread knife actually works best for clean slices without squishing the pinwheels)
- Butter knife or offset spatula (for spreading the cream cheese evenly)
- Plastic wrap or parchment paper (for wrapping the rolled tortillas before chilling)
- Small mixing bowl (if you’re mixing anything into the cream cheese)
- Toothpicks (optional, for securing the pinwheels if they’re being transported)
If you don’t have a serrated knife, a very sharp chef’s knife works—just use a gentle sawing motion rather than pressing down hard. I’ve also used a pizza cutter in a pinch, and honestly, it works surprisingly well for clean edges. Just make sure it’s sharp enough to cut through without squishing.
For storage, I recommend a good set of airtight containers. These pinwheels keep best when they’re snug in the container—too much air circulation dries them out. If you’re packing them for school lunch, a bento-style box with compartments works perfectly.
Preparation Method
- Soften the cream cheese: Take your cream cheese out of the fridge about 30 minutes before you start, or microwave it in 10-second bursts until soft. You want it spreadable but not warm. If you’re adding ranch mix or any seasonings, stir them into the cream cheese now until everything’s well combined.
- Prepare your work surface: Lay one tortilla flat on your cutting board. Make sure it’s at room temperature—cold tortillas crack when you roll them. If yours just came out of the fridge, let them sit on the counter for 5 minutes first.
- Spread the cream cheese: Using your butter knife or offset spatula, spread a thin, even layer of cream cheese over the entire surface of the tortilla. Go all the way to the edges—this acts as the glue that holds everything together. Don’t use too much, or your pinwheels will be messy. You want just enough to coat the tortilla without it oozing out when you roll.
- Layer the fillings: Place 2 slices of turkey flat on top of the cream cheese, covering most of the surface. If you’re adding cheese slices, lay them on top of the turkey. Sprinkle a thin layer of shredded lettuce and carrots (or whatever veggies you’re using) evenly across the surface. Don’t overstuff—less is more here. Too many fillings make it hard to roll and cause everything to squish out the sides.
- Roll it up tight: Starting at one edge, roll the tortilla tightly but gently. Use your fingers to keep the fillings in place as you go. Think of it like rolling a sleeping bag—you want it snug but not so tight that the tortilla tears. When you reach the end, press down gently to seal the seam.
- Wrap and chill: Wrap each rolled tortilla tightly in plastic wrap or parchment paper. This helps them hold their shape and makes slicing much easier. Pop them in the fridge for at least 30 minutes—an hour is even better. I know it’s tempting to skip this step, but don’t. Chilling firms up the cream cheese and makes the pinwheels hold together when you slice them.
- Slice into pinwheels: Unwrap your chilled rolls and place them on the cutting board. Using a sharp serrated knife, slice each roll into 1-inch thick rounds. Use a gentle sawing motion rather than pressing straight down—this gives you clean edges without squishing the rolls. You should get about 6-8 pinwheels per tortilla, depending on how thick you slice them.
- Arrange and serve: Place the pinwheels cut-side up on a plate or in your lunchbox. They should look like little spirals with all the colorful layers visible. If you’re packing them for later, arrange them in a single layer in an airtight container with a piece of paper towel on top to absorb any excess moisture.
A quick tip from someone who’s made these more times than I can count: if your pinwheels are falling apart when you slice them, they weren’t chilled long enough. Pop them back in the fridge for another 15 minutes and try again. Also, wipe your knife clean between cuts—cream cheese buildup on the blade makes messy slices.
Cooking Tips & Techniques
After making these roll-ups for school lunches, parties, and even road trip snacks, I’ve picked up a few tricks that make a real difference. Let me share what I’ve learned—including the mistakes I’ve made so you don’t have to repeat them.
The biggest mistake I see people make is overfilling the tortillas. I get it—you want to pack in as much goodness as possible. But too many fillings makes the roll bulky and hard to slice cleanly. The fillings also tend to fall out the sides, leaving you with a mess instead of neat little pinwheels. Stick to thin layers, and you’ll get much better results.
Another common issue is soggy pinwheels. This happens when you use wet vegetables or don’t drain them properly. If you’re adding tomatoes, cucumbers, or bell peppers, pat them dry with paper towels first. I also recommend placing a paper towel in the container with your pinwheels—it absorbs any moisture that accumulates and keeps everything fresh longer.
For the cleanest slices, use a serrated knife and a gentle sawing motion. Pressing straight down with a regular knife squishes the roll and makes the fillings slide out. I learned this after accidentally mutilating an entire batch before a party. Now I always use my bread knife, and the difference is night and day.
If you’re making these ahead of time, wait to slice them until just before serving. Whole rolled tortillas keep beautifully in the fridge for up to 3 days, but once sliced, they start to dry out after about 24 hours. I usually roll and chill them the night before, then slice and pack them in the morning. It saves time without sacrificing freshness.
For parties, try making a double batch with different fillings. I’ll do one batch with turkey and cheese, another with ham and Swiss, and maybe a third with just veggies for the vegetarian crowd. They look gorgeous arranged on a platter together, and everyone finds something they like.
Variations & Adaptations
One of the best things about this recipe is how easy it is to change up based on what you have or what your family likes. Here are some of my favorite variations:
Dietary Adaptations
- Gluten-Free: Use gluten-free tortillas (the almond flour or cassava flour ones work best—they’re pliable enough to roll without cracking)
- Low-Carb/Keto: Swap the flour tortillas for large lettuce leaves or low-carb tortillas. I’ve also used thinly sliced deli ham as the wrapper, which is surprisingly delicious.
- Dairy-Free: Use dairy-free cream cheese (I like Kite Hill or Violife brands—they spread well and taste great)
- Vegetarian: Skip the turkey and load up on veggies, or use plant-based deli slices. Hummus also works beautifully as a spread instead of cream cheese.
Flavor Variations
- Italian Style: Mix Italian seasoning into the cream cheese, use provolone cheese, and add sliced salami instead of turkey. Serve with marinara for dipping.
- Southwest Style: Stir taco seasoning into the cream cheese, use pepper jack cheese, and add black beans and corn. These are always a hit at parties.
- Everything Bagel Style: Mix everything bagel seasoning into the cream cheese, use smoked turkey, and add a thin layer of cucumber. It tastes just like your favorite bagel sandwich.
- Buffalo Chicken Style: Mix buffalo sauce into the cream cheese, use shredded rotisserie chicken instead of turkey, and add a little blue cheese crumble. Warning: these disappear fast.
Seasonal Twists
- Spring: Add thinly sliced radishes and fresh dill to the cream cheese for a bright, fresh flavor.
- Summer: Use fresh basil leaves and sliced tomatoes (patted dry!) with mozzarella for a caprese-inspired version.
- Fall: Add a thin layer of cranberry sauce and some fresh spinach for a holiday-inspired twist.
- Winter: Mix roasted red pepper spread into the cream cheese and use roast beef instead of turkey.
I once made a batch with leftover Easter ham and a smear of honey mustard, and my kids still ask for that version. Don’t be afraid to experiment—the worst that happens is you eat a slightly weird pinwheel for lunch, and honestly, that’s not such a bad outcome.
Serving & Storage Suggestions
These pinwheels are incredibly versatile when it comes to serving. Here’s what works best:
For lunchboxes: Pack the pinwheels in a single layer with a small piece of paper towel on top to absorb moisture. They’ll stay fresh for about 4-5 hours at room temperature, which is perfect for school lunches. If you’re packing them the night before, keep them in the fridge and add an ice pack to the lunchbox in the morning.
For parties and gatherings: Arrange the pinwheels on a platter cut-side up so everyone can see the beautiful spirals. They look gorgeous next to a bowl of ranch dressing or honey mustard for dipping. I like to garnish the platter with some fresh herbs or extra shredded carrots for color.
For snacks: Serve them cold or at room temperature—they’re delicious either way. My kids eat them straight from the fridge as an after-school snack, and I’ve been known to grab a few while packing lunches (quality control, you know).
Storage tips: Whole rolled tortillas (unsliced) can be stored in the fridge for up to 3 days. Sliced pinwheels are best within 24 hours. To freeze, wrap the whole rolls tightly in plastic wrap and then foil—they’ll keep for up to 2 months. Thaw in the fridge overnight before slicing.
Reheating note: These are meant to be served cold, so no reheating needed. If you want them warm (which is actually pretty tasty), pop them in the microwave for about 10 seconds, but be careful—the cream cheese gets hot fast.
One thing I love about these roll-ups is that the flavors actually meld together and improve after a few hours in the fridge. The cream cheese absorbs the flavors from the turkey and seasonings, and everything just tastes more cohesive. So don’t stress about making them too far ahead—they might actually be better that way.
Nutritional Information & Benefits
These turkey pinwheel roll-ups are actually a pretty balanced snack or lunch option. Here’s a rough breakdown per serving (about 6 pinwheels):
- Calories: 280-320 (depending on fillings)
- Protein: 18-22 grams
- Carbohydrates: 22-26 grams
- Fat: 14-18 grams
- Fiber: 2-3 grams
- Sugar: 3-5 grams
The turkey provides lean protein that keeps kids full and focused through the school day. Cream cheese adds calcium and a little healthy fat for brain function. And if you load up on veggies, you’re getting extra fiber, vitamins, and antioxidants with every bite.
For a lighter version, use reduced-fat cream cheese and whole wheat tortillas. You can also swap the turkey for chicken breast or even tofu slices if you’re watching sodium intake. Just be aware that deli meats can be high in sodium, so look for low-sodium options if that’s a concern.
These roll-ups are naturally low in added sugar (unless you’re adding sweet ingredients) and can easily fit into most dietary patterns. They’re also a great way to sneak extra vegetables into picky eaters’ lunches—the cream cheese and turkey mask the veggie flavor pretty well.
If you’re looking for other healthy lunch options, you might enjoy our no-cook bento box lunch formula or these 5-ingredient no-bake energy balls for another quick and healthy snack idea.
Conclusion
These easy turkey pinwheel lunchbox roll-ups with cream cheese have honestly saved my sanity on more mornings than I can count. They’re quick, they’re versatile, and they actually taste good—which is more than I can say for a lot of the other lunchbox ideas I’ve tried over the years.
What I love most about this recipe is how forgiving it is. You can use whatever you have in the fridge, adjust the fillings to suit your family’s tastes, and still end up with something that looks and tastes like you put real effort into it. And on those chaotic mornings when everything feels like it’s falling apart, having a reliable recipe like this in your back pocket makes a real difference.
I’d love to hear how these turn out for you! Try them with different fillings, experiment with new flavor combinations, and let me know what your family thinks. Drop a comment below or tag me in your photos—I genuinely love seeing how people make these their own. And if you have a variation that your kids go crazy for, please share it. We’re all in this lunch-packing journey together, and we could all use a few more ideas.
Now go forth and roll those tortillas. Your lunchboxes (and your sanity) will thank you.
Frequently Asked Questions
Can I make these turkey pinwheels the night before?
Absolutely! In fact, I recommend it. Roll the tortillas, wrap them tightly in plastic wrap, and refrigerate overnight. Just wait to slice them until the morning—they’ll stay fresher that way. The flavors actually meld together beautifully overnight.
How do I keep the pinwheels from getting soggy in a lunchbox?
Pat all your vegetables dry before adding them, and place a paper towel in the container on top of the pinwheels. The paper towel absorbs excess moisture without drying out the roll-ups. If you’re using an ice pack, make sure the pinwheels aren’t sitting directly on it—condensation can make them soggy.
Can I freeze turkey pinwheel roll-ups?
Yes! Freeze the whole rolled tortillas (unsliced) wrapped tightly in plastic wrap and then foil. They’ll keep for up to 2 months. Thaw in the refrigerator overnight before slicing and serving. I wouldn’t recommend freezing already-sliced pinwheels—the texture gets weird.
What’s the best way to slice pinwheels without them falling apart?
Use a serrated knife and a gentle sawing motion—don’t press straight down. Make sure the rolls are well-chilled (at least 30 minutes in the fridge). Wipe the knife clean between cuts to prevent cream cheese buildup. And don’t overfill the tortillas—thin, even layers hold together much better.
Can I use flavored cream cheese instead of plain?
Definitely! Chive and onion cream cheese works great with turkey. Strawberry cream cheese is actually delicious with turkey too—don’t knock it till you try it. Just keep in mind that flavored cream cheeses can be saltier or sweeter than plain, so adjust your other fillings accordingly.
Pin This Recipe!

Easy Turkey Pinwheel Lunchbox Roll-Ups with Cream Cheese

These easy turkey pinwheel lunchbox roll-ups with cream cheese are a quick, no-cook recipe perfect for school lunches, snacks, or party platters. Ready in 10 minutes with simple ingredients, they’re endlessly customizable and always a crowd-pleaser.
- Prep Time: 10 minutes
- Cook Time: 0 minutes
- Total Time: 40 minutes (includes 30 minutes chilling)
- Yield: 4 servings 1x
- Category: Lunch, Snack, Appetizer
- Cuisine: American
Ingredients
- 8 ounces cream cheese, softened to room temperature
- 4 large flour tortillas (burrito size, about 10 inches)
- 8 slices deli turkey, thin-sliced
- 1/2 cup shredded lettuce (romaine or iceberg)
- 1/4 cup shredded carrots
- 2 tablespoons ranch dressing mix (optional)
- 4 slices provolone or cheddar cheese (optional)
- 1/4 cup sliced bell peppers (optional)
- 2 tablespoons everything bagel seasoning (optional)
- 1/4 cup cucumber, thinly sliced and patted dry (optional)
Instructions
- Soften the cream cheese: Take cream cheese out of fridge 30 minutes before starting, or microwave in 10-second bursts until soft but not warm. If using ranch mix or seasonings, stir into cream cheese until combined.
- Prepare your work surface: Lay one tortilla flat on a cutting board. Ensure tortilla is at room temperature.
- Spread the cream cheese: Using a butter knife or offset spatula, spread a thin, even layer of cream cheese over the entire surface of the tortilla, going all the way to the edges.
- Layer the fillings: Place 2 slices of turkey flat on the cream cheese. If using cheese, lay on top of turkey. Sprinkle a thin layer of shredded lettuce and carrots (or other veggies) evenly across the surface. Do not overstuff.
- Roll it up tight: Starting at one edge, roll the tortilla tightly but gently, using fingers to keep fillings in place. Press down gently to seal the seam.
- Wrap and chill: Wrap each rolled tortilla tightly in plastic wrap or parchment paper. Refrigerate for at least 30 minutes (1 hour is better).
- Slice into pinwheels: Unwrap chilled rolls and place on cutting board. Using a sharp serrated knife, slice each roll into 1-inch thick rounds using a gentle sawing motion. You should get 6-8 pinwheels per tortilla.
- Arrange and serve: Place pinwheels cut-side up on a plate or in lunchbox. If packing for later, arrange in a single layer in an airtight container with a paper towel on top to absorb moisture.
Notes
Pat all vegetables dry before adding to prevent sogginess. For cleanest slices, chill rolls at least 30 minutes and use a serrated knife with a gentle sawing motion. Whole rolled tortillas keep in fridge up to 3 days; sliced pinwheels are best within 24 hours. Can freeze whole rolls for up to 2 months.
Nutrition
- Serving Size: 6 pinwheels
- Calories: 300
- Sugar: 4
- Sodium: 650
- Fat: 16
- Saturated Fat: 8
- Carbohydrates: 24
- Fiber: 2.5
- Protein: 20
Keywords: turkey pinwheels, lunchbox roll-ups, cream cheese pinwheels, easy lunch, no-cook recipe, kid-friendly, party appetizer