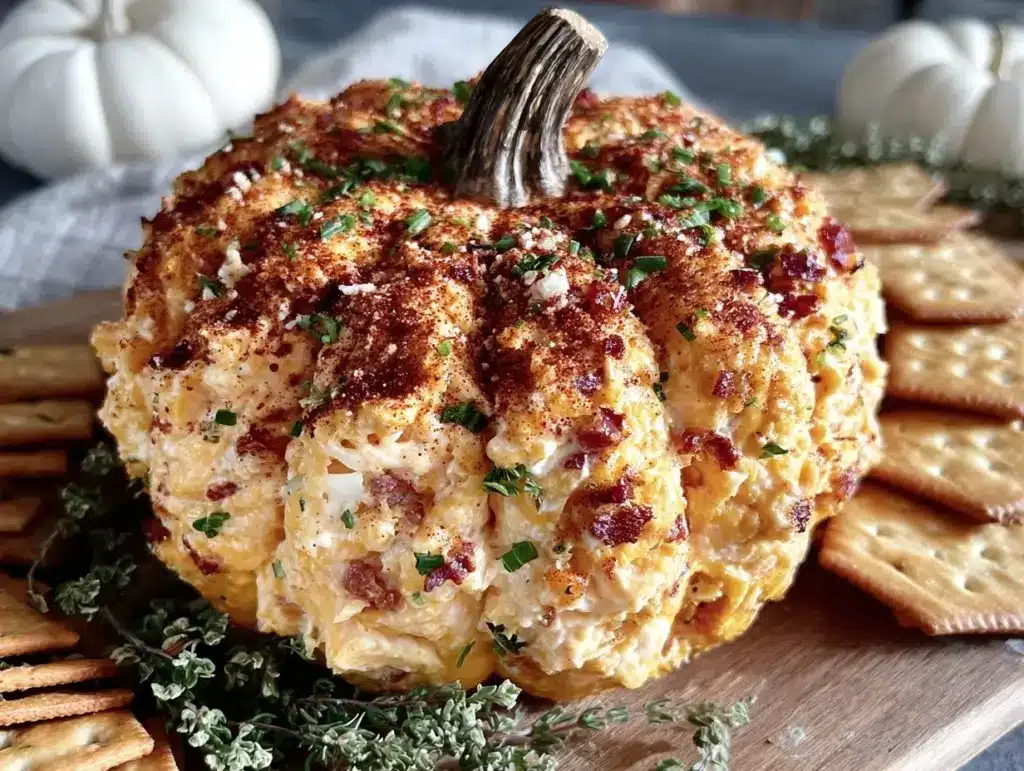
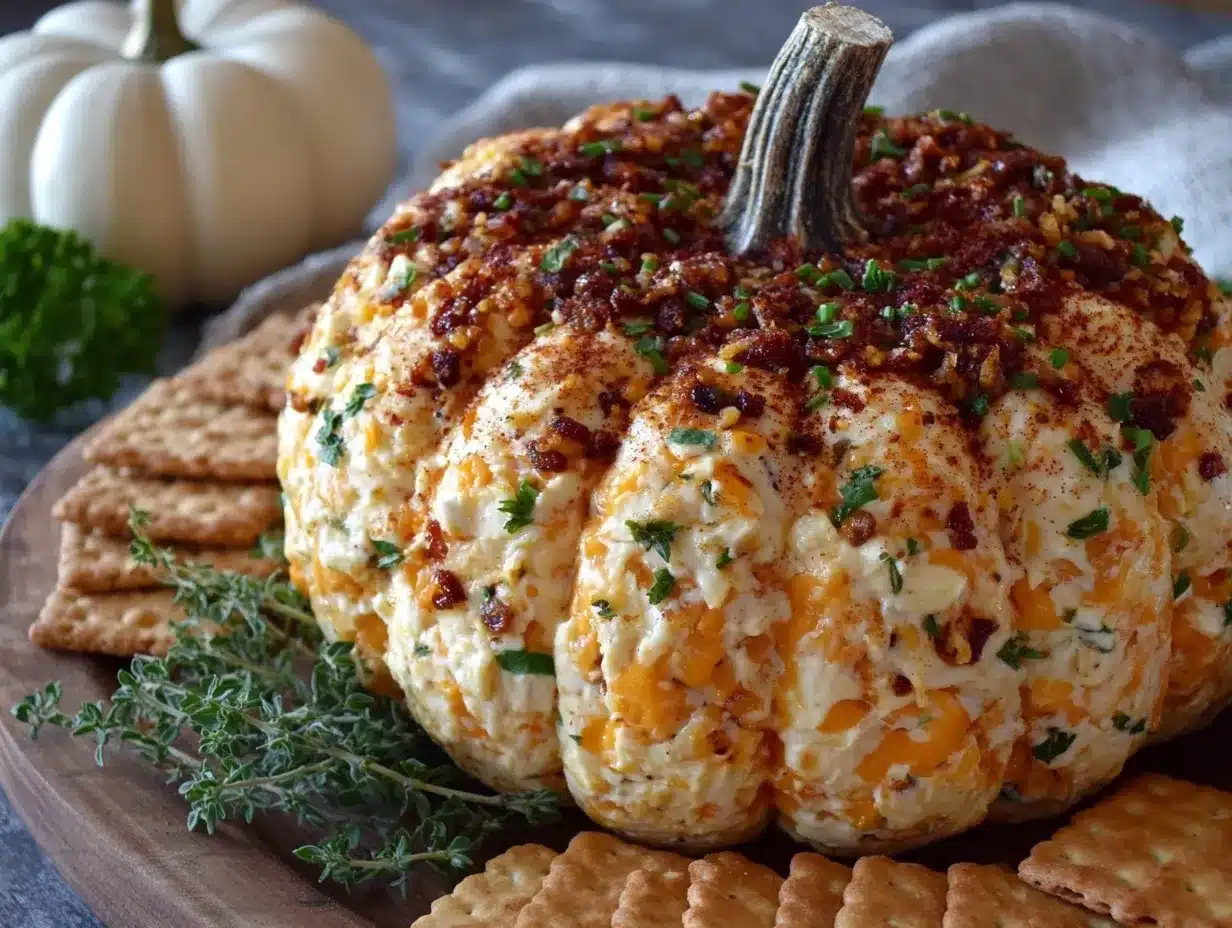
The vibrant orange hue, creamy texture, and festive design of this pumpkin-shaped cheese ball make it a show-stopping centerpiece for any fall gathering. Whether you’re hosting a Thanksgiving dinner or a cozy autumn get-together, this recipe is easy to prepare and guaranteed to impress your guests. I first stumbled upon the idea of creating a cheese ball shaped like a pumpkin when brainstorming fun ways to elevate my usual party appetizers during a fall potluck. It was a huge hit, and I’ve been perfecting the recipe ever since!
This festive pumpkin cheese ball combines savory flavors with a touch of sweetness for the ultimate crowd-pleaser. It’s perfect for serving with crackers, pretzels, or fresh veggie sticks. Plus, it’s super versatile — you can customize the flavors to suit your taste preferences. Trust me, once you make this, it will become a staple for fall entertaining. Let’s dive in!
Why You’ll Love This Recipe
- Eye-catching design: Shaped like an adorable pumpkin, this cheese ball is sure to be a conversation starter at your party.
- Easy to make: You can whip this up in under 30 minutes with just a few simple ingredients.
- Perfect for fall gatherings: Whether it’s Halloween, Thanksgiving, or a casual autumn dinner, this cheese ball fits the theme perfectly.
- Customizable flavors: Add your favorite spices, herbs, or mix-ins to make it uniquely yours.
- Make-ahead magic: Prepare it the night before and save yourself the stress of last-minute party prep.
- Kid-friendly: Even the pickiest eaters love cheesy goodness, and the fun pumpkin shape will win them over.
Unlike store-bought cheese balls, this homemade version is fresh, flavorful, and free from unnecessary additives. Plus, shaping it into a pumpkin makes it extra festive — perfect for photos and social media shares. This recipe has been tested countless times, and I can confidently say it’s as delicious as it is delightful to look at!
What Ingredients You Will Need
This recipe uses simple ingredients that you likely already have in your kitchen. Here’s what you’ll need:
- Cream cheese: Two 8-ounce blocks, softened. I recommend full-fat for the creamiest texture.
- Sharp cheddar cheese: 2 cups, shredded. You can use pre-shredded or grate it fresh for extra flavor.
- Garlic powder: 1 teaspoon for a savory kick.
- Onion powder: 1 teaspoon to amp up the flavor.
- Worcestershire sauce: 1 tablespoon for a tangy depth.
- Chopped green onions: 2 tablespoons for a fresh, slightly zesty touch.
- Paprika: 1/2 teaspoon to enhance the color and flavor.
- Crushed cheese crackers: About 1 cup, for the coating. I love using cheddar-flavored crackers for extra color and crunch.
- Stem: A small bell pepper stem or pretzel rod for the “pumpkin” stem.
Want to customize it? Swap out the sharp cheddar for pepper jack or gouda, or add chopped nuts like pecans for extra texture. You can also adjust the seasonings to match your personal taste.
Equipment Needed
Here’s a quick list of tools you’ll need to make this festive pumpkin cheese ball:
- Mixing bowl: A large bowl for combining all the ingredients.
- Hand mixer or wooden spoon: For mixing the cheese ball mixture until smooth.
- Plastic wrap: To shape and chill your cheese ball.
- Serving plate: A nice platter to display your finished pumpkin cheese ball.
- Knife: For chopping green onions and cutting your bell pepper stem.
- Spatula: Helpful for scooping and shaping the cheese ball.
If you don’t have a hand mixer, don’t worry — a sturdy wooden spoon will get the job done with a little extra elbow grease. And for the crushed crackers, you can use a food processor or seal them in a zip-top bag and crush them with a rolling pin.
How to Make a Festive Pumpkin Shaped Cheese Ball
- Prepare the ingredients: Start by softening the cream cheese to room temperature. Grate the cheddar cheese if you’re using a block, and chop your green onions finely.
- Combine the ingredients: In a large mixing bowl, add the softened cream cheese, shredded cheddar cheese, garlic powder, onion powder, Worcestershire sauce, green onions, and paprika. Use a hand mixer or a wooden spoon to mix everything until smooth and well combined. The mixture should be thick but spreadable.
- Shape the cheese ball: Lay a large piece of plastic wrap on your counter. Transfer the cheese mixture onto the center of the wrap. Gather the edges of the plastic wrap around the cheese mixture, forming it into a ball. Twist the plastic wrap at the top to seal it tightly.
- Chill the cheese ball: Place the wrapped cheese ball in the refrigerator for at least 1-2 hours, or overnight if you’re making it ahead. This step helps the flavors meld and firms up the mixture.
- Prepare the coating: While the cheese ball is chilling, crush the cheese crackers into fine crumbs. You can use a food processor or crush them manually by placing them in a zip-top bag and rolling over them with a rolling pin.
- Coat the cheese ball: Once chilled, unwrap the cheese ball and roll it in the crushed crackers until fully coated. Press gently to ensure the crumbs stick evenly.
- Create the pumpkin shape: Place the coated cheese ball on your serving plate. Use your fingers to shape the ball into a rough pumpkin shape, slightly flattening the top and bottom.
- Add the stem: Insert the bell pepper stem or pretzel rod into the top center of the cheese ball to mimic a pumpkin stem.
- Serve: Garnish with additional green onions or herbs around the base of the pumpkin cheese ball for a festive look. Serve with crackers, pretzels, or veggie sticks.
And there you have it — a gorgeous, delicious pumpkin-shaped cheese ball ready to wow your guests!
Cooking Tips & Techniques
Here are a few helpful tips to ensure your pumpkin cheese ball turns out perfectly:
- Soften the cream cheese: Make sure your cream cheese is fully softened before mixing. Take it out of the fridge at least 30 minutes before you start.
- Don’t skip the chilling step: Chilling the cheese ball allows the flavors to meld together and makes it easier to shape and coat.
- Choose a sturdy cracker: Use a cracker that won’t crumble easily when scooping the cheese ball. Pretzel chips, pita chips, or sturdy crackers are great options.
- Experiment with seasonings: Taste the cheese mixture before forming the ball and adjust the seasonings to your liking.
- Work with cold hands: If the cheese mixture starts sticking to your fingers as you shape the ball, rinse your hands in cold water and dry them before continuing.
With these tips, you’ll be a pro at creating a festive pumpkin-shaped cheese ball that’s as delicious as it is beautiful.
Variations & Adaptations
If you’re looking to switch things up, here are some fun variations and adaptations for this cheese ball:
- Dietary swaps: Use vegan cream cheese and dairy-free cheddar if you’re catering to plant-based eaters. Add nutritional yeast for extra cheesy flavor.
- Flavor twists: Mix in cooked, crumbled bacon, diced jalapeños, or sun-dried tomatoes for a smoky, spicy, or tangy kick.
- Nutty crunch: Replace the cheese cracker coating with crushed pecans, walnuts, or sesame seeds for added texture.
- Seasonal touch: Add a teaspoon of pumpkin spice for a unique autumn flavor. It pairs surprisingly well with the cheddar and cream cheese.
One time, I swapped out the cheddar for smoked gouda and added caramelized onions — it was an instant hit! Don’t be afraid to get creative and make this recipe your own.
Serving & Storage Suggestions
Here’s how to serve and store your pumpkin-shaped cheese ball for maximum enjoyment:
- Serving temperature: Serve the cheese ball chilled but allow it to sit out for about 15 minutes before serving so it’s easier to scoop.
- Presentation tips: Garnish the plate with fresh herbs, like parsley or thyme, and surround the cheese ball with an assortment of crackers, pretzels, and veggie sticks.
- Storage instructions: Wrap any leftovers in plastic wrap and store them in the refrigerator for up to 3-4 days.
- Reheating: No reheating required, but if the cheese ball has firmed up too much, allow it to sit at room temperature for a few minutes before serving again.
- Flavor development: This cheese ball tastes even better the next day as the flavors have more time to meld together.
Trust me, this cheese ball is a hit whether served fresh or enjoyed as leftovers!
Nutritional Information & Benefits
Here’s a quick breakdown of the nutritional profile for this festive pumpkin cheese ball:
- Calories: Approximately 250 calories per serving (based on 10 servings).
- Protein: Packed with protein from the cream cheese and cheddar, offering around 8-10g per serving.
- Low-carb option: Perfect for those following a low-carb diet when served with veggies instead of crackers.
- Healthy fats: Full-fat cream cheese provides a source of satisfying, healthy fats.
- Allergen notes: Contains dairy; opt for vegan substitutions if needed.
While this recipe is indulgent, it’s made with wholesome ingredients that you can feel good about serving. Plus, portion control is easy thanks to its shareable nature!
Conclusion
This festive pumpkin cheese ball is more than just a seasonal appetizer — it’s a statement piece that brings smiles and satisfies cravings. I love how customizable it is, making it perfect for any occasion or dietary preference. It’s one of those recipes that you’ll come back to year after year.
Give this recipe a try for your next fall party, and don’t forget to share your results in the comments! Did you add your own flair or try one of the variations? I’d love to hear about your experience.
So, grab your mixing bowl, put on your favorite fall playlist, and get ready to create a party appetizer your guests will talk about long after the leaves have fallen!
FAQs
Can I make the cheese ball ahead of time?
Absolutely! You can prepare the cheese ball up to 24 hours in advance. Just wrap it tightly in plastic wrap and refrigerate until ready to serve.
What crackers pair best with this cheese ball?
Sturdy crackers like wheat thins, rye crisps, or pretzel chips work great. You can also serve it with celery and carrot sticks for a healthier option.
Can I freeze the cheese ball?
Yes, you can freeze the cheese ball for up to a month. Wrap it tightly in plastic wrap and place it in an airtight container. Thaw in the refrigerator before serving.
How do I make the pumpkin shape look more realistic?
Use a butter knife or spoon to create ridges along the sides of the cheese ball after coating it with crumbs. Adding a real bell pepper stem as the top will complete the look!
Can I make this recipe spicy?
Absolutely! Add some diced jalapeños, hot sauce, or cayenne pepper to the cheese mixture for a delicious spicy kick.
Pin This Recipe!
Festive Pumpkin Cheese Ball Recipe for Perfect Fall Parties

This pumpkin-shaped cheese ball is a show-stopping centerpiece for fall gatherings, combining savory flavors with a touch of sweetness. Perfect for serving with crackers, pretzels, or veggie sticks.
- Prep Time: 15 minutes
- Cook Time: 0 minutes
- Total Time: 2 hours 15 minutes
- Yield: 10 servings 1x
- Category: Appetizer
- Cuisine: American
Ingredients
- 16 ounces cream cheese, softened
- 2 cups sharp cheddar cheese, shredded
- 1 teaspoon garlic powder
- 1 teaspoon onion powder
- 1 tablespoon Worcestershire sauce
- 2 tablespoons chopped green onions
- 1/2 teaspoon paprika
- 1 cup crushed cheese crackers
- 1 small bell pepper stem or pretzel rod for the ‘pumpkin’ stem
Instructions
- Prepare the ingredients: Soften the cream cheese to room temperature. Grate the cheddar cheese if using a block, and chop green onions finely.
- Combine the ingredients: In a large mixing bowl, add softened cream cheese, shredded cheddar cheese, garlic powder, onion powder, Worcestershire sauce, green onions, and paprika. Mix until smooth and well combined using a hand mixer or wooden spoon.
- Shape the cheese ball: Lay a large piece of plastic wrap on the counter. Transfer the cheese mixture onto the center of the wrap. Gather the edges of the plastic wrap around the cheese mixture, forming it into a ball. Twist the plastic wrap at the top to seal tightly.
- Chill the cheese ball: Place the wrapped cheese ball in the refrigerator for at least 1-2 hours, or overnight.
- Prepare the coating: Crush the cheese crackers into fine crumbs using a food processor or manually with a rolling pin.
- Coat the cheese ball: Unwrap the chilled cheese ball and roll it in the crushed crackers until fully coated. Press gently to ensure the crumbs stick evenly.
- Create the pumpkin shape: Place the coated cheese ball on a serving plate. Use your fingers to shape the ball into a rough pumpkin shape, slightly flattening the top and bottom.
- Add the stem: Insert the bell pepper stem or pretzel rod into the top center of the cheese ball to mimic a pumpkin stem.
- Optional: Add ridges by using a butter knife or the side of a spoon to gently press and shape lines along the sides.
- Serve: Garnish with additional green onions or herbs around the base of the pumpkin cheese ball for a festive look. Serve with crackers, pretzels, or veggie sticks.
Notes
[‘Make sure the cream cheese is fully softened before mixing.’, ‘Chill the cheese ball for at least 1-2 hours to allow flavors to meld and firm up.’, ‘Use sturdy crackers or pretzels for serving to avoid breaking while scooping.’, ‘Experiment with seasonings and mix-ins to customize the flavor.’, ‘If the cheese mixture sticks to your fingers while shaping, rinse your hands in cold water and dry them before continuing.’]
Nutrition
- Serving Size: 1/10 of cheese ball
- Calories: 250
- Sugar: 1
- Sodium: 300
- Fat: 20
- Saturated Fat: 12
- Carbohydrates: 5
- Protein: 8
Keywords: Pumpkin Cheese Ball, Fall Appetizer, Party Food, Thanksgiving Recipe, Autumn Snack


