
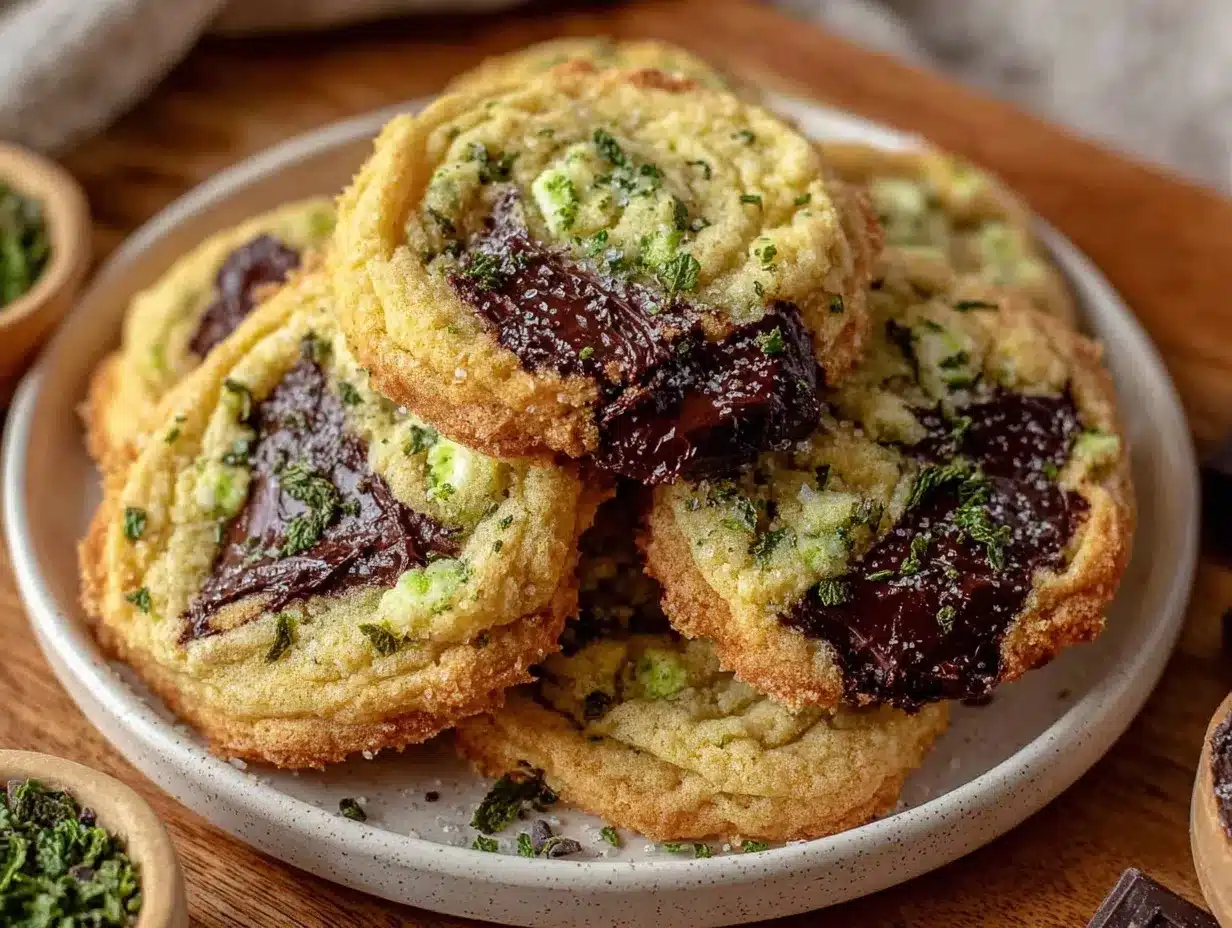
There’s something magical about biting into a soft, chewy cookie and being greeted with that refreshing burst of mint paired with rich chocolate chips. It’s like a little party in your mouth! These irresistible mint chocolate chip cookies are a treat you’ll want to bake over and over again. Whether you’re making them for a holiday cookie swap, a family movie night, or just to satisfy your sweet tooth, this recipe is bound to become a favorite.
I first started experimenting with mint chocolate chip cookies when I wanted to recreate the flavors of my favorite ice cream in cookie form. Let me just say, the result was pure heaven. The combination of the cool mint and the melt-in-your-mouth chocolate is an absolute winner. I’ve baked dozens of batches since then, tweaking and perfecting the recipe to make it just right. Trust me, you’re going to love these!
The best part? These cookies are super simple to whip up, and they’re packed with flavor. No fancy equipment, no complicated techniques—just pure, delicious bliss. So, if you’re ready to treat yourself and your loved ones to a batch of cookies that will make everyone ask for seconds, let’s dive in!
Why You’ll Love This Recipe
- Mint chocolate perfection: The refreshing mint flavor paired with rich, gooey chocolate chips is a match made in heaven.
- Easy to make: No need to be a pastry chef—this recipe is straightforward and beginner-friendly.
- Perfect for any occasion: These cookies are a hit at holiday parties, bake sales, or even just as a sweet treat for yourself.
- Customizable: You can easily tweak the flavors or add your favorite mix-ins for a fun twist!
- A crowd-pleaser: Whether you’re baking for kids or adults, these cookies always disappear in minutes.
- A dessert upgrade: Turn your favorite mint chocolate chip ice cream into a warm, chewy cookie—what’s not to love?
Honestly, these cookies are the kind that make you close your eyes and savor each bite. They’re a little nostalgic, a little indulgent, and a whole lot of delicious. Plus, you can bake them ahead of time, store them, and enjoy them whenever you need a little pick-me-up. Let’s get baking!
What Ingredients You Will Need
This recipe uses simple, easy-to-find ingredients to create cookies that feel gourmet. You may already have most of these in your pantry!
- All-purpose flour: The base of our cookies. You can also use gluten-free flour if needed.
- Baking soda: Helps the cookies rise and achieve their perfect texture.
- Salt: Balances the sweetness and enhances the flavors.
- Unsalted butter: Softened to room temperature for easy mixing and a rich, creamy texture.
- Granulated sugar: Adds sweetness and helps create those slightly crisp edges.
- Brown sugar: Adds a bit of chewiness and depth of flavor.
- Egg: Acts as a binder and gives the cookies their structure.
- Vanilla extract: Enhances the flavor and rounds out the sweetness.
- Peppermint extract: The star of the show! Be sure to measure carefully—it’s potent!
- Green food coloring (optional): For that festive mint-chocolate-chip look.
- Chocolate chips: Semi-sweet or dark chocolate chips work beautifully. You can mix in mint chips for extra minty goodness.
Pro tip: If you’re feeling adventurous, try adding crushed candy canes for a holiday twist or use white chocolate chips for a creamier flavor.
Equipment Needed
- Mixing bowls: One for your dry ingredients and one for your wet ingredients.
- Hand or stand mixer: A stand mixer makes this recipe super easy, but a hand mixer works just as well.
- Measuring cups and spoons: Accuracy is key for baking, so don’t eyeball it!
- Baking sheets: Line them with parchment paper for easy cleanup.
- Spatula: Helpful for scraping down the sides of the bowl.
No fancy tools are required here. If you don’t have a mixer, you can mix everything by hand—it just takes a bit more elbow grease. And if you don’t have parchment paper, you can use a silicone baking mat or grease your baking sheet lightly.
How to Make Irresistible Mint Chocolate Chip Cookies
- Preheat the oven: Set your oven to 350°F (175°C). Line your baking sheets with parchment paper.
- Mix the dry ingredients: In a medium bowl, whisk together 2 ½ cups (315g) all-purpose flour, 1 teaspoon baking soda, and ½ teaspoon salt. Set aside.
- Cream butter and sugars: In a large bowl, beat 1 cup (225g) unsalted butter, ¾ cup (150g) granulated sugar, and ¾ cup (165g) brown sugar until light and fluffy, about 2-3 minutes.
- Add wet ingredients: Mix in 1 large egg, 1 teaspoon vanilla extract, and ½ teaspoon peppermint extract. If desired, add 4-6 drops of green food coloring for that classic mint chocolate chip look.
- Combine wet and dry ingredients: Gradually add the dry ingredients to the wet ingredients, mixing on low until just combined. Avoid overmixing to keep the cookies tender.
- Fold in chocolate chips: Use a spatula to gently fold in 1 ½ cups (270g) of semi-sweet chocolate chips or mint chips.
- Shape the cookies: Scoop about 1 ½ tablespoons of dough for each cookie and roll it into a ball. Place them about 2 inches apart on the baking sheets.
- Bake: Bake for 10-12 minutes or until the edges are just set. The centers may look slightly underbaked—that’s okay!
- Cool: Let the cookies cool on the baking sheets for 5 minutes before transferring them to a wire rack to cool completely.
Pro tip: If you want extra gooey cookies, press a few extra chocolate chips onto the tops of the dough balls before baking.
Cooking Tips & Techniques
Here are some tips to ensure your mint chocolate chip cookies turn out perfectly every time:
- Don’t overmix: Mixing too much can make your cookies tough instead of tender.
- Chill the dough: If your kitchen is warm, chilling the dough for 30 minutes will prevent the cookies from spreading too much.
- Use room-temperature ingredients: This ensures even mixing and better texture.
- Watch the baking time: Pull the cookies out when the edges are set but the centers still look soft. They’ll firm up as they cool.
- Experiment with flavors: If you’re not a fan of peppermint, try orange extract or almond extract for a different twist.
Variations & Adaptations
Want to mix things up? Here are some fun ways to customize these cookies:
- Gluten-free: Replace the all-purpose flour with a 1-to-1 gluten-free baking flour.
- Dairy-free: Use plant-based butter and dairy-free chocolate chips.
- Holiday twist: Add crushed candy canes for a festive crunch.
- Double chocolate: Replace half the flour with cocoa powder for a rich chocolate base.
- Nutty flavor: Fold in chopped walnuts or pecans for some extra texture.
My personal favorite variation is swapping out half the chocolate chips for white chocolate chips. The sweetness pairs beautifully with the mint!
Serving & Storage Suggestions
These cookies are best served warm, straight out of the oven, with a cold glass of milk or a hot cup of cocoa. But they’re just as delicious at room temperature or even chilled!
- Storage: Keep cookies in an airtight container at room temperature for up to 5 days.
- Freezing: You can freeze the baked cookies for up to 3 months. Just thaw them at room temperature or reheat them in a 300°F (150°C) oven for a few minutes.
- Reheating: Warm cookies in the microwave for 10-15 seconds to bring back their soft, gooey texture.
Pro tip: The flavors deepen over time, so don’t be surprised if they taste even better the next day!
Nutritional Information & Benefits
Here’s a quick snapshot of the nutritional benefits of these cookies:
- Calories: Approximately 180 calories per cookie.
- Key ingredients: Mint extract provides a refreshing twist, while chocolate chips are rich in antioxidants.
- Dietary considerations: Easily customizable for gluten-free and dairy-free diets.
While these cookies are a treat, they’re great for satisfying cravings without going overboard. Remember, it’s all about balance!
Conclusion
If you’re looking for a cookie recipe that hits all the right notes—soft, chewy, minty, and chocolatey—you’ve found it. These irresistible mint chocolate chip cookies are everything you could want in a dessert. Plus, they’re easy to make and perfect for sharing (or not—it’s okay to keep them all to yourself!).
I love how versatile this recipe is. You can stick to the classic version or get creative with your own twists. Either way, you’ll end up with a batch of cookies that will have everyone asking for the recipe.
I’d love to hear how your cookies turn out! Leave a comment below with your favorite variations or share your baking stories. Happy baking!
FAQs
Can I use fresh mint instead of mint extract?
Fresh mint has a different flavor profile and might not be as strong. If you want to use fresh mint, make a mint-infused butter for a subtle flavor.
Do I have to add green food coloring?
No, food coloring is entirely optional. It’s just for aesthetics and doesn’t change the flavor.
Can I use milk chocolate chips instead of semi-sweet?
Absolutely! Milk chocolate chips will give a sweeter flavor, so it’s all about your personal preference.
How do I prevent my cookies from spreading too much?
Chilling the dough for 30 minutes before baking helps keep the cookies from spreading too thin.
Can I double this recipe?
Yes! This recipe doubles beautifully. Just make sure to mix the dough in a large enough bowl and bake in batches.
Pin This Recipe!

Irresistible Mint Chocolate Chip Cookies Recipe You Must Try

Soft, chewy cookies with a refreshing burst of mint paired with rich chocolate chips. Perfect for any occasion and easy to make.
- Prep Time: 15 minutes
- Cook Time: 12 minutes
- Total Time: 27 minutes
- Yield: 24 cookies 1x
- Category: Dessert
- Cuisine: American
Ingredients
- 2 ½ cups (315g) all-purpose flour
- 1 teaspoon baking soda
- ½ teaspoon salt
- 1 cup (225g) unsalted butter, softened
- ¾ cup (150g) granulated sugar
- ¾ cup (165g) brown sugar
- 1 large egg
- 1 teaspoon vanilla extract
- ½ teaspoon peppermint extract
- 4–6 drops green food coloring (optional)
- 1 ½ cups (270g) semi-sweet chocolate chips or mint chips
Instructions
- Preheat the oven to 350°F (175°C). Line your baking sheets with parchment paper.
- In a medium bowl, whisk together 2 ½ cups (315g) all-purpose flour, 1 teaspoon baking soda, and ½ teaspoon salt. Set aside.
- In a large bowl, beat 1 cup (225g) unsalted butter, ¾ cup (150g) granulated sugar, and ¾ cup (165g) brown sugar until light and fluffy, about 2-3 minutes.
- Mix in 1 large egg, 1 teaspoon vanilla extract, and ½ teaspoon peppermint extract. If desired, add 4-6 drops of green food coloring.
- Gradually add the dry ingredients to the wet ingredients, mixing on low until just combined. Avoid overmixing.
- Use a spatula to gently fold in 1 ½ cups (270g) of semi-sweet chocolate chips or mint chips.
- Scoop about 1 ½ tablespoons of dough for each cookie and roll it into a ball. Place them about 2 inches apart on the baking sheets.
- Bake for 10-12 minutes or until the edges are just set. The centers may look slightly underbaked.
- Let the cookies cool on the baking sheets for 5 minutes before transferring them to a wire rack to cool completely.
Notes
[‘Don’t overmix the dough to keep cookies tender.’, ‘Chill the dough for 30 minutes if your kitchen is warm to prevent spreading.’, ‘Use room-temperature ingredients for better texture.’, ‘Pull cookies out when edges are set but centers are soft; they will firm up as they cool.’, ‘Experiment with flavors like orange extract or almond extract for a twist.’]
Nutrition
- Serving Size: 1 cookie
- Calories: 180
- Sugar: 15
- Sodium: 100
- Fat: 8
- Saturated Fat: 5
- Carbohydrates: 24
- Fiber: 1
- Protein: 2
Keywords: mint chocolate chip cookies, dessert, easy cookies, holiday cookies, mint cookies, chocolate chip cookies


