Spicy-sweet, savory, and packed with punchy flavors—the first time I made a Korean ground beef bowl, my kitchen filled with that unmistakable aroma of garlic, sesame oil, and caramelized soy. It’s one of those dishes that can turn even the most ordinary Tuesday night into something special. Honestly, if you’re craving a quick dinner that feels like you put in way more effort than you actually did, this recipe is your answer.
I stumbled on Korean ground beef bowls when my weeknight routine desperately needed a shakeup. You know those days when you just can’t face another bland salad or boring chicken breast? That’s when this meal walked into my life (well, into my kitchen, at least). I’d seen similar recipes floating around, but after a few tweaks and taste tests (my family can be brutally honest!), I landed on this version. It’s the kind of healthy comfort food that’s good enough for guests, but simple enough for a solo dinner after a long day.
This Korean ground beef bowl has become my go-to for busy nights, picky eaters, and last-minute meal plans. It’s loaded with lean protein, customizable vegetables, and a sauce that’s sticky, garlicky, and just a little bit spicy. If you’ve ever wondered how to get dinner on the table in under 20 minutes, with minimal dishes, and maximum flavor—well, here you go. Whether you’re meal prepping for the week or just hungry right now, you’ll love how easy, healthy, and satisfying this Korean ground beef bowl is.
Why You’ll Love This Korean Ground Beef Bowl Recipe
- Quick & Easy: You can whip up this dinner in about 20 minutes—no marathon cooking session required. Perfect for those “I need food now!” moments.
- Simple Ingredients: Seriously, most of the stuff is probably already in your pantry or fridge. No need for a special grocery run.
- Perfect for Any Occasion: It’s a winner for weeknight family dinners, but also feels fancy enough for casual gatherings with friends. Even picky eaters come back for seconds!
- Crowd-Pleaser: I can’t count how many times my kids have requested this over takeout (that’s saying something!). It’s got that sweet-savory balance everyone loves.
- Unbelievably Delicious: The combo of tender beef, garlicky sauce, and perfectly cooked rice is total comfort food. I always sneak a few bites straight from the pan.
What sets this recipe apart from others? For starters, blending the sauce before adding it to the beef gives you a silky texture and deep flavor. I use a bit of grated pear or apple (a trick I picked up from a Korean friend) for subtle sweetness and authentic taste. You can easily swap out the veggies or protein without losing that addictive punch.
This isn’t just another ground beef stir-fry—it’s my best version after tons of trial and error. Every time I cook it, I remember why it’s on heavy rotation in my house: pure satisfaction, little effort, and almost zero cleanup. You’ll love how flexible it is, whether you’re craving something spicy, need a gluten-free option, or want a protein boost. It’s the kind of recipe that feels like a treat, even when you’re just trying to get dinner on the table.
Trust me, once you try this Korean ground beef bowl, you’ll wonder how you ever lived without it. It’s comfort food, weeknight hero, and healthy meal all rolled into one delicious bowl.
What Ingredients You Will Need
This recipe uses a handful of simple, wholesome ingredients to deliver bold flavor and satisfying texture without the fuss. You can easily mix and match based on what you have at home, but here’s what I typically use:
- Ground Beef (1 lb / 450g) – I prefer lean (90/10), but any ground beef works. Ground turkey or chicken is a good swap if you want it lighter.
- Low Sodium Soy Sauce (1/4 cup / 60ml) – Adds deep umami flavor. Tamari or coconut aminos for gluten-free.
- Brown Sugar (2 tbsp / 24g) – This gives the sauce a classic Korean bulgogi sweetness. You can use honey or coconut sugar if you want.
- Sesame Oil (1 tbsp / 15ml) – Nutty and aromatic. Toasted sesame oil is best for finishing, but regular works for cooking.
- Garlic (4 cloves, minced) – Fresh is best. If you love garlic, add an extra clove (I usually do!).
- Ginger (1 inch piece, grated) – Adds warmth. Ground ginger is fine in a pinch (about 1/2 tsp).
- Green Onion (3, sliced) – For freshness and a bit of crunch.
- Red Pepper Flakes (1/2 tsp) – Optional, for a kick. Gochugaru (Korean chili flakes) if you have them!
- Pear or Apple (1/2, grated) – Secret weapon for authentic flavor. Leave out if you don’t have it, but I promise it’s worth trying.
- Cooked White or Brown Rice (2 cups / 350g) – For serving. Cauliflower rice or quinoa for low-carb or gluten-free.
- Mixed Vegetables (1–2 cups, chopped) – Carrots, zucchini, broccoli, snap peas—whatever’s on hand. Frozen veggies work, too.
- Kimchi (optional, for topping) – Adds tang and crunch. Not essential, but highly recommended.
- Sesame Seeds (1 tbsp) – For garnish and a little texture.
Ingredient notes:
- Substitutions: Use ground turkey or chicken for a lighter version. You can swap brown sugar for honey or coconut sugar if you want a natural sweetener. Tamari or coconut aminos are great for gluten-free eaters.
- Vegetables: Pick whatever’s in season or in your fridge. I’ve used spinach, bell peppers, and even shredded cabbage—works every time.
- Rice: Cauliflower rice keeps carbs low and sneaks in extra veggies. Jasmine rice gives you a more classic flavor.
- Brands: For soy sauce, I like Kikkoman or San-J. For sesame oil, Ottogi is reliably good.
- Allergen tips: If you’re sensitive to soy, coconut aminos are a great alternative.
Don’t stress if you’re missing an ingredient—this dish is super forgiving. The key is the balance of sweet, salty, and nutty flavors. That’s what makes the Korean ground beef bowl so addictive!
Equipment Needed
- Large Skillet or Wok: For browning the beef and tossing everything together. Nonstick works great, but stainless steel gives a nice sear.
- Wooden Spoon or Spatula: For stirring and breaking up the meat. I’ve used silicone spatulas with no issues.
- Chef’s Knife: For chopping veggies and mincing garlic. A good sharp knife makes prep way faster.
- Cutting Board: Preferably large—you’ll want room for all those veggies.
- Rice Cooker or Saucepan: For preparing the rice. I love my budget rice cooker, but stovetop works fine.
- Grater: For apple/pear and ginger. If you don’t have one, a food processor does the trick.
- Measuring Spoons and Cups: For getting the sauce just right. I usually eyeball, but measuring helps keep it consistent.
Alternative tools: If you don’t have a wok, a deep sauté pan works fine. For the grater, use a microplane or even finely dice by hand if you’re feeling patient.
Maintenance tip: Keep your skillet well-seasoned for best results, and sharpen that chef’s knife regularly—makes a world of difference. If you’re just starting out, most of these tools are pretty affordable at big box stores or online.
Preparation Method
-
Cook the Rice:
Start by preparing 2 cups (350g) of white or brown rice according to package instructions. Rice cookers are handy, but stovetop works too—takes about 15–20 minutes. If you use cauliflower rice, just heat it in a skillet for 3–4 minutes. -
Prep the Vegetables:
While rice cooks, chop 1–2 cups of mixed vegetables (carrots, broccoli, zucchini, or whatever’s handy). Slice green onions thinly. Mince 4 cloves of garlic and grate 1 inch of ginger and half an apple or pear (if using). I always do this while the rice is bubbling away, makes it feel faster! -
Make the Sauce:
In a small bowl, whisk together 1/4 cup (60ml) low sodium soy sauce, 2 tbsp (24g) brown sugar, 1 tbsp (15ml) sesame oil, the grated pear or apple, minced garlic, grated ginger, and 1/2 tsp red pepper flakes (or gochugaru). Taste and adjust—if you like it sweeter, add a bit more sugar. If you want extra heat, toss in more chili flakes. -
Brown the Ground Beef:
Heat a large skillet or wok over medium-high. Add 1 lb (450g) ground beef and cook, breaking it up with a wooden spoon, until browned and cooked through (5–7 minutes). Drain excess fat if needed. I find lean beef gives you less grease, but if you use regular, just spoon off the extra. -
Add the Sauce:
Pour the sauce over the browned beef. Stir well and let simmer for 2–3 minutes, until the sauce thickens slightly and coats the meat. Don’t rush this step—the caramelization is where the magic happens! If the sauce seems too thin, just let it bubble for another minute. -
Add Vegetables:
Toss in your chopped veggies. Stir everything together and cook for 2–4 minutes, just until veggies are bright and tender-crisp. You want a bit of crunch, not mush! Taste and season with extra soy sauce or sesame oil if needed. -
Finish and Serve:
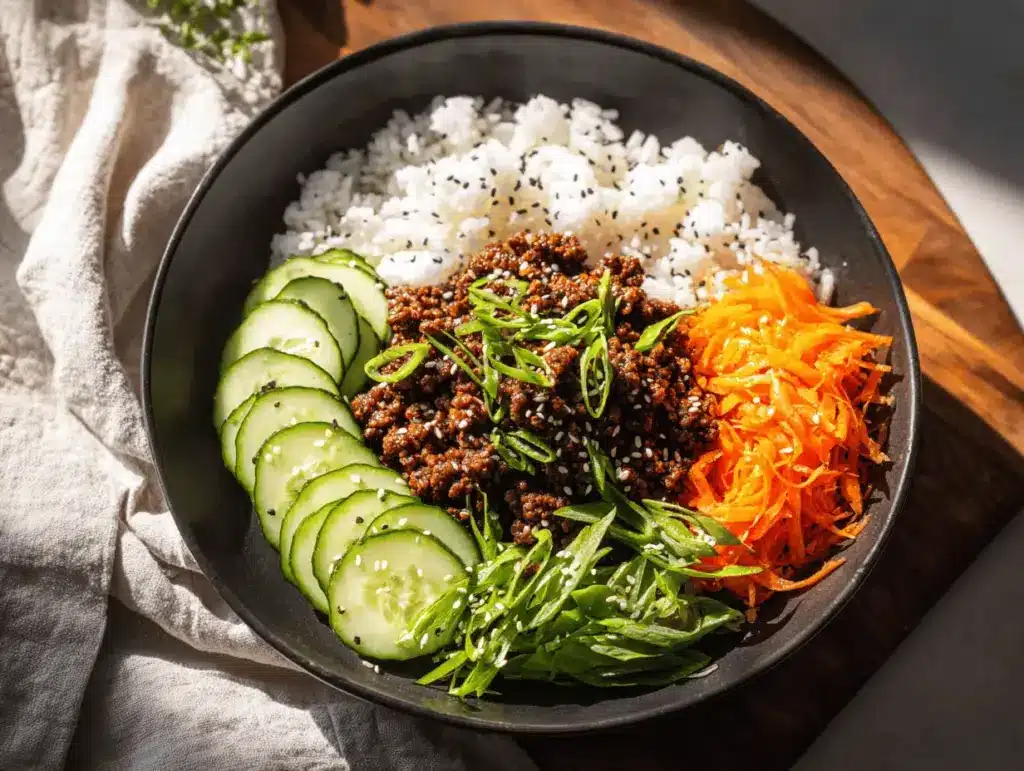
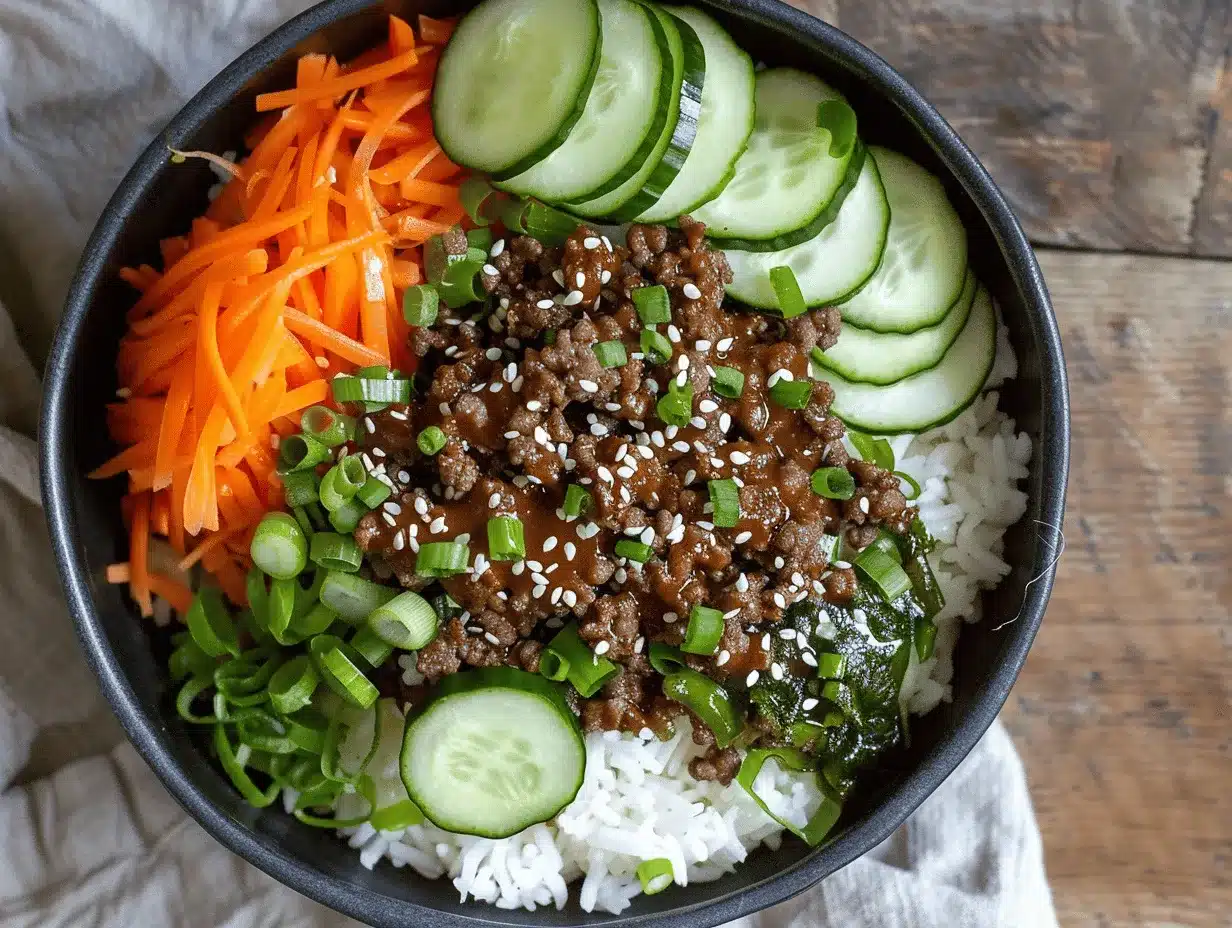
Remove from heat. Spoon beef and veggie mixture over bowls of hot rice. Top with sliced green onions, a sprinkle of sesame seeds, and a scoop of kimchi if you like. Sometimes I drizzle a little extra sesame oil for a glossy finish. -
Troubleshooting:
If it looks watery, just keep simmering. If the beef is tough, reduce heat and add a splash of water or broth to loosen. Sauce too salty? Add a pinch of sugar or a splash of water. -
Efficiency Tips:
Prep all veggies ahead for speed. Double the sauce and freeze half for next time. If you’re making a big batch, use two skillets to avoid crowding.
By the time you’re done, your kitchen will smell amazing, and you’ll have a bowl that looks straight out of a restaurant. The best part? Minimal cleanup and happy eaters all around.
Cooking Tips & Techniques
Here are some pro tips and hard-earned lessons for nailing this Korean ground beef bowl every single time:
- Don’t Overcrowd the Pan: If you double the recipe, use two pans or cook in batches. Crowding leads to steaming, not browning, and you want those crispy beef bits!
- High Heat for Browning: Start with medium-high heat when cooking the beef. You’re looking for deep color and caramelization—that’s where the flavor lives.
- Fresh Garlic and Ginger: Honestly, powder just doesn’t compare. Fresh aromatics make the sauce pop.
- Balance Your Sauce: Taste before you add to the meat. If it’s too salty, a splash of water or extra pear/apple does wonders.
- Veggie Timing: Add sturdy veggies (like carrots and broccoli) first, quick-cooking ones (like spinach or zucchini) last. Overcooked veggies get mushy fast.
- Consistency: Grate the pear/apple finely for smooth texture. If you just chop it, the sauce will be chunky (not a tragedy, but not ideal).
I’ve burned the beef a few times by walking away during browning—trust me, stay close and stir often. If the sauce ever split or got too thick, I just added a splash of broth and stirred until smooth again.
For multitasking, start rice first, then chop veggies while beef browns. Clean as you go—less chaos after dinner. If you’re cooking for a crowd, keep everything warm in a low oven (covered) until ready to serve.
Little tweaks make a big difference: a drizzle of toasted sesame oil at the end, extra green onion for crunch, or even a fried egg on top for richness. The more you make it, the better it gets!
Variations & Adaptations
This Korean ground beef bowl recipe is endlessly customizable. Here are my favorite ways to switch it up:
- Dietary Swaps: Use ground turkey or chicken for a leaner option. For vegetarian, swap in crumbled tofu or tempeh—just sauté with the sauce as you would beef.
- Seasonal Veggies: In summer, toss in fresh snap peas and bell peppers. In winter, try shredded cabbage or bok choy for heartiness. You can even use frozen veggie mixes if you’re in a pinch.
- Flavor Boosts: Add gochujang (Korean chili paste) to the sauce for extra heat. Try a splash of rice vinegar for tang, or mix in a little fish sauce for depth.
- Low-Carb or Gluten-Free: Serve over cauliflower rice or steamed quinoa. Use coconut aminos or tamari instead of soy sauce.
- Cooking Method: If you don’t want to stand at the stove, bake the beef mixture in a casserole dish at 375°F (190°C) for 20 minutes, then stir in veggies for the last 5 minutes.
- Allergen Help: Nut allergies? Skip the sesame seeds. Soy allergies? Go for coconut aminos.
One of my favorite personal tweaks: I add a fried egg on top, sprinkle with extra chili flakes, and serve with a quick cucumber salad. Makes it feel like a full Korean feast with almost zero extra work.
Don’t be afraid to play around—this recipe is super forgiving. Mix and match to suit your taste, allergies, or what’s lurking in the fridge!
Serving & Storage Suggestions
You’ll want to serve your Korean ground beef bowl piping hot, straight from the pan. The flavors are boldest right away, but honestly, leftovers are amazing too.
- Serving: Spoon beef and veggies over rice in wide bowls. Garnish with sliced green onions, sesame seeds, and a little kimchi for color. A fried egg or cucumber salad on the side makes it restaurant-worthy.
- Beverages: I love pairing this with iced green tea or a light lager. For a cozy vibe, try it with a bowl of miso soup.
- Storage: Leftovers keep well in the fridge for 3–4 days. Store in airtight containers (I use glass for best freshness).
- Freezing: The cooked beef and sauce freeze beautifully for up to 2 months. Freeze rice and veggies separately, then reheat together.
- Reheating: Microwave individual portions (cover loosely). For best texture, reheat beef in a skillet with a splash of water or broth until hot. Add fresh veggies or green onions just before serving.
- Flavor Development: The sauce gets richer as it sits—leftovers taste even better the next day!
If you’re meal prepping, portion bowls in advance and stash in the fridge. Makes for effortless lunches all week long.
Nutritional Information & Benefits
Estimated per serving (based on 4 servings):
- Calories: 410
- Protein: 22g
- Carbs: 38g
- Fat: 18g
- Fiber: 3g
This Korean ground beef bowl is a great source of lean protein, healthy fats (from sesame oil), and vitamins from all those veggies. If you use brown rice or cauliflower rice, you’ll boost fiber and keep carbs in check. Soy sauce is lower in sodium if you pick the “low sodium” version.
It’s gluten-free if you use tamari and fits low-carb diets with cauliflower rice. Allergens to watch: soy (in the sauce), sesame (in oil and seeds). For me, meals like this help me get more veggies in without feeling like I’m missing out. Plus, the protein keeps you full for hours!
Conclusion
If you’re looking for a dinner that’s quick, healthy, and tastes like you ordered takeout, this Korean ground beef bowl is the answer. With just a few simple ingredients and less than 20 minutes, you get a dish that feels both comforting and nourishing.
I love how easy it is to tailor this recipe for almost any diet or taste preference. The sweet-savory sauce, crunchy veggies, and tender beef are a combo you’ll want again and again. It’s become a staple in my home, and I hope it finds a place in yours too!
Give it a try, tweak it to your liking, and let me know how it goes. Drop a comment below with your favorite add-ins, share with friends, or pin it for later. Trust me—once you make this Korean ground beef bowl, you’ll want it in your weekly meal rotation!
Here’s to cozy bowls, happy tummies, and easy dinners!
FAQs – Korean Ground Beef Bowl Recipe
Can I make this Korean ground beef bowl ahead of time?
Absolutely! Cook the beef and sauce, store in the fridge for up to 4 days. Reheat and add fresh veggies before serving for best texture.
What’s the best substitute for ground beef?
Ground turkey, chicken, or crumbled tofu work well. Just adjust cooking time—poultry cooks faster, tofu needs less browning.
How spicy is this recipe?
It’s mild with just a bit of kick from red pepper flakes. Add more or less to suit your taste, or use gochujang for extra heat.
Can I use frozen vegetables?
Definitely! Just add them straight to the pan and cook an extra minute or two until heated through.
Is this Korean ground beef bowl gluten-free?
Yes, if you use tamari or coconut aminos instead of regular soy sauce. Serve with gluten-free rice or quinoa.
Pin This Recipe!
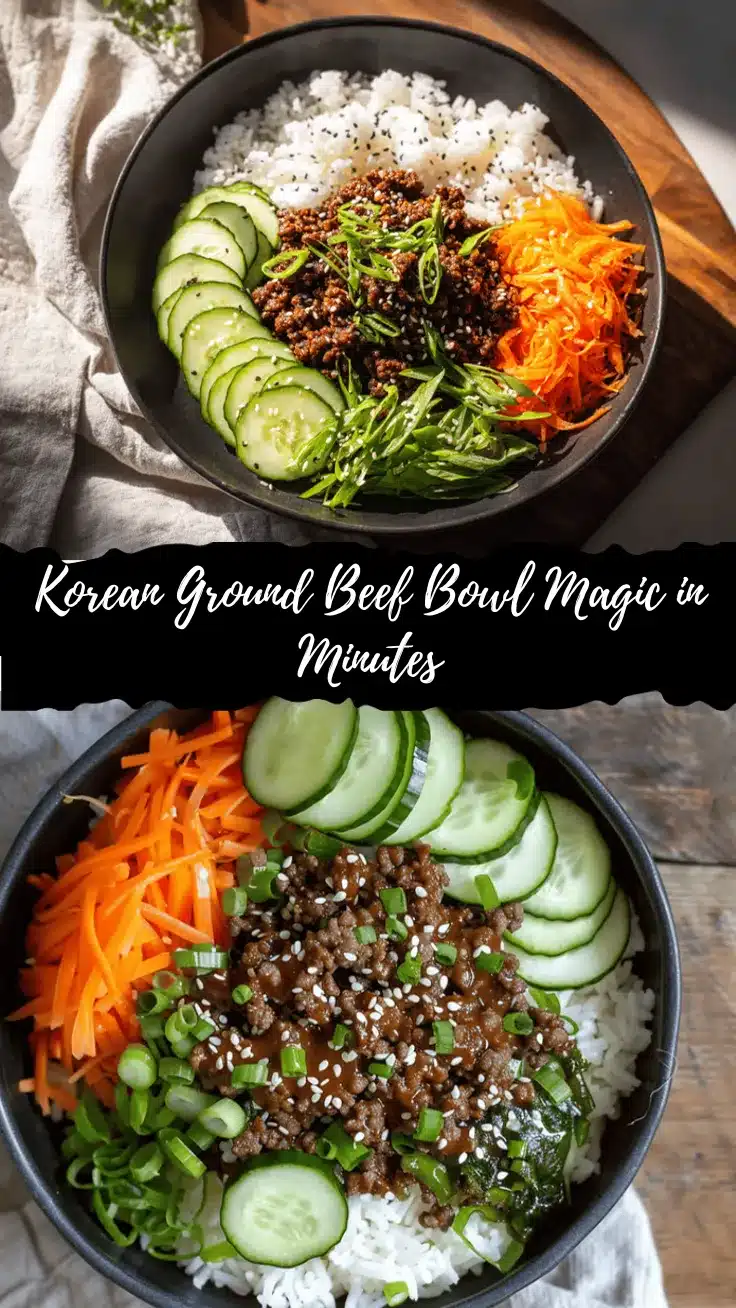
Korean Ground Beef Bowl

This Korean ground beef bowl is a quick, healthy, and flavor-packed dinner featuring lean ground beef, a sweet-savory garlic soy sauce, and customizable veggies, all served over rice. Ready in just 20 minutes, it’s perfect for busy weeknights and meal prep.
- Prep Time: 10 minutes
- Cook Time: 10 minutes
- Total Time: 20 minutes
- Yield: 4 servings 1x
- Category: Main Course
- Cuisine: Korean
Ingredients
- 1 lb (450g) lean ground beef (90/10 preferred, but any ground beef works)
- 1/4 cup (60ml) low sodium soy sauce (or tamari/coconut aminos for gluten-free)
- 2 tbsp (24g) brown sugar (or honey/coconut sugar)
- 1 tbsp (15ml) sesame oil
- 4 cloves garlic, minced
- 1 inch piece ginger, grated (or 1/2 tsp ground ginger)
- 3 green onions, sliced
- 1/2 tsp red pepper flakes (or gochugaru, optional)
- 1/2 pear or apple, grated (optional but recommended)
- 2 cups (350g) cooked white or brown rice (or cauliflower rice/quinoa for low-carb)
- 1–2 cups mixed vegetables, chopped (carrots, zucchini, broccoli, snap peas, etc.)
- Kimchi (optional, for topping)
- 1 tbsp sesame seeds (for garnish)
Instructions
- Cook the rice according to package instructions (about 15–20 minutes for white or brown rice). For cauliflower rice, heat in a skillet for 3–4 minutes.
- While rice cooks, chop mixed vegetables, slice green onions, mince garlic, and grate ginger and pear/apple (if using).
- In a small bowl, whisk together soy sauce, brown sugar, sesame oil, grated pear/apple, minced garlic, grated ginger, and red pepper flakes. Taste and adjust seasoning as desired.
- Heat a large skillet or wok over medium-high heat. Add ground beef and cook, breaking it up with a wooden spoon, until browned and cooked through (5–7 minutes). Drain excess fat if needed.
- Pour the sauce over the browned beef. Stir well and let simmer for 2–3 minutes, until the sauce thickens slightly and coats the meat.
- Add chopped vegetables to the skillet. Stir and cook for 2–4 minutes, until veggies are bright and tender-crisp. Adjust seasoning if needed.
- Remove from heat. Spoon beef and veggie mixture over bowls of hot rice.
- Top with sliced green onions, sesame seeds, and kimchi if desired. Drizzle with extra sesame oil for a glossy finish.
- If the mixture looks watery, simmer longer. If too salty, add a splash of water or a pinch of sugar. For meal prep, portion into containers and refrigerate.
Notes
For a gluten-free version, use tamari or coconut aminos and serve with rice or quinoa. Swap ground turkey, chicken, or tofu for beef as desired. Add a fried egg on top for extra richness. Use any vegetables you have on hand. Leftovers keep well for 3–4 days and taste even better as the flavors develop.
Nutrition
- Serving Size: 1 bowl (about 1/4 of recipe)
- Calories: 410
- Sugar: 8
- Sodium: 650
- Fat: 18
- Saturated Fat: 5
- Carbohydrates: 38
- Fiber: 3
- Protein: 22
Keywords: Korean ground beef bowl, easy dinner, healthy, 20-minute meal, ground beef, rice bowl, Asian, meal prep, gluten-free option, quick dinner


