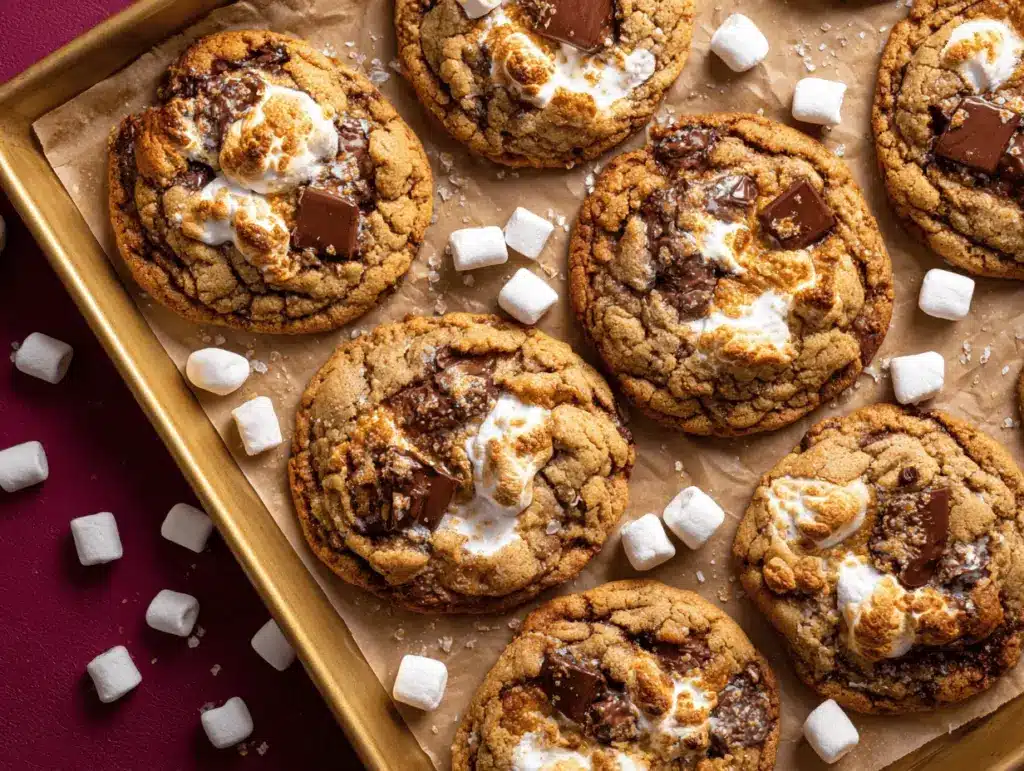
Imagine biting into a warm, gooey cookie—sweet peanut butter mingling with melty chocolate and toasted marshmallows. The aroma alone makes your kitchen feel like a cozy campfire. That’s exactly what you get with these peanut butter s’mores cookies. Honestly, the first time I whipped up a batch, it was a rainy Saturday and I wanted something nostalgic but a little bit extra. S’mores always remind me of summer nights, but combining them with peanut butter cookies? Game-changer.
My love for peanut butter cookies goes way back. But adding the s’mores twist—mini marshmallows and chunks of chocolate—takes them from classic to irresistible. I started experimenting with this recipe after a camping trip where my kids wanted s’mores every night. Back home, we didn’t have a fire pit, but I had peanut butter, chocolate, and marshmallows. That’s how these easy, gooey treats came to be!
This peanut butter s’mores cookies recipe is a lifesaver when you’re craving something cozy and nostalgic. It’s perfect for families, parties, or anyone who wants the campfire magic without leaving the kitchen. If you’re a peanut butter fan (like me), or just love cookies that are chewy, gooey, and packed with flavor, this one is for you. As someone who’s tested this recipe more times than I can count (sometimes just to “check” the gooeyness), I promise it works every time. So grab your mixing bowl—you’re about to make your new favorite cookie!
Why You’ll Love This Recipe
- Quick & Easy: You can have these peanut butter s’mores cookies ready in under 40 minutes. Seriously, no fancy steps, just mix, scoop, and bake.
- Simple Ingredients: Everything you need is probably already in your pantry. Peanut butter, chocolate, marshmallows, and the usual cookie suspects.
- Perfect for Any Occasion: These cookies shine at birthday parties, movie nights, or just a Saturday afternoon with friends.
- Crowd-Pleaser: Kids go wild for the gooey marshmallows, and grown-ups swoon over the peanut butter-chocolate combo. They disappear fast—trust me!
- Unbelievably Delicious: The chewy peanut butter base, pockets of melted chocolate, and golden marshmallow tops make every bite a little celebration.
What sets these peanut butter s’mores cookies apart? For starters, I use creamy peanut butter for maximum chew and flavor. Blending the dough until just combined keeps it soft, and pressing extra marshmallows on top means you get that authentic s’mores vibe. I’ve tried adding graham cracker crumbs for crunch—amazing, but not essential if you want to keep it simple.
Honestly, after baking dozens of batches, I think the biggest difference is the texture. These cookies stay gooey in the middle, with crispy edges and sticky marshmallow bits. It’s comfort food with a twist—nostalgic, but a little more grown-up. They’re the kind of treat you make once and keep coming back to, especially when you want something homemade but totally fuss-free. If you love cookies that are a little messy, a lot delicious, and perfect for sharing, you’ll adore this peanut butter s’mores cookies recipe!
What Ingredients You Will Need
This recipe uses classic, easy-to-find ingredients for maximum flavor and minimal fuss. Most of these are pantry staples, and you can swap a few things if you’re in a pinch.
- For the Cookie Dough:
- 1/2 cup (120g) unsalted butter, softened (adds richness)
- 1 cup (250g) creamy peanut butter (I usually go for Jif or Skippy)
- 3/4 cup (150g) brown sugar, packed (for chewiness)
- 1/4 cup (50g) granulated sugar
- 1 large egg, room temperature
- 1 tsp vanilla extract (real vanilla makes a difference!)
- 1 1/4 cups (160g) all-purpose flour
- 1/2 tsp baking soda
- 1/4 tsp salt
- For the S’mores Mix-Ins:
- 1 cup (180g) semi-sweet chocolate chips or chopped chocolate bars (I love Ghirardelli)
- 1 cup (50g) mini marshmallows
- 3/4 cup (75g) graham cracker pieces (optional, for crunch)
Substitutions & Tips:
- If you need gluten-free, swap flour for a 1:1 gluten-free blend and use gluten-free graham crackers.
- Dairy-free? Use vegan butter and dairy-free chocolate chips.
- Crunchy peanut butter works fine, though the texture will be a bit chunkier.
- No brown sugar? You can use all granulated sugar, but the cookies won’t be quite as chewy.
- If you’re out of mini marshmallows, cut big ones into pieces—they melt the same!
I’ve tried lots of brands, but honestly, any creamy peanut butter will do. If you want a hint of salt, use salted butter and skip the added salt. The s’mores mix-ins are flexible—add more chocolate or marshmallows depending on your mood (I do this often for extra gooeyness).
Equipment Needed
- Mixing Bowls: One large, one medium. Glass or stainless steel works great.
- Electric Mixer: Stand or hand mixer for creaming butter and sugar. If you don’t have one, a sturdy whisk and some muscle will do (I’ve done it both ways).
- Measuring Cups & Spoons: For accuracy—especially important for baking!
- Cookie Scoop or Spoon: Helps portion cookies evenly and keeps hands clean.
- Baking Sheet: I use a heavy-duty sheet lined with parchment paper. Silicone mats work, too.
- Cooling Rack: For letting cookies cool without getting soggy bottoms.
- Parchment Paper or Silicone Baking Mat: Prevents sticking and makes cleanup easier.
Alternatives: If you don’t have a mixer, just mix by hand—it takes a bit longer, but the cookies turn out fine. No cooling rack? Transfer cookies to a plate lined with paper towels. Maintenance tip: Wash cookie scoops right after use to keep them from getting sticky. Budget-friendly advice: Dollar store measuring sets and mixing bowls work just as well as pricier ones!
Preparation Method
- Preheat & Prep:
Preheat your oven to 350°F (175°C). Line a baking sheet with parchment paper or a silicone mat. This prevents sticking and helps with easy cleanup. - Cream Butter & Sugars:
In a large mixing bowl, beat together 1/2 cup (120g) unsalted butter, 1 cup (250g) creamy peanut butter, 3/4 cup (150g) brown sugar, and 1/4 cup (50g) granulated sugar. Use medium speed for about 2–3 minutes, until the mixture is light and fluffy. If mixing by hand, aim for a pale, creamy texture. - Add Wet Ingredients:
Beat in 1 large egg and 1 tsp vanilla extract until just combined. Don’t over-mix—this keeps cookies soft. - Combine Dry Ingredients:
In a separate bowl, whisk together 1 1/4 cups (160g) flour, 1/2 tsp baking soda, and 1/4 tsp salt. Slowly add to the peanut butter mixture, mixing on low just until you don’t see streaks of flour. The dough will be thick—don’t worry, that’s normal. - Fold in S’mores Goodness:
Gently stir in 1 cup (180g) chocolate chips, 1 cup (50g) mini marshmallows, and 3/4 cup (75g) graham cracker pieces. If the dough feels sticky, chill for 10 minutes before scooping. - Shape Cookies:
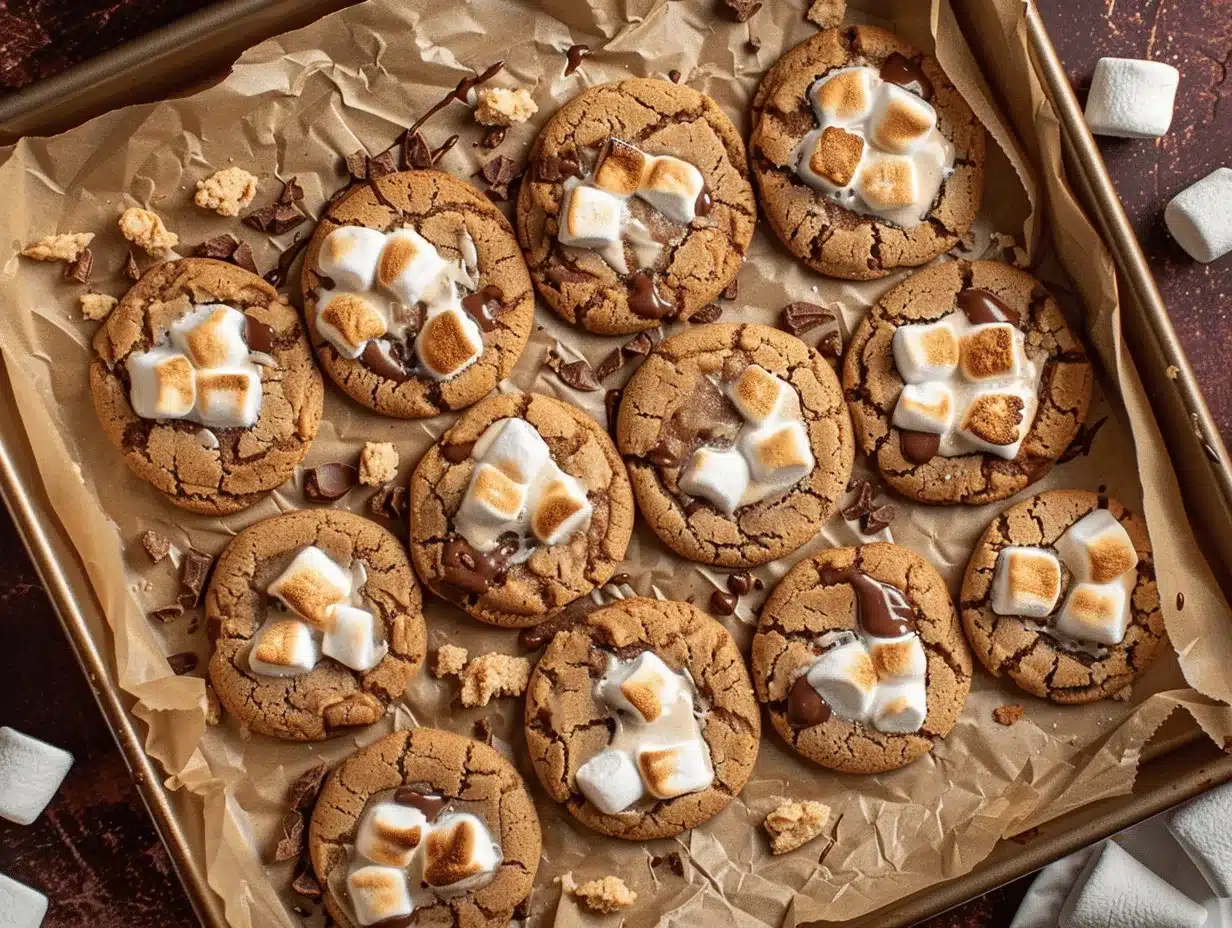
Use a cookie scoop (about 2 tbsp or 30g per cookie) to drop dough onto the prepared baking sheet, spacing about 2 inches apart. Press a few extra marshmallows and chocolate chips on top for that gooey campfire look. - Bake:
Bake for 10–12 minutes. Cookies are done when edges are set and tops look slightly crackled. Marshmallows should be golden and puffy. If you like extra gooey centers, pull them at 10 minutes; for firmer cookies, leave for 12. - Cool:
Let cookies cool on the baking sheet for 5 minutes (they’re fragile when hot!). Transfer to a wire rack to finish cooling. The cookies firm up as they cool, so don’t panic if they look super soft at first.
Troubleshooting: If cookies spread too much, chill the dough longer. If marshmallows melt too fast, press half on top after baking for 5 minutes. I’ve had cookies stick when I forgot parchment—don’t skip it! For the best gooeyness, eat warm, but they’re still delicious days later.
Efficiency Tip: While dough chills, prep your toppings or make a quick coffee—multi-tasking at its finest.
Cooking Tips & Techniques
Here are some tried-and-true tricks for peanut butter s’mores cookies, learned from plenty of baking adventures (and a few mishaps):
- Don’t Overmix: Once you add the flour, mix just until combined. Overmixing leads to tough cookies—been there, regretted that.
- Chill the Dough: If your kitchen is warm or your dough feels sticky, chill it for 15–30 minutes. It helps prevent spreading and keeps cookies thick and chewy.
- Extra Toppings: Press extra marshmallows and chocolate chips on top before baking. This keeps the cookies looking (and tasting) like true s’mores.
- Watch the Marshmallows: Mini marshmallows can melt quickly. If you want them extra gooey, add some halfway through baking or right after cookies come out of the oven.
- Cookie Size Matters: Larger cookies take longer to bake and stay gooier inside. If you prefer bite-sized, reduce baking time by a minute or two.
- Use Fresh Ingredients: Baking soda loses power over time. Make sure yours is fresh for the perfect lift.
- Batch Baking: If making a double batch, rotate baking sheets halfway through for even baking.
I’ve burned marshmallows by leaving cookies in too long, and had cookies spread into pancakes when skipping the chilling step. Learning from these “oops moments” makes a big difference. For consistent results, measure carefully and don’t rush the chilling if your dough feels loose. If you want to save time, scoop dough onto baking sheets before chilling—works great!
Variations & Adaptations
One of the best things about peanut butter s’mores cookies is how easy they are to customize. Here are a few fun ways to switch things up:
- Gluten-Free: Use a 1:1 gluten-free flour blend. Swap graham crackers for gluten-free, or skip them for a pure peanut butter-chocolate-marshmallow treat.
- Vegan: Use plant-based butter, a flax egg (1 tbsp flax meal + 2.5 tbsp water), and vegan marshmallows/chocolate chips. The cookies are still ooey-gooey and delicious.
- Nut-Free: Substitute sunflower seed butter for peanut butter. The flavor is slightly different, but still super yummy.
- Seasonal Twists: Add cinnamon in the fall, or swap chocolate for white chocolate chips at Christmas. I’ve even tried adding crushed peppermint—surprisingly good!
- Flavor Boost: Mix in a pinch of sea salt on top before baking, or drizzle melted chocolate after they cool for extra indulgence.
I personally love tossing in a handful of pretzels for a salty crunch—sounds odd, tastes amazing. If you’re baking for allergies, check your marshmallows and chocolate for hidden gluten or dairy. You can also bake these as bars in a square pan for a thicker, gooier treat (just increase baking time by 5–7 minutes).
Serving & Storage Suggestions
These cookies are best served fresh and slightly warm—think campfire s’mores, but from your oven. If you want that gooey, melty texture, reheat in the microwave for 10–15 seconds. I like stacking them on a pretty plate with extra marshmallows and chocolate chips scattered around for that Pinterest-worthy look.
Pair with cold milk, hot chocolate, or even iced coffee. They’re a hit at parties and make a killer dessert for movie nights.
Storage: Store in an airtight container at room temperature for up to 4 days. For longer storage, freeze cookies in a single layer, then transfer to a freezer bag—good for up to 2 months. Thaw at room temp, then warm in the microwave for best texture.
Flavor Note: The peanut butter and chocolate flavors mellow and deepen after a day or two. If you like extra soft cookies, place a slice of bread in the container—it keeps them moist!
Nutritional Information & Benefits
Each peanut butter s’mores cookie has roughly 180 calories, 9g fat, 22g carbs, and 3g protein (depending on mix-ins and size). Peanut butter adds healthy fats and a little protein, while chocolate and marshmallows bring that comforting sweetness.
If you use gluten-free or vegan options, the nutritional profile shifts slightly. These cookies do contain common allergens: peanuts, gluten (unless adapted), and dairy. Always check labels if making for someone with allergies.
Honestly, I love that these cookies feel indulgent but have a bit of staying power thanks to the peanut butter. They’re a treat, but not just empty calories. Perfect for a pick-me-up snack or a sweet finish to a meal!
Conclusion
If you’re looking for the ultimate homemade treat, this peanut butter s’mores cookies recipe is it. Gooey, chewy, and packed with classic s’mores flavor—these cookies are pure comfort in every bite. Whether you stick to the recipe or try one of the fun variations, they’re the kind of treat you’ll want to bake again and again.
I love making these cookies for family nights and sharing them with friends. They always get a “wow!” and I love seeing everyone’s face when they taste that perfect combo of peanut butter, chocolate, and marshmallow. Go ahead and make them your own—add your favorite mix-ins, or bake a double batch for sharing!
If you try this peanut butter s’mores cookies recipe, let me know how it goes! Drop a comment below, share your photos, or tag me on social media. I can’t wait to hear what gooey goodness you create. Happy baking!
Frequently Asked Questions
Can I make peanut butter s’mores cookies ahead of time?
Absolutely! Store them in an airtight container for up to 4 days, or freeze for longer. Warm them before serving for maximum gooeyness.
Do I need to chill the dough before baking?
It’s optional, but chilling helps cookies stay thick and chewy. If your dough feels sticky, 15–30 minutes in the fridge is perfect.
Can I use crunchy peanut butter instead of creamy?
Yes! Crunchy peanut butter adds extra texture. The cookies will be a bit chunkier, but still delicious.
How do I prevent marshmallows from melting too much?
Try pressing half the marshmallows on top halfway through baking, or add some right after baking. This keeps them gooey and visible.
Are these cookies gluten-free?
They can be! Just swap in a gluten-free flour blend and gluten-free graham crackers. Check your mix-ins for hidden gluten, too.
Pin This Recipe!

Peanut Butter S’mores Cookies

Gooey peanut butter cookies packed with melty chocolate and toasted marshmallows, bringing classic campfire s’mores flavor to your kitchen. Perfect for family nights, parties, or whenever you crave a nostalgic, homemade treat.
- Prep Time: 15 minutes
- Cook Time: 12 minutes
- Total Time: 27 minutes
- Yield: 18 cookies 1x
- Category: Dessert
- Cuisine: American
Ingredients
- 1/2 cup unsalted butter, softened
- 1 cup creamy peanut butter
- 3/4 cup brown sugar, packed
- 1/4 cup granulated sugar
- 1 large egg, room temperature
- 1 teaspoon vanilla extract
- 1 1/4 cups all-purpose flour
- 1/2 teaspoon baking soda
- 1/4 teaspoon salt
- 1 cup semi-sweet chocolate chips or chopped chocolate bars
- 1 cup mini marshmallows
- 3/4 cup graham cracker pieces (optional)
Instructions
- Preheat oven to 350°F (175°C). Line a baking sheet with parchment paper or a silicone baking mat.
- In a large mixing bowl, beat together butter, peanut butter, brown sugar, and granulated sugar until light and fluffy (2–3 minutes).
- Add egg and vanilla extract; mix until just combined.
- In a separate bowl, whisk together flour, baking soda, and salt. Gradually add to the wet mixture, mixing on low until just combined.
- Fold in chocolate chips, mini marshmallows, and graham cracker pieces. If dough is sticky, chill for 10 minutes.
- Scoop dough (about 2 tablespoons per cookie) onto prepared baking sheet, spacing 2 inches apart. Press extra marshmallows and chocolate chips on top if desired.
- Bake for 10–12 minutes, until edges are set and tops are crackled. Marshmallows should be golden and puffy.
- Cool cookies on baking sheet for 5 minutes, then transfer to a wire rack to finish cooling.
Notes
Chilling the dough helps prevent spreading and keeps cookies thick and chewy. For extra gooey marshmallows, add some halfway through baking or right after cookies come out of the oven. Graham crackers are optional for crunch. Store cookies in an airtight container for up to 4 days, or freeze for up to 2 months.
Nutrition
- Serving Size: 1 cookie
- Calories: 180
- Sugar: 14
- Sodium: 90
- Fat: 9
- Saturated Fat: 4
- Carbohydrates: 22
- Fiber: 1
- Protein: 3
Keywords: peanut butter cookies, s'mores cookies, easy cookie recipe, campfire dessert, gooey cookies, chocolate marshmallow cookies


