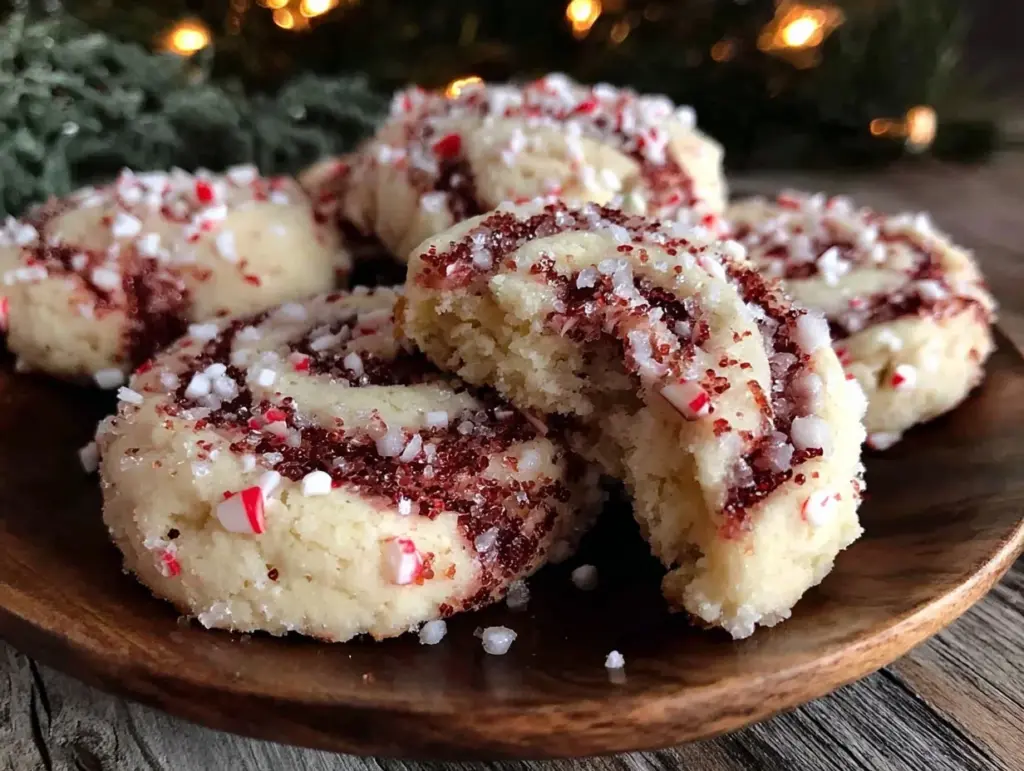
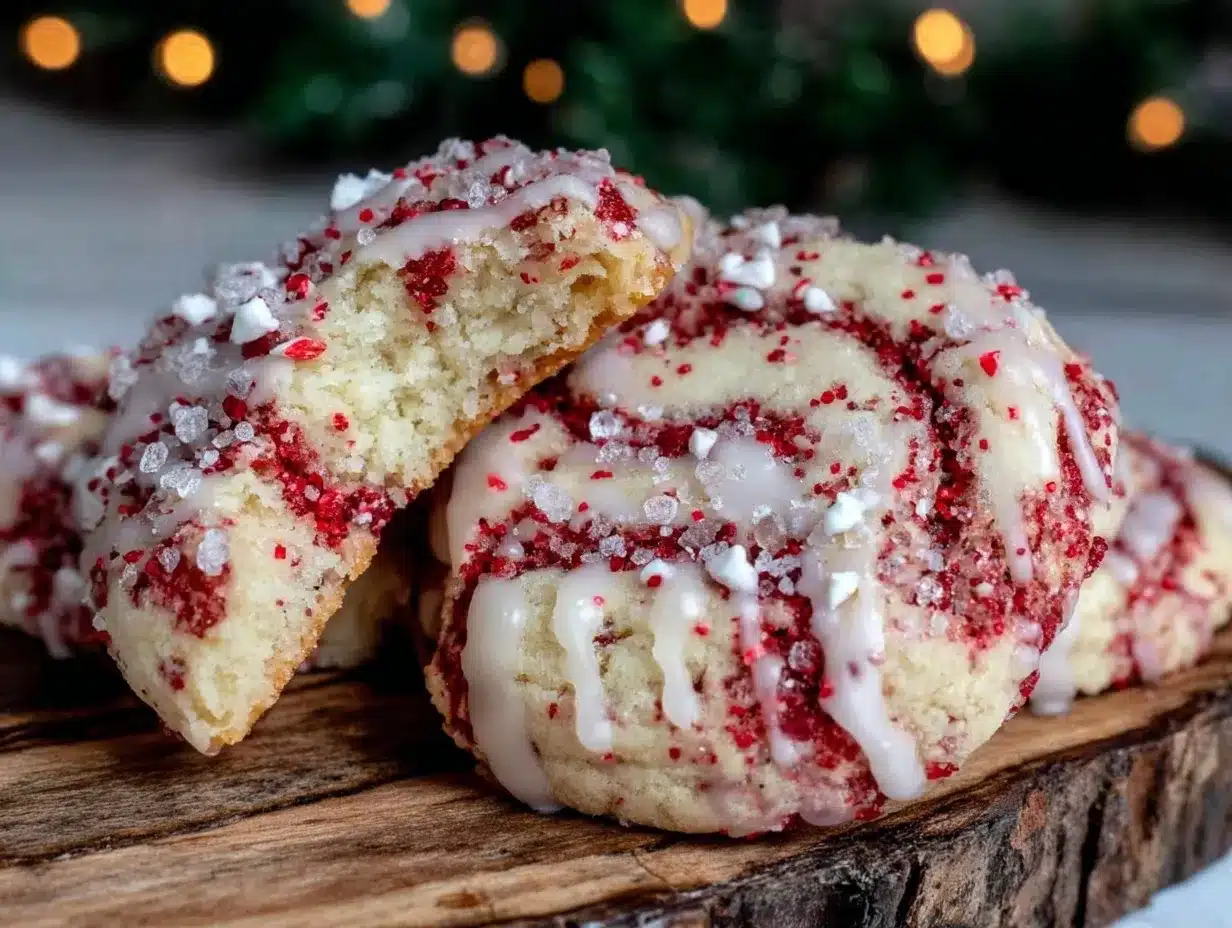
The smell of fresh peppermint and buttery cookie dough wafting through the kitchen instantly puts me in the holiday spirit. Honestly, there’s just something magical about these peppermint pinwheel cookies that takes me back to family gatherings filled with laughter and cozy moments. I first stumbled upon this recipe years ago when I wanted to bake something festive but fuss-free, and it quickly became a beloved tradition in my house. These peppermint pinwheel cookies are not only a feast for the eyes with their striking red and white swirls but also a delightful burst of minty sweetness that pairs perfectly with a cup of cocoa.
What really makes this peppermint pinwheel cookies recipe stand out is how effortlessly it combines classic holiday flavors with a simple, five-step process. After baking these cookies multiple times, tweaking the peppermint intensity and dough texture, I can confidently say this treat is a game changer for your holiday cookie platter. Whether you’re new to baking or a seasoned pro, this recipe is approachable and fun—plus, it’s great for sharing with friends, gifting, or just sneaking a few bites yourself (no judgment here!).
If you love festive desserts that taste as good as they look, this peppermint pinwheel cookies recipe is definitely one to keep in your holiday arsenal. You’ll find the balance of sweet and minty absolutely addictive, making it hard to stop at just one.
Why You’ll Love This Peppermint Pinwheel Cookies Recipe
After baking this peppermint pinwheel cookies recipe more times than I can count, I’ve gathered a few reasons why it’s a guaranteed crowd-pleaser:
- Quick & Easy: Comes together in under 45 minutes, perfect for last-minute holiday baking marathons.
- Simple Ingredients: No obscure items needed; the pantry staples you already have will do the trick.
- Perfect for Holiday Parties: Eye-catching and festive, these cookies make a stunning addition to any cookie tray or gift box.
- Crowd-Pleaser: From kids to grandparents, everyone raves about the minty freshness and tender crumb.
- Unbelievably Delicious: The peppermint flavor is just right—not overpowering, but enough to make your taste buds sing.
This isn’t just another sugar cookie recipe with a festive twist. The secret lies in rolling the dough carefully to create those perfect pinwheel spirals and using crushed peppermint candy for a little crunch and authentic holiday flair. Plus, the dough stays soft and chewy, which means you get the best texture every time. Honestly, I’ve tried a bunch of peppermint cookie recipes, but this peppermint pinwheel cookies recipe is hands-down my favorite for that classic holiday feel with a simple, foolproof method.
What Ingredients You Will Need
This peppermint pinwheel cookies recipe uses simple, wholesome ingredients that come together to deliver that signature minty, buttery flavor and melt-in-your-mouth texture. Most of these are probably hanging out in your pantry or fridge already, making this a no-stress baking project.
- All-purpose flour: 2 ½ cups (315g) – provides the perfect structure and tenderness.
- Baking powder: 1 teaspoon – helps the cookies rise just enough for softness.
- Salt: ½ teaspoon – balances sweetness and enhances flavor.
- Unsalted butter: 1 cup (227g), softened – I like using Land O Lakes for a rich taste.
- Granulated sugar: ¾ cup (150g) – adds sweetness and a slight crisp edge.
- Egg: 1 large, room temperature – binds everything together.
- Vanilla extract: 1 teaspoon – adds warm, aromatic notes.
- Red food coloring: 1 tablespoon – gives that festive pop of color (gel type works best to avoid watering down the dough).
- Crushed peppermint candies: ½ cup (about 50g) – for a refreshing crunch and authentic peppermint flavor. (You can crush candy canes or use store-bought peppermint bits.)
Pro tip: Look for finely crushed peppermint candies so they blend nicely into the dough without making it too tough. If you prefer a natural color option, beet juice powder works well with red food coloring too.
Equipment Needed
- Mixing bowls: One large and one medium-sized for dough mixing.
- Electric mixer or stand mixer: Helps cream the butter and sugar smoothly—makes life easier but you can whisk by hand if needed.
- Measuring cups and spoons: For precise ingredient amounts; baking is all about accuracy here.
- Rolling pin: To roll out the dough evenly for that perfect pinwheel effect.
- Parchment paper or silicone baking mat: Prevents sticking and ensures even baking.
- Sharp knife or pizza cutter: To slice the rolled dough into neat pinwheels.
- Baking sheet: A rimmed, heavy-duty sheet works best to keep cookies from sliding off.
If you don’t have a stand mixer, no worries—just make sure the butter is softened so you can cream it easily by hand. Also, I recommend investing in a good rolling pin if you bake often; it really makes the rolling smoother and the dough more even. I’ve used both wooden and silicone rolling pins and prefer wooden for better control.
Detailed Preparation Method
- Mix dry ingredients: In a medium bowl, whisk together 2 ½ cups (315g) all-purpose flour, 1 teaspoon baking powder, and ½ teaspoon salt. Set aside. (This step is quick but key—helps distribute the leavening evenly.)
- Cream butter and sugar: In a large bowl, beat 1 cup (227g) softened unsalted butter with ¾ cup (150g) granulated sugar until light and fluffy, about 3-4 minutes using a mixer. (You’ll notice the mixture pale and become airy—that’s a good sign.)
- Add egg and vanilla: Beat in 1 large egg and 1 teaspoon vanilla extract until combined. (If your butter was properly softened, this will mix in smoothly.)
- Divide and color dough: Split the dough roughly in half. Add 1 tablespoon red gel food coloring to one half and mix until uniform. Leave the other half plain. (If the dough feels too sticky, pop it in the fridge for 10-15 minutes.)
- Roll dough into rectangles: On parchment paper, roll each dough half into a 9×12 inch (23×30 cm) rectangle about ¼ inch (6 mm) thick. Chill both for 15 minutes until firm but pliable. (Chilling prevents cracking when rolling.)
- Layer and roll: Place the red dough rectangle on top of the plain dough. Press gently to adhere. Starting from one short edge, carefully roll the dough into a tight log. Wrap in plastic wrap and chill for at least 1 hour or until firm. (This step is a bit fiddly—take your time so the layers stay neat.)
- Slice and add peppermint: Preheat oven to 350°F (175°C). Line baking sheets with parchment paper. Slice the chilled log into ¼ inch (6 mm) thick rounds. Sprinkle crushed peppermint candies on top of each cookie and gently press so they stick. (If you want peppermint inside the dough, fold some bits into the plain dough before layering.)
- Bake: Bake cookies for 10-12 minutes until edges are set but centers still look soft. (They firm as they cool—don’t overbake!) Let cool on baking sheets for 5 minutes, then transfer to wire racks.
Quick tip: If your dough feels too soft while rolling, pop it back in the fridge a bit longer. Also, using parchment paper to roll and transfer the dough helps keep everything neat and saves cleanup time.
Cooking Tips & Techniques
When making peppermint pinwheel cookies, a few tricks can make all the difference:
- Keep dough cool: Warm dough is tough to handle and can lose its shape. Chilling between steps makes rolling easier and keeps the pinwheels crisp.
- Don’t overmix flour: Once you add dry ingredients, mix just until combined. Overworking can lead to tough cookies.
- Use gel food coloring: It adds vibrant color without changing dough texture like liquid food coloring might.
- Focus on uniform slices: Cutting the log into even rounds helps cookies bake evenly and look pretty.
- Manage peppermint candies: Crush to medium-fine pieces so they stick well but don’t overpower the dough.
- Watch baking time: These cookies are tender, so pull them out just as the edges set to avoid dryness.
I learned the hard way that rushing the chilling steps leads to cracked dough and messy pinwheels. Patience really pays off here! Also, using a pizza cutter for slicing the log makes getting straight cuts much easier.
Variations & Adaptations
Want to put your own spin on these peppermint pinwheel cookies? Here are some ideas I’ve tried and loved:
- Chocolate Peppermint: Add ¼ cup (25g) cocoa powder to the plain dough for a chocolatey base that contrasts beautifully with the red peppermint dough.
- Gluten-Free: Substitute the all-purpose flour with a gluten-free baking blend. I recommend ensuring the blend contains xanthan gum for the best texture.
- Vegan Version: Use vegan butter and replace the egg with ¼ cup (60 ml) unsweetened applesauce or a flax egg. The texture is a bit different but still tasty!
- Mint Extract Boost: For extra minty punch, add ½ teaspoon peppermint extract to the dough along with vanilla.
- Seasonal Colors: Swap the red food coloring for green or a mix of red and green to create a fun holiday swirl.
I once made a batch with crushed candy cane pieces folded inside the dough instead of sprinkled on top—resulted in surprise bursts of peppermint in every bite. Feel free to experiment with what you love!
Serving & Storage Suggestions
These peppermint pinwheel cookies are best served at room temperature, fresh from the cooling rack. They pair wonderfully with hot cocoa, coffee, or a glass of cold milk—perfect for cozy holiday afternoons. For a festive touch, arrange them on a decorative platter with some fresh pine sprigs or holiday ribbons.
To keep them fresh, store cookies in an airtight container at room temperature for up to 5 days. If you want to save them longer, freezing works great—just layer parchment between cookies to prevent sticking and place in a freezer-safe container or bag. When you’re ready, thaw at room temperature for about 30 minutes before serving.
Reheating isn’t generally necessary, but if you prefer a warm cookie, pop them in a 300°F (150°C) oven for 5 minutes. This also helps refresh the peppermint crunch. Over time, the peppermint flavor melds deeper into the dough, making them even more satisfying.
Nutritional Information & Benefits
Each peppermint pinwheel cookie contains roughly 120-140 calories, depending on size, with about 6-7 grams of fat and 15-18 grams of carbohydrates. The butter provides richness while the peppermint candies add festive flavor without extra fat.
While these aren’t exactly health food, the mint in peppermint candies can help soothe digestion after holiday feasts (a little bonus, right?). For those with dietary needs, the recipe adapts well to gluten-free and vegan versions without losing much in taste or texture.
Personally, I find baking these cookies a joyful way to celebrate the season without guilt, especially when shared with loved ones. It’s all about balance and savoring those special moments.
Conclusion
So, if you want an easy, festive treat that looks stunning and tastes like a peppermint dream, this peppermint pinwheel cookies recipe is your go-to. With just five simple steps and everyday ingredients, you’ll have a batch of show-stopping cookies that bring smiles and holiday cheer.
Feel free to make it your own—whether that means adding chocolate, going gluten-free, or upping the peppermint punch. I love this recipe because it’s both nostalgic and fresh, a perfect blend for holiday baking.
Give it a try and let me know how yours turn out! Don’t forget to share your cookie photos and any fun twists you add—I’m always excited to see your creations. Happy baking and happy holidays!
Frequently Asked Questions About Peppermint Pinwheel Cookies
Can I make the dough ahead of time?
Absolutely! You can prepare and roll the dough, then wrap it tightly in plastic wrap and refrigerate for up to 2 days before slicing and baking.
What’s the best way to crush peppermint candies?
Place candies in a sealed plastic bag and gently tap with a rolling pin or meat mallet until you have small, coarse pieces—not powdery.
Can I freeze the dough log before slicing?
Yes! Freezing the dough log makes slicing easier. Just slice the frozen log directly and bake, adding a minute or two to baking time.
How do I prevent the colors from bleeding during baking?
Use gel food coloring and chill the dough well before rolling and baking. Avoid overhandling the dough to keep colors sharp.
Are these cookies chewy or crispy?
They have a tender, slightly chewy texture with a gentle crisp around the edges—perfect balance for peppermint pinwheels.
Pin This Recipe!

Peppermint Pinwheel Cookies

Festive peppermint pinwheel cookies with a tender, chewy texture and a delightful burst of minty sweetness, perfect for holiday gatherings and gifting.
- Prep Time: 20 minutes
- Cook Time: 12 minutes
- Total Time: 45 minutes
- Yield: 24 servings 1x
- Category: Dessert
- Cuisine: American
Ingredients
- 2 ½ cups (315g) all-purpose flour
- 1 teaspoon baking powder
- ½ teaspoon salt
- 1 cup (227g) unsalted butter, softened
- ¾ cup (150g) granulated sugar
- 1 large egg, room temperature
- 1 teaspoon vanilla extract
- 1 tablespoon red gel food coloring
- ½ cup (about 50g) crushed peppermint candies
Instructions
- Mix dry ingredients: In a medium bowl, whisk together 2 ½ cups (315g) all-purpose flour, 1 teaspoon baking powder, and ½ teaspoon salt. Set aside.
- Cream butter and sugar: In a large bowl, beat 1 cup (227g) softened unsalted butter with ¾ cup (150g) granulated sugar until light and fluffy, about 3-4 minutes using a mixer.
- Add egg and vanilla: Beat in 1 large egg and 1 teaspoon vanilla extract until combined.
- Divide and color dough: Split the dough roughly in half. Add 1 tablespoon red gel food coloring to one half and mix until uniform. Leave the other half plain. Chill if dough feels sticky.
- Roll dough into rectangles: On parchment paper, roll each dough half into a 9×12 inch (23×30 cm) rectangle about ¼ inch (6 mm) thick. Chill both for 15 minutes until firm but pliable.
- Layer and roll: Place the red dough rectangle on top of the plain dough. Press gently to adhere. Starting from one short edge, carefully roll the dough into a tight log. Wrap in plastic wrap and chill for at least 1 hour or until firm.
- Slice and add peppermint: Preheat oven to 350°F (175°C). Line baking sheets with parchment paper. Slice the chilled log into ¼ inch (6 mm) thick rounds. Sprinkle crushed peppermint candies on top of each cookie and gently press so they stick.
- Bake: Bake cookies for 10-12 minutes until edges are set but centers still look soft. Let cool on baking sheets for 5 minutes, then transfer to wire racks.
Notes
Use gel food coloring to avoid watering down the dough. Chill dough between steps to prevent cracking and maintain shape. Crush peppermint candies to medium-fine pieces for best texture. If dough is too soft, chill longer. Use parchment paper for rolling and baking to keep things neat.
Nutrition
- Serving Size: 1 cookie
- Calories: 130
- Sugar: 10
- Sodium: 90
- Fat: 6.5
- Saturated Fat: 4
- Carbohydrates: 16
- Fiber: 0.5
- Protein: 2
Keywords: peppermint pinwheel cookies, holiday cookies, peppermint cookies, festive cookies, easy cookie recipe, holiday baking