Picture this: you pull a pan of warm, chocolatey cake from the oven, and as you poke those little holes across the top, the sweet scent of melted peanut butter cups fills your kitchen. Honestly, there’s just something magical about a Reese’s Peanut Butter Cup Poke Cake. Maybe it’s the way the creamy peanut butter mingles with fudgy chocolate, or maybe it’s how ridiculously simple it is to make (no fancy baking skills required, I promise!). Either way, this is the kind of dessert that has everyone going back for “just one more bite.”
I first whipped up this Reese’s Peanut Butter Cup Poke Cake on a whim for a friend’s birthday—she’s a certified peanut butter fanatic, and I wanted to surprise her with something special. The reaction? Let’s just say she asked for the recipe before she’d even finished her second slice. Since then, it’s become my go-to for birthdays, potlucks, and those days when only chocolate and peanut butter will do.
What makes this Reese’s Peanut Butter Cup Poke Cake stand out? It’s the perfect mix of convenience (hello, cake mix!) and over-the-top flavor. There’s no need for a mixer or complicated steps. Plus, you’ll get that classic Reese’s taste in every bite, with a soft, moist crumb and pockets of gooey peanut butter. If you’re feeding a crowd, or just want a dessert that’ll make you the hero of any gathering, this cake’s your ticket. Trust me—I’ve made it more times than I can count, and it always disappears fast.
Whether you’re a busy parent, a beginner baker, or just someone who loves a good shortcut, this Reese’s Peanut Butter Cup Poke Cake is the definition of easy indulgence. Ready to make your kitchen smell like a dream and your taste buds do a happy dance? Let’s get baking!
Why You’ll Love This Reese’s Peanut Butter Cup Poke Cake
- Unbelievably Easy: No need to be a pro baker! This recipe uses a boxed cake mix and simple, fuss-free ingredients you can find at any grocery store.
- Crowd-Pleasing Flavor: Chocolate and peanut butter are a match made in dessert heaven. Add in actual Reese’s Peanut Butter Cups and you’ve got a real showstopper.
- Perfect for Any Occasion: Birthdays, holidays, game nights, or just because—it’s always a hit. I’ve taken this cake to potlucks and watched grown adults fight over the last slice (not even kidding!).
- Make-Ahead Friendly: You can bake it the night before and let the flavors mingle in the fridge. In fact, it gets even better after a few hours.
- Customizable: Want to use dark chocolate cake mix? Or add a drizzle of caramel? This recipe is super flexible—make it your own!
- Kid-Approved: My kids have declared it their “favorite cake ever.” And let’s face it, if the kids are happy, everyone’s happy.
- No Mixer Needed: Just grab a bowl and a whisk. Less cleanup, more cake.
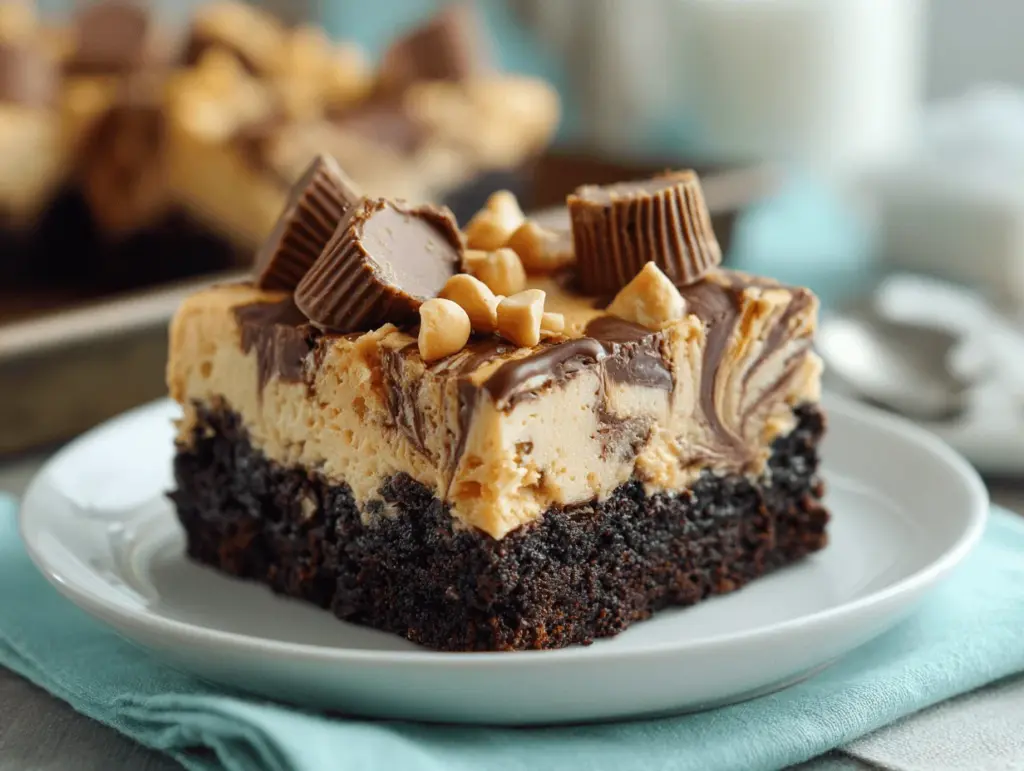
What sets this Reese’s Peanut Butter Cup Poke Cake apart from the rest? For starters, I’ve tested every method you can imagine—spreading, drizzling, even blending the peanut butter layer. The real secret is pouring a warm peanut butter mixture over those freshly poked holes, letting it seep into the cake and create dreamy, gooey pockets of flavor. Top it with a creamy chocolate whipped topping and a mountain of chopped Reese’s cups, and you’ve got the ultimate dessert. It’s rich but balanced, decadent but not overwhelming. And honestly, it’s the kind of cake that makes people ask, “Did you really make this yourself?”
This recipe isn’t just about taste—it’s about making memories. Whether you’re celebrating something big or just getting through a regular Tuesday, there’s nothing like sharing a slice of this poke cake with people you love. It’s comfort food at its best, with a playful, nostalgic twist. So, if you want a foolproof dessert that’ll have everyone swooning, this Reese’s Peanut Butter Cup Poke Cake is your answer.
What Ingredients You Will Need
This Reese’s Peanut Butter Cup Poke Cake is built on simple, familiar ingredients that pack big flavor—no obscure specialty items here. Most are pantry staples, and you can swap in alternatives based on what you have handy. Here’s what you’ll need:
- For the Cake:
- 1 box chocolate cake mix (15.25 oz/432g; Devil’s food, fudge, or classic chocolate all work great. I like Duncan Hines or Betty Crocker.)
- Eggs (usually 3 large; check your cake mix box for exact amount)
- Vegetable oil (1/2 cup/120 ml, or as specified on your cake mix)
- Water (as called for on the cake mix box, typically 1 cup/240 ml)
- For the Filling:
- 1 can sweetened condensed milk (14 oz/397g; this soaks into the cake, making it extra moist and rich)
- 1/2 cup creamy peanut butter (120g; smooth works best, but you can use crunchy for texture)
- Optional: 1/4 cup whole milk or heavy cream (60 ml; helps the peanut butter drizzle easily)
- For the Topping:
- 1 tub whipped topping (8 oz/226g; like Cool Whip, thawed; or use homemade whipped cream if you’re feeling fancy)
- 1/2 cup hot fudge sauce (120g; jarred is fine, just warm it up so it spreads easily)
- 8-10 Reese’s Peanut Butter Cups (regular size; chopped; you can add more or less depending on your love for Reese’s!)
- Optional: Mini chocolate chips or peanut butter chips (for that extra wow factor)
Ingredient Tips & Swaps:
- If you’re gluten-free, use your favorite gluten-free chocolate cake mix. King Arthur is my go-to.
- Dairy-free? Use coconut condensed milk and dairy-free whipped topping. Reese’s are not dairy-free, so swap with your favorite vegan PB cups.
- No whipped topping? Real whipped cream (lightly sweetened) works beautifully. Just keep it chilled until serving.
- Want less sugar? Use sugar-free cake mix and sugar-free fudge sauce. The cake will still be decadent!
- Can’t find hot fudge? Melt regular chocolate chips with a splash of cream for a quick homemade drizzle.
I always say, recipes are guidelines—not rules. If you’re missing something, don’t stress. This cake is super forgiving, and honestly, it’s hard to mess up. The most important thing? Don’t skimp on the Reese’s cups. That’s where the magic happens!
Equipment Needed
- 9×13-inch baking pan (23×33 cm; glass or metal both work—metal gives a crispier edge, glass keeps it soft)
- Mixing bowls (one large for the cake, smaller ones for the filling and toppings)
- Whisk or electric hand mixer (a whisk is usually enough, but a mixer gives an extra-smooth batter)
- Measuring cups and spoons (accuracy matters for baking, so don’t eyeball it!)
- Wooden spoon or spatula (for mixing and spreading)
- Fork or the handle of a wooden spoon (for poking holes in the cake—don’t use anything too thin, or the filling won’t soak in as well)
- Microwave-safe bowl (for gently warming peanut butter and fudge sauce)
- Sharp knife (for chopping up Reese’s cups—pro tip: chill them first for cleaner cuts)
If you don’t have a 9×13 pan, two 8×8 pans work in a pinch (just adjust the baking time a bit). I’ve even used disposable foil pans for easy cleanup at parties—works like a charm.
Budget-wise, you don’t need any fancy gear. I once made this cake at a friend’s house using a plastic mixing bowl and a regular fork—still turned out perfect! For maintenance, soak your pan right after baking if you want to avoid scrubbing fudgey bits later. And if you’re a peanut butter dessert lover, consider investing in a set of spatulas—nothing scrapes out bowls quite like a flexible silicone spatula!
How to Make Reese’s Peanut Butter Cup Poke Cake

-
Preheat and Prep:
- Preheat your oven to 350°F (175°C).
- Grease a 9×13-inch (23×33 cm) baking pan with butter or nonstick spray. This keeps your cake from sticking and makes cleanup a breeze.
-
Mix and Bake the Cake:
- In a large bowl, combine the chocolate cake mix, eggs, oil, and water (follow box instructions for exact amounts).
- Whisk or beat with a hand mixer for about 2 minutes, until smooth and lump-free.
- Pour the batter into your prepared pan and smooth the top.
- Bake for 28–32 minutes, or until a toothpick inserted in the center comes out clean. (Don’t overbake—this cake is best a little moist!)
-
Poke the Cake:
- Let the cake cool for about 10 minutes. It should be warm but not hot.
- Using the handle of a wooden spoon or a thick fork, poke holes all over the cake, spacing about 1 inch (2.5 cm) apart. Don’t go all the way to the bottom—about 3/4 deep is perfect.
-
Mix the Peanut Butter Filling:
- In a microwave-safe bowl, combine the sweetened condensed milk and creamy peanut butter.
- Microwave in 20-second bursts, stirring until smooth and pourable. (If needed, add a splash of milk or cream.)
- Pour the mixture evenly over the cake, letting it soak into the holes. Use a spatula to help it spread, if needed.
-
Cool Completely:
- Let the cake cool to room temperature, then refrigerate for at least 1 hour. This helps the filling set and the flavors meld. (Overnight is even better!)
-
Add the Toppings:
- Spread the whipped topping evenly over the chilled cake.
- Drizzle with warmed hot fudge sauce. (You can use a spoon to make swirls or zig-zags—get creative!)
- Scatter the chopped Reese’s Peanut Butter Cups over the top. Add mini chips or extra peanut butter drizzle if you’re feeling extra.
-
Chill and Serve:
- For cleaner cuts and best flavor, refrigerate for another hour before serving.
- Slice into squares. Serve chilled or at room temperature—both ways are delicious!
Pro Tips: If your filling isn’t soaking in, gently tap the pan on the counter to help it settle. If your fudge sauce is too thick, microwave it with a splash of cream. And if your Reese’s cups start to melt while you chop, pop them in the freezer for 5 minutes first.
Cooking Tips & Techniques
After baking this Reese’s Peanut Butter Cup Poke Cake more times than I can count, I’ve picked up a few tricks. Here’s what makes a good cake great:
- Don’t Overbake: This cake is meant to be moist. Start checking for doneness at the lower end of the baking time. If your toothpick comes out with a few moist crumbs (not wet batter), you’re good.
- Poke Deep, Not Through: You want those holes to be deep enough for the filling to seep in, but not so deep that it leaks out the bottom. About 3/4 of the way down is just right.
- Warm Your Fillings: Both the peanut butter mixture and fudge sauce should be warm and pourable—never hot. If they’re too thick, they’ll sit on top of the cake instead of soaking in.
- Chill for Easy Slicing: Cold cake holds its structure better when cutting. I know it’s tempting to dig in right away, but trust me—patience pays off.
- Layer Your Toppings: Don’t be shy with the Reese’s cups. Scatter some over the whipped topping, and reserve a few for the very top so they don’t get lost.
Common mistakes? I once forgot to grease the pan. Let’s just say the cake came out in “rustic” chunks. Also, don’t skip cooling the cake before adding whipped topping, or you’ll end up with a melty mess. If you’re multitasking (like I usually am), set a timer for each step—especially when chilling between layers. Consistency is key, and these little details make all the difference!
Variations & Adaptations
- Gluten-Free Version: Use your favorite gluten-free chocolate cake mix and check that all toppings are gluten-free. I’ve used King Arthur’s mix and it works beautifully!
- Dairy-Free Adaptation: Swap out sweetened condensed milk for coconut condensed milk, and use a dairy-free whipped topping. Substitute vegan peanut butter cups for the classic Reese’s.
- Flavor Swaps: Try a white or yellow cake mix as the base, or add a layer of caramel sauce for a turtle cake twist. You can also sprinkle chopped pretzels on top for a salty crunch.
- Different Cooking Methods: I’ve even made this cake in a sheet pan for thinner bars—just reduce baking time. For a round cake, split the batter between two 9-inch pans and layer with filling and topping.
- Allergen Substitutions: For nut allergies, use sunflower seed butter and nut-free chocolate cups.
- Personal Favorite: Sometimes I fold mini chocolate chips into the batter for extra chocolate wow. Or, add a pinch of sea salt on top to balance the sweetness!
Don’t be afraid to get creative. The base recipe is super forgiving, so make it your own with whatever flavors or dietary tweaks you love most. If you try something wild, let me know in the comments—seriously, I love hearing about your cake experiments!
Serving & Storage Suggestions
This Reese’s Peanut Butter Cup Poke Cake is best served chilled or at cool room temperature. I find that the flavors and texture really come together after a few hours in the fridge. For a party, cut it into neat squares and arrange on a platter—sprinkle extra Reese’s cups or mini chips on top for that Pinterest-worthy look.
Want to get fancy? Add a dollop of whipped cream and a drizzle of chocolate syrup just before serving. This cake pairs perfectly with cold milk, hot coffee, or (if you’re feeling grown-up) a rich stout or coffee liqueur.
Storage: Cover the pan with foil or plastic wrap and keep in the refrigerator for up to 5 days. The cake actually gets better as it sits, with the filling and flavors melding beautifully. For longer storage, freeze individual slices in airtight containers for up to 2 months—thaw in the fridge overnight before serving.
Reheating isn’t really necessary, but if you want a slightly melty topping, microwave a slice for 10-15 seconds. Just be careful not to overheat, or the whipped topping will lose its fluff. This cake travels well, too—I’ve packed slices for picnics and never had leftovers come home!
Nutritional Information & Benefits
While this Reese’s Peanut Butter Cup Poke Cake is definitely a treat, it’s nice to know what you’re enjoying! Here’s an approximate breakdown per serving (assuming 16 squares):
- Calories: 370
- Total Fat: 18g
- Saturated Fat: 7g
- Carbohydrates: 48g
- Sugar: 34g
- Protein: 5g
Health Notes: While this cake is indulgent, peanut butter offers a bit of plant-based protein and healthy fats. If you want to lighten things up, use reduced-fat whipped topping and skim milk. For those with allergies, always check for peanuts, dairy, and gluten in your ingredient choices.
From a personal wellness perspective, I think of this cake as a “sometimes” food—perfect for celebrations or sharing with friends. The happiness it brings? Worth every bite!
Conclusion
If you’re searching for a dessert that’s outrageously delicious, easy to make, and guaranteed to impress, this Reese’s Peanut Butter Cup Poke Cake is your answer. It’s got that classic chocolate-peanut butter combo everyone loves, plus a gooey, creamy filling and a topping that’s pure nostalgia. Whether you’re baking for a birthday, a holiday, or just a Tuesday treat, this cake is always a hit.
Don’t be afraid to make it your own—swap toppings, try new flavors, and share your twists in the comments. Personally, this is my “happy place” dessert; it never fails to cheer me up or bring a smile to a friend’s face. Give it a try, and let me know how it goes! If you love it (and I bet you will), please share this recipe with your fellow dessert lovers or pin it for later. Happy baking, and remember: life’s short—eat the cake!
Frequently Asked Questions about Reese’s Peanut Butter Cup Poke Cake
Can I make this poke cake ahead of time?
Absolutely! In fact, making it a day ahead lets the flavors blend even better. Just keep it covered in the fridge until you’re ready to serve.
Can I use a different candy instead of Reese’s Peanut Butter Cups?
Yes! Try chopped Snickers, Milky Way, or even mini peanut butter cups. Use what you love or have on hand.
What’s the best way to poke holes in the cake?
I use the handle of a wooden spoon. If you use a fork or skewer, make sure the holes are big enough for the filling to soak in. Don’t go all the way to the bottom.
Can I freeze this cake?
Definitely! Slice the cake and wrap individual pieces in plastic wrap, then freeze in an airtight container. Thaw in the fridge overnight for best texture.
How do I keep the whipped topping from getting runny?
Always let the cake cool completely before adding the topping, and keep the cake refrigerated. If you use homemade whipped cream, stabilize it with a little powdered sugar or instant pudding mix.
Pin This Recipe!
Reese’s Peanut Butter Cup Poke Cake

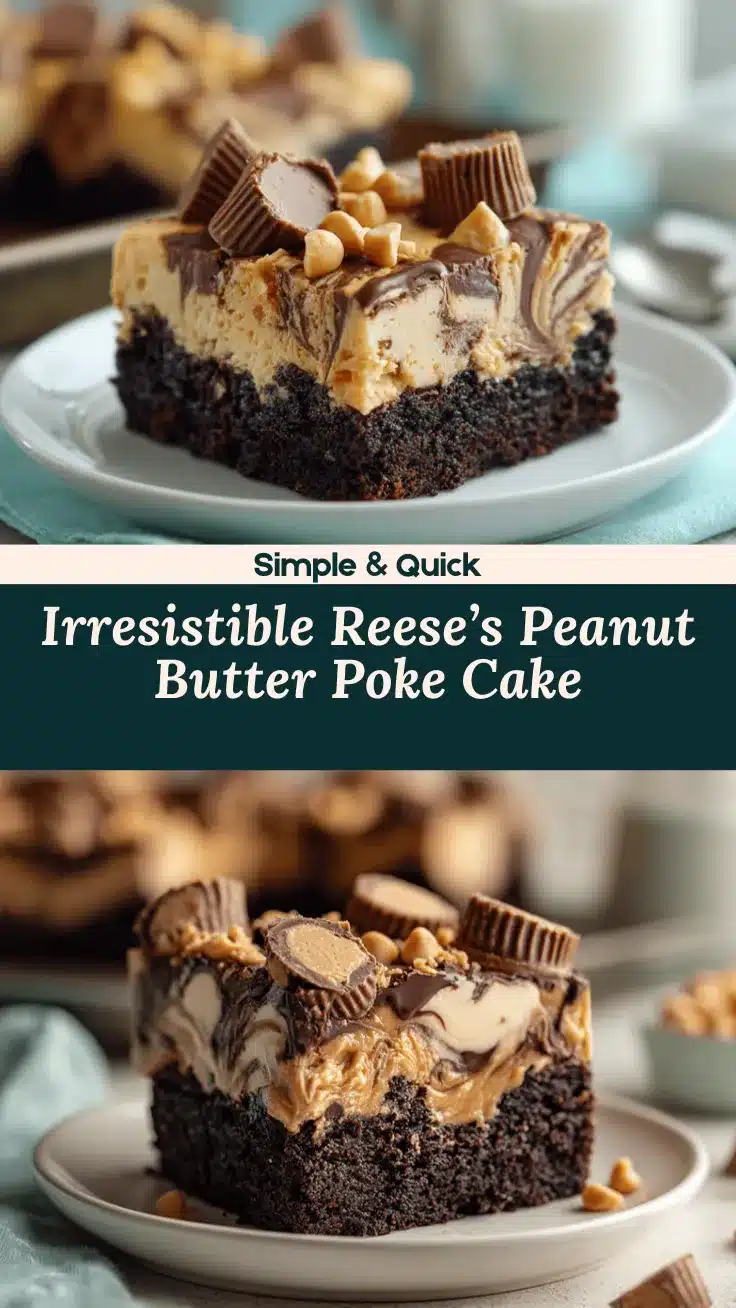
This easy poke cake combines a moist chocolate cake base with a gooey peanut butter filling, topped with whipped topping, hot fudge, and plenty of chopped Reese’s Peanut Butter Cups. It’s a crowd-pleasing, make-ahead dessert perfect for birthdays, potlucks, or any chocolate-peanut butter craving.
- Prep Time: 20 minutes
- Cook Time: 30 minutes
- Total Time: 2 hours 10 minutes
- Yield: 16 servings 1x
- Category: Dessert
- Cuisine: American
Ingredients
- 1 box chocolate cake mix (15.25 oz)
- 3 large eggs (or as specified on cake mix box)
- 1/2 cup vegetable oil (or as specified on cake mix box)
- 1 cup water (or as specified on cake mix box)
- 1 can sweetened condensed milk (14 oz)
- 1/2 cup creamy peanut butter
- Optional: 1/4 cup whole milk or heavy cream
- 1 tub whipped topping (8 oz, thawed)
- 1/2 cup hot fudge sauce (warmed)
- 8–10 Reese’s Peanut Butter Cups (chopped)
- Optional: Mini chocolate chips or peanut butter chips for garnish
Instructions
- Preheat oven to 350°F (175°C). Grease a 9×13-inch baking pan with butter or nonstick spray.
- In a large bowl, combine chocolate cake mix, eggs, oil, and water as directed on the box. Whisk or beat for about 2 minutes until smooth.
- Pour batter into prepared pan and smooth the top. Bake for 28–32 minutes, or until a toothpick inserted in the center comes out clean.
- Let cake cool for about 10 minutes. Using the handle of a wooden spoon or thick fork, poke holes all over the cake, about 1 inch apart and 3/4 of the way down.
- In a microwave-safe bowl, combine sweetened condensed milk and creamy peanut butter. Microwave in 20-second bursts, stirring until smooth and pourable. Add a splash of milk or cream if needed.
- Pour peanut butter mixture evenly over the cake, letting it soak into the holes. Use a spatula to spread if needed.
- Let cake cool to room temperature, then refrigerate for at least 1 hour (overnight is even better).
- Spread whipped topping evenly over the chilled cake.
- Drizzle with warmed hot fudge sauce and scatter chopped Reese’s Peanut Butter Cups on top. Add mini chips or extra peanut butter drizzle if desired.
- Refrigerate for another hour for cleaner cuts. Slice into squares and serve chilled or at room temperature.
Notes
For best results, chill the cake before serving for clean slices and melded flavors. Don’t overbake the cake—moist crumbs are ideal. If the peanut butter filling is too thick, add a splash of milk or cream. For gluten-free or dairy-free adaptations, use appropriate cake mix and toppings. Cake can be made a day ahead and freezes well in individual slices.
Nutrition
- Serving Size: 1 square (1/16 of cake)
- Calories: 370
- Sugar: 34
- Fat: 18
- Saturated Fat: 7
- Carbohydrates: 48
- Protein: 5
Keywords: poke cake, Reese's, peanut butter, chocolate, easy dessert, birthday cake, potluck, make-ahead, cake mix, peanut butter cup cake