“Pass me the salt,” my friend joked at dinner, eyes twinkling as she reached for the little jar with the handwritten tag dangling from the rim. That night, I realized flavored salts weren’t just a sprinkle on food—they were a whole vibe. Honestly, I hadn’t planned on making flavored salts; it was a last-minute idea born from a half-empty jar of sea salt and a handful of herbs wilting on the counter. I thought, why not try mixing a few flavors to jazz up the usual? What started as a casual experiment quickly became a little obsession, with batches disappearing faster than I expected.
It was during a quiet weekend afternoon, while sipping tea and scribbling gift tags, that the idea hit me: these perfect flavored salts would make charming homemade gifts. The charm lies in their simplicity—just salt, herbs, spices, and a bit of time to let flavors meld. Plus, adding a handmade tag gives each jar a personal touch that feels special, even if the gift is just for a neighbor or coworker. Honestly, these salts stuck with me because they bring that little spark of joy to everyday meals, and sharing them feels like passing on a pinch of happiness.
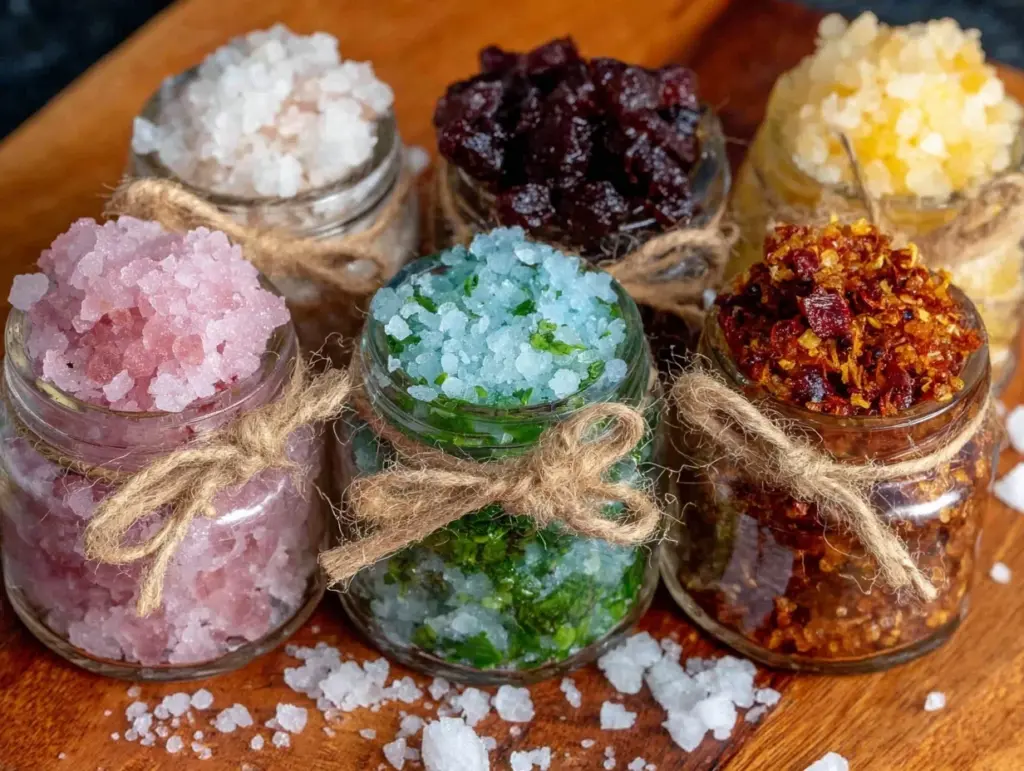
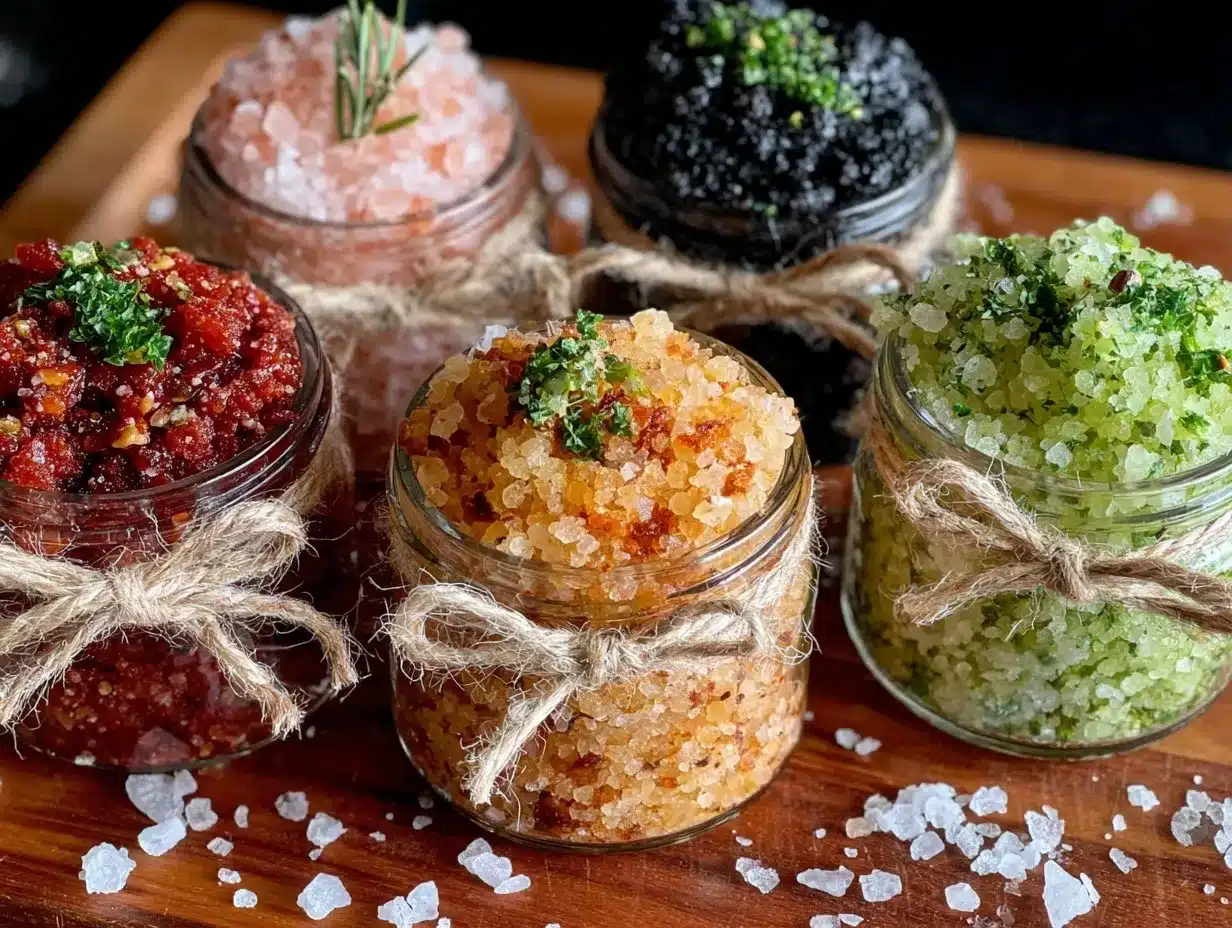
So, here’s the scoop on making your own perfect flavored salts 5 ways, complete with easy, handmade gift tags. You’ll see how a tiny jar of salt can become a thoughtful, delicious present, or just a neat way to brighten your own kitchen routine.
Why You’ll Love This Recipe
From personal trials and countless kitchen tastings, this recipe for perfect flavored salts 5 ways is a keeper. I’ve tested and tweaked to balance ease, flavor, and presentation, making it a go-to for quick gifts or your own pantry upgrade. Here’s why it’s worth your time:
- Quick & Easy: These flavored salts come together in under 15 minutes, perfect for last-minute gift ideas or a weekend kitchen project.
- Simple Ingredients: No need for fancy store hunts—just sea salt and common herbs and spices you likely already have.
- Perfect for Gifts: Handmade tags add a personal, rustic touch that makes these jars ideal for holidays, hostess gifts, or casual exchanges.
- Crowd-Pleaser: Whether you’re sprinkling them on roasted veggies, grilled meats, or even popcorn, the salts always get compliments.
- Unbelievably Delicious: The careful blending of herbs, citrus zest, and spices creates layers of flavor that turn everyday dishes into something memorable.
This isn’t just your average flavored salt recipe. The secret? I blend fine sea salt with fresh, dried, and toasted ingredients, then let them rest so the flavors marry beautifully. Plus, the handmade tags make the jars feel like a gift from the heart, not just another kitchen experiment. It’s comforting to know that something so simple can make you pause and really savor a meal, or brighten someone’s day with a thoughtful, tasty gift.
What Ingredients You Will Need
This recipe uses simple, wholesome ingredients to deliver bold flavor and satisfying texture without the fuss. Most are pantry staples or easily sourced, and you can swap a few for dietary needs or personal taste.
- Sea Salt: Fine or flaky sea salt forms the base for all five flavored salts. I prefer Maldon sea salt for its clean taste and flaky texture.
- Herbs & Spices:
- Dried Rosemary (crushed) – adds piney, woody notes
- Dried Thyme – subtle, earthy flavor
- Smoked Paprika – for smoky warmth
- Crushed Red Pepper Flakes – a mild kick of heat
- Black Peppercorns (freshly cracked) – sharp and aromatic
- Citrus Zest: Lemon and orange zest brighten two of the salts with fresh, zesty aromas. Use organic citrus to avoid pesticides if you’re zesting the peel.
- Garlic Powder: Adds savory depth without overpowering
- Lavender Flowers (dried): For a floral, slightly sweet salt—use culinary-grade lavender only
- Seaweed Flakes (optional): Adds a subtle umami note, perfect for seafood dishes
For the handmade gift tags, you’ll need simple cardstock or kraft paper, twine or ribbon, and a fine-tip pen for labeling. You can add small decorative touches like pressed herbs or stamps to make each tag unique.
Substitution tip: If you want a low-sodium version, try using a mix of salt and finely ground nuts or seeds to keep texture but reduce salt content. For gluten-free and vegan options, all ingredients here are naturally compliant.
Equipment Needed
- Mixing Bowls: A few medium-sized bowls to blend your salts separately.
- Measuring Spoons and Cups: For accurate ingredient proportions, especially when balancing herbs and spices.
- Fine Grater or Microplane: For zesting citrus fruits finely without the bitter white pith.
- Mortar and Pestle (optional): Great for crushing herbs and peppercorns to release oils, but a rolling pin or spice grinder works well too.
- Glass Jars with Lids: Small jars or spice containers to store your flavored salts. Recycled jam jars are perfect and eco-friendly.
- Cardstock and Craft Supplies: For making your handmade gift tags—scissors, hole punch, twine, and pens.
Honestly, no fancy gadgets required here. I’ve tried everything from high-end spice grinders to just using my fingers to crush herbs, and it all works fine. The key is freshness and neat packaging. If you’re on a budget, thrift stores often have cute little jars and crafting supplies for pennies.
Preparation Method
- Prepare the Citrus Zest: Use a microplane to gently zest 1 lemon and 1 orange, avoiding the white pith. Set aside separately for the lemon salt and orange salt blends. (Approx. 5 minutes)
- Crush the Herbs and Spices: Using a mortar and pestle or spice grinder, lightly crush 2 tablespoons each of dried rosemary and thyme for the herb salt. For spicy and smoky salts, crack 1 tablespoon black peppercorns and combine with 1 teaspoon smoked paprika or red pepper flakes. (Approx. 7 minutes)
- Mix Each Salt Base: In separate bowls, combine 1 cup (240 ml) sea salt with:
- Herb Salt: crushed rosemary, thyme
- Lemon Salt: lemon zest, garlic powder (1 tsp)
- Orange Salt: orange zest, lavender flowers (1 tsp dried)
- Smoky Salt: smoked paprika, cracked black pepper
- Spicy Salt: crushed red pepper flakes, garlic powder
- Blend Thoroughly: Stir each mixture well to evenly distribute herbs and spices. The colors and aromas should be vibrant and inviting. (Approx. 3 minutes)
- Dry the Salts: Spread each blend on a parchment-lined baking sheet and allow to air dry for 1-2 hours to remove any excess moisture from fresh ingredients. Alternatively, dry gently in an oven at 200°F (95°C) for 10 minutes—watch closely to avoid toasting.
- Jar and Label: Spoon each salt into clean glass jars, leaving some space at the top. Add a handmade tag indicating the flavor and date. Tie the tag with twine or ribbon for a rustic finish. (Approx. 10 minutes)
- Rest Before Use: Let the salts rest sealed for at least 24 hours to meld flavors, though they can be used immediately if you’re impatient like me.
A quick note from experience: don’t skip the drying step if you use fresh zest or herbs. Moisture can clump your salt or shorten shelf life. Also, labeling helps you avoid mixing flavors later—trust me on this one!
Cooking Tips & Techniques
Getting the perfect flavored salt is less about complicated techniques and more about balance and patience. Here are some tips I’ve gleaned from trial and error:
- Use Fresh Spices and Herbs: Dried ingredients lose potency over time. Freshly crushed herbs and freshly grated zest make a world of difference.
- Control Moisture: Citrus zest and herbs can be damp. Air drying or low oven drying prevents mold and keeps salts free-flowing.
- Grind Coarseness: Consider the texture you want. Fine salts blend easily into dressings, while flaky salts add crunch as finishing touches.
- Don’t Overdo the Flavors: Salt should still shine through. Use spices and herbs as accents, not the main event.
- Store Properly: Keep salts in airtight containers away from heat and light to maintain freshness.
- Test Before Gifting: Sprinkle a little on a simple dish (like roasted potatoes or scrambled eggs) to check the seasoning balance.
One time, I skipped drying the lemon zest salt and ended up with a clumpy jar that smelled more like citrus juice than salt. Lesson learned! Also, making these salts reminded me a bit of the seasoning blends I use in my crispy keto beef tacos with cheese shells recipe—both rely on layering flavors carefully.
Variations & Adaptations
The beauty of flavored salts lies in their versatility. Here are a few ways to mix it up:
- Herb Swap: Use fresh herbs like basil or oregano for a lighter, garden-fresh flavor. Just dry them thoroughly before mixing.
- Spice It Up: Add cumin or coriander seeds for a warm, earthy twist—great for smoky salt variations. You can even add a pinch of cinnamon for subtle complexity.
- Umami Boost: Incorporate finely ground dried mushrooms or toasted seaweed flakes for a savory punch, perfect on grilled salmon or chicken.
- Sweet & Salty: Mix in a little sugar or coconut sugar with cinnamon and sea salt for a unique finishing salt that pairs beautifully with desserts or roasted nuts.
- Seasonal Flair: Swap citrus zest for dried cranberries or orange peel in winter, or fresh herbs for edible flowers in spring.
Personally, I once made a batch with lavender flowers and a hint of vanilla bean powder—sounds odd, but it turned out to be a delightful match for roasted carrots and even my creamy white pizza with ricotta and spinach.
Serving & Storage Suggestions
Flavored salts are best used as finishing touches, sprinkled over dishes just before serving. Here’s how to get the most out of them:
- Serving Temperature: Use at room temperature to preserve the texture and aroma.
- Presentation: Offer salts in pretty little jars with spoons or spread on small plates for guests to add themselves.
- Complementary Pairings: Herb and lemon salts go great with roasted vegetables or grilled chicken, smoky salt pairs perfectly with pork chops, and lavender salt adds charm to salads or creamy dips.
- Storage: Store in airtight glass jars in a cool, dry place. Avoid humid kitchens as moisture can cause clumping.
- Reheating: Not applicable, but if you sprinkle on hot dishes, the heat will release flavors beautifully.
- Flavor Development: Salts deepen in aroma over time, so they’re even better after a week resting sealed.
For gifting, these salts look fantastic alongside dishes like my creamy honey whipped feta recipe, making a lovely flavor combo gift set. And if you’re hosting a cozy dinner, a jar of flavored salt on the table adds an extra sprinkle of love.
Nutritional Information & Benefits
While flavored salts are used sparingly, here’s a quick look at their nutritional profile and benefits:
- Primarily sodium from sea salt, so moderation is key for heart health.
- Herbs like rosemary and thyme offer antioxidants and anti-inflammatory properties.
- Citrus zest provides a small boost of vitamin C and essential oils that support digestion.
- Lavender and spices contribute trace minerals and may aid relaxation or digestion.
- Suitable for gluten-free, vegan, and paleo diets.
From a wellness perspective, these salts give you flavor without extra calories or additives, encouraging you to savor food more mindfully and creatively.
Conclusion
Perfect flavored salts 5 ways aren’t just a recipe; they’re a little kitchen ritual that turns everyday meals into moments of delight. Whether you keep them for yourself or gift them with handmade tags, they offer a simple way to share care and flavor. I love how this project marries creativity, practicality, and a touch of rustic charm—no complicated steps, just real, honest ingredients that make a difference on the plate.
Give yourself room to experiment, tweak the blends to your taste, and add your own personal touch with gift tags that tell a story. It’s these small details that make homemade gifts so meaningful and memorable. I’d love to hear how you customize your salts or what dishes you sprinkle them on—drop a comment or share your ideas!
Happy salting, and here’s to making simple things special in the kitchen.
FAQs
How long do homemade flavored salts last?
Stored in airtight containers away from moisture and heat, flavored salts can last up to 6 months. The flavors may mellow but remain delicious.
Can I use table salt instead of sea salt?
You can, but sea salt offers better texture and flavor. Table salt is finer and may clump more easily in these blends.
Are flavored salts suitable for low-sodium diets?
If you’re watching sodium intake, use these salts sparingly or try mixing with herbs or finely ground nuts to reduce salt concentration.
Can I use fresh herbs instead of dried?
Fresh herbs can be used but should be dried thoroughly first to prevent moisture-related clumping or spoilage.
What are some creative uses for flavored salts?
They’re great on roasted veggies, grilled meats, eggs, popcorn, and even sprinkled on buttered toast or mixed into dips for an extra flavor kick.
Pin This Recipe!

Perfect Flavored Salts 5 Ways
A simple and versatile recipe for making five different flavored salts using sea salt, herbs, spices, and citrus zest. Perfect for gifting or enhancing everyday meals.
- Prep Time: 15 minutes
- Cook Time: 10 minutes (optional oven drying)
- Total Time: 1 hour 30 minutes (including drying and resting time)
- Yield: Approximately 5 cups of flavored salts total 1x
- Category: Condiment / Seasoning
- Cuisine: Universal
Ingredients
- 1 cup fine or flaky sea salt (e.g., Maldon sea salt)
- 2 tablespoons dried rosemary, crushed
- 2 tablespoons dried thyme
- 1 teaspoon smoked paprika
- 1 teaspoon crushed red pepper flakes
- 1 tablespoon freshly cracked black peppercorns
- Zest of 1 lemon
- Zest of 1 orange
- 1 teaspoon garlic powder
- 1 teaspoon dried lavender flowers (culinary-grade)
- Seaweed flakes (optional)
Instructions
- Use a microplane to gently zest 1 lemon and 1 orange, avoiding the white pith. Set aside separately for the lemon salt and orange salt blends.
- Using a mortar and pestle or spice grinder, lightly crush 2 tablespoons each of dried rosemary and thyme for the herb salt. Crack 1 tablespoon black peppercorns and combine with 1 teaspoon smoked paprika or red pepper flakes for smoky and spicy salts.
- In separate bowls, combine 1 cup sea salt with the following:
- – Herb Salt: crushed rosemary and thyme
- – Lemon Salt: lemon zest and 1 teaspoon garlic powder
- – Orange Salt: orange zest and 1 teaspoon dried lavender flowers
- – Smoky Salt: smoked paprika and cracked black pepper
- – Spicy Salt: crushed red pepper flakes and garlic powder
- Stir each mixture well to evenly distribute herbs and spices.
- Spread each blend on a parchment-lined baking sheet and allow to air dry for 1-2 hours to remove excess moisture. Alternatively, dry gently in an oven at 200°F (95°C) for 10 minutes, watching closely to avoid toasting.
- Spoon each salt into clean glass jars, leaving some space at the top. Add a handmade tag indicating the flavor and date, tying it with twine or ribbon.
- Let the salts rest sealed for at least 24 hours to meld flavors before use, though they can be used immediately if desired.
Notes
Do not skip the drying step if using fresh zest or herbs to prevent clumping and extend shelf life. Store salts in airtight containers away from moisture and heat. Let salts rest for at least 24 hours for best flavor melding. Freshly crushed herbs and freshly grated zest improve potency and aroma. Use salts sparingly due to sodium content. Handmade tags add a personal touch for gifting.
Nutrition
- Serving Size: Use as a finishing s
- Calories: 5
- Sodium: 2300
- Carbohydrates: 1
- Fiber: 1
Keywords: flavored salts, homemade salts, sea salt blends, gift ideas, herb salt, citrus salt, smoky salt, spicy salt, lavender salt, easy seasoning


